W02 Project Management

Version Control: GIT: Exploring and Configuring
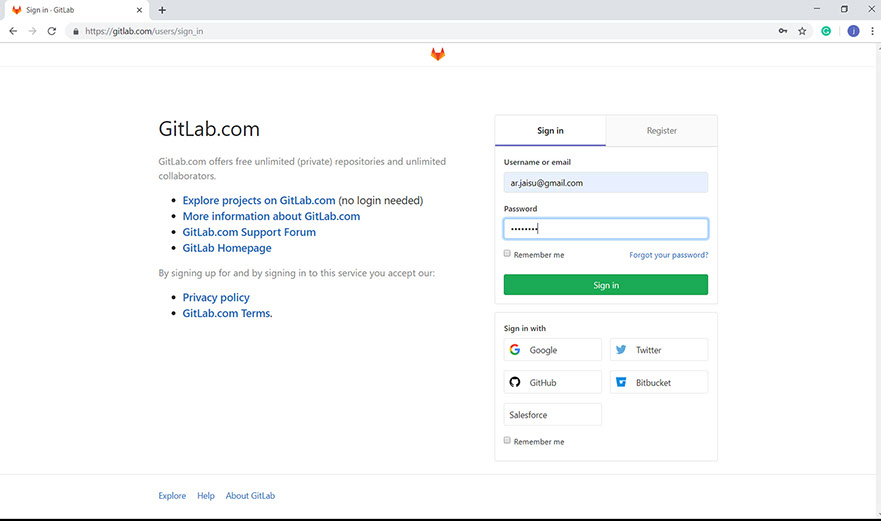
1. Account in Gitlab
The first step is to set up your GitLab Account. I got my confirmation link from Academmany IT.
FabCloud Platform: https://gitlab.fabcloud.org
Login with your email address as username and student_id as password.

Setup you profile
- Login to Gitlab, click on the upper right icon and Settings
- You can set your avatar image and add some more info about you
- You can add a secondary email address

Notifications settings
- Set Notification email: ar.jaisu@gmail.com
- Set Global Notification Level: Watch

2. SSH Key Generation
SSH Keys
SSH (Secure Socket Shell), is a network protocol that provides administrators with a secure way to access a remote computer.
Git uses the SSH protocol to establish secure communication between your computer and the GIT server hosting your repository. This makes sure only you can update your repository and nobody else can tamper the communication. Without SSH Key you can only use the web interface. SSH Keys allow you to use the GIT repository securely, without requiring a password every time.
Windows Using PuttyGEN

Step 01: Download PuTTYgen on Windows
https://www.puttygen.com/
Step 02: Run PuTTYgen on Windows
- To run PuTTYgen, Go to Windows -> Start Menu -> All Programs -> PuTTY -> PuTTYgen.
- You will see the PuTTY key generator dialog box on your screen.
- You will find a “Generate” button in that dialog. Clicking on it will lead to generating the keys for you.
- Now you will need to add a unique key passphrase in the Key passphrase and Confirm passphrase field.
- Click on the “Save Public Key” and “Save Private Key” buttons to save your public and private keys.
- You will see the text starting with ssh-RSA in the Public key for pasting into OpenSSH authorized_keys file field which is located at the top of the window. Copy that entire text to your clipboard by pressing ctrl+c as you will require the key to paste on your clipboard in the public key tool of control panel or directly on the cloud server.
Voila! Now you can generate public or private key pair using PuTTYgen.
Step 03: Add the public key to your authorized keys
This step is to link your computer to the server.
-This would generate a key. Copy the key and paste it into the profile.
-Now the Git link needs to be linked to the system. Copy the link
-The SSH from the profile needs to be copied and pasted in the system variables which I sunder the environmental variables in advanced system settings.


3. Cloning the repository
URL

4. Syncing files
These are the basic commands to add, commit and push files:
Git pull (to get files from the repository)
Git status (to see the files and changes if made any)
Git add (to add files to the index)
Git commit (to commit changes if made)
Git push (to upload the modified files to the repository)
git config --global user.name "Jaisu Thundiyil Joseph"
To tell GIT who I am.
git config --global user.ar.jaisu@gmail.com
To tell GIT my email address.
git init
To create a local repository.
git clone username@host:/path/to/repository
To copy from cloud repo to my local repository.
ssh-keygen -t rsa -C "ar.jaisu@gmail.com"
To generate SSH keys in the local machine.
git add
add files to GIT.
git commit -m "Commit message"
To commit changes commit changes to head (but not yet to the remote repository).
git commit -a
Commit any files I have added with git add, and also commit any files I have changed since then.
git status
List the files I have changed and those I still need to add or commit.
git push
Send changes to the master branch of my remote repository.
git pull
Fetch and merge changes on the remote server to my working directory.
-crop-u5281.jpg?crc=314587911)
-crop-u5288.jpg?crc=3856623574)
GitHub

Step 01: Download Github from https://github.com/

Step 02: Install GitHub

Step 03: Login to GitHub


Step 04: Clone repository from the internet


Step 05: Select of URL option


Step 06: Pull Push and Summary note and then commit.

Website Creation
I used Adobe Muse to build my website.

Adobe Muse is a website builder that allows designers to create fixed, fluid, and adaptive websites without having to write any code. Muse generates static websites giving users the freedom to host their sites with any hosting provider. Users can add more advanced functionality such as blogging and e Commerce to their website with plugins created by third-party developers.
STEP1
Create a New Website from File in the Menu Bar. You can use the shortcut Ctrl+N.

STEP2
Adjust the Page width, Min width, Min height, Margins and Other required parameters, into the new site parameters in the file menu.

STEP3
Create masters
- Home
- Fab Diary
Insert Pages
I created a home page, Fab project page and 18 Fab diary pages.

STEP4
Design each page as per your requirement. Muse gives you a graphic friendly assignment context
I used photoshop to do my pre- composition and prepare images.

STEP5
To create design, simple tools from the tool bar are used look at the map created below which will help to learn about the tools and access to them in less than 10 mins.

STEP 6
Linking the webpages created or adding a link/file etc using a muse is extremely, it could also be used to create static buttons and link different files and pages on the website. By selecting the hyperlink option, one could add connect to another page or link or add a file as shown below.
Final website preview in browser select the option preview site in browser or press Ctrl+Alt+E.

Did I ?
- Yes, I Made a website and described how I did it.
- Yes, I Introduced Myself.
- Yes, I Documented steps for uploading files to archive.
- Yes, I Pushed to the class archive.
- Yes, I Signed and uploaded Student Agreement.