12. Output devices
Objectives
This week’s group assignment is to measure the power consumption of an output device. And as an individual assignment I have to add an output device to a microcontroller board that I have designed and program it to do something.
Files, Tools and Planning
Files
Output Eagle file
DC Motor control Arduino Program
Tools
Eagle
GIMP
Roland Modella MDX 20
Arduino IDE
Planning
Upload trello board here
Link with final Project
As my final project is a cat litter system, it might have two output possibilities:
1. A rake which moves from one end to the other to remove the cat faeces, which might need a DC motor for the to and fro movement and a Servo motor for the up and down movement.
2. An overhead storage system of fresh litter that opens upon some given input. I thought this can also be achieved using a servo motor connected to springs.
As I’m very confused about the movement of the rake and worried how effective it will be in moving the faeces from the box, I decided to try out the first. So even if this turns out to be unsatisfactory, I can try another method for my final project.
Research
I tried to find projects that includes various kinds of raking mechanisms and the types of motors used.
Gardening is where raking is most often required and I tried to find various types.

I also found out that tiny toy cars that move from one end to another in one direction uses DC motors. This gravitated me towards trying out DC motors as an output device because the rake mechanism with a DC motor can be done in a box with to and fro movement between two ends of the box.

References
Remy Ducros
Javi BuronGarcia
Sachin Salim
Chaitali Choudhary
Greg Buckland
Group Assignment
Find it here in our group page.
Individual Assignment
I have learned DC motors in college but that was theory and it was learned and forgotten after exams.
Learning
To begin with, I wanted to understand simple DC motor workings and how to drive one (on and off) using an Arduino. So I simulated it with Tinkercad and tried various codes, to alter the movement and delay in between.

Design
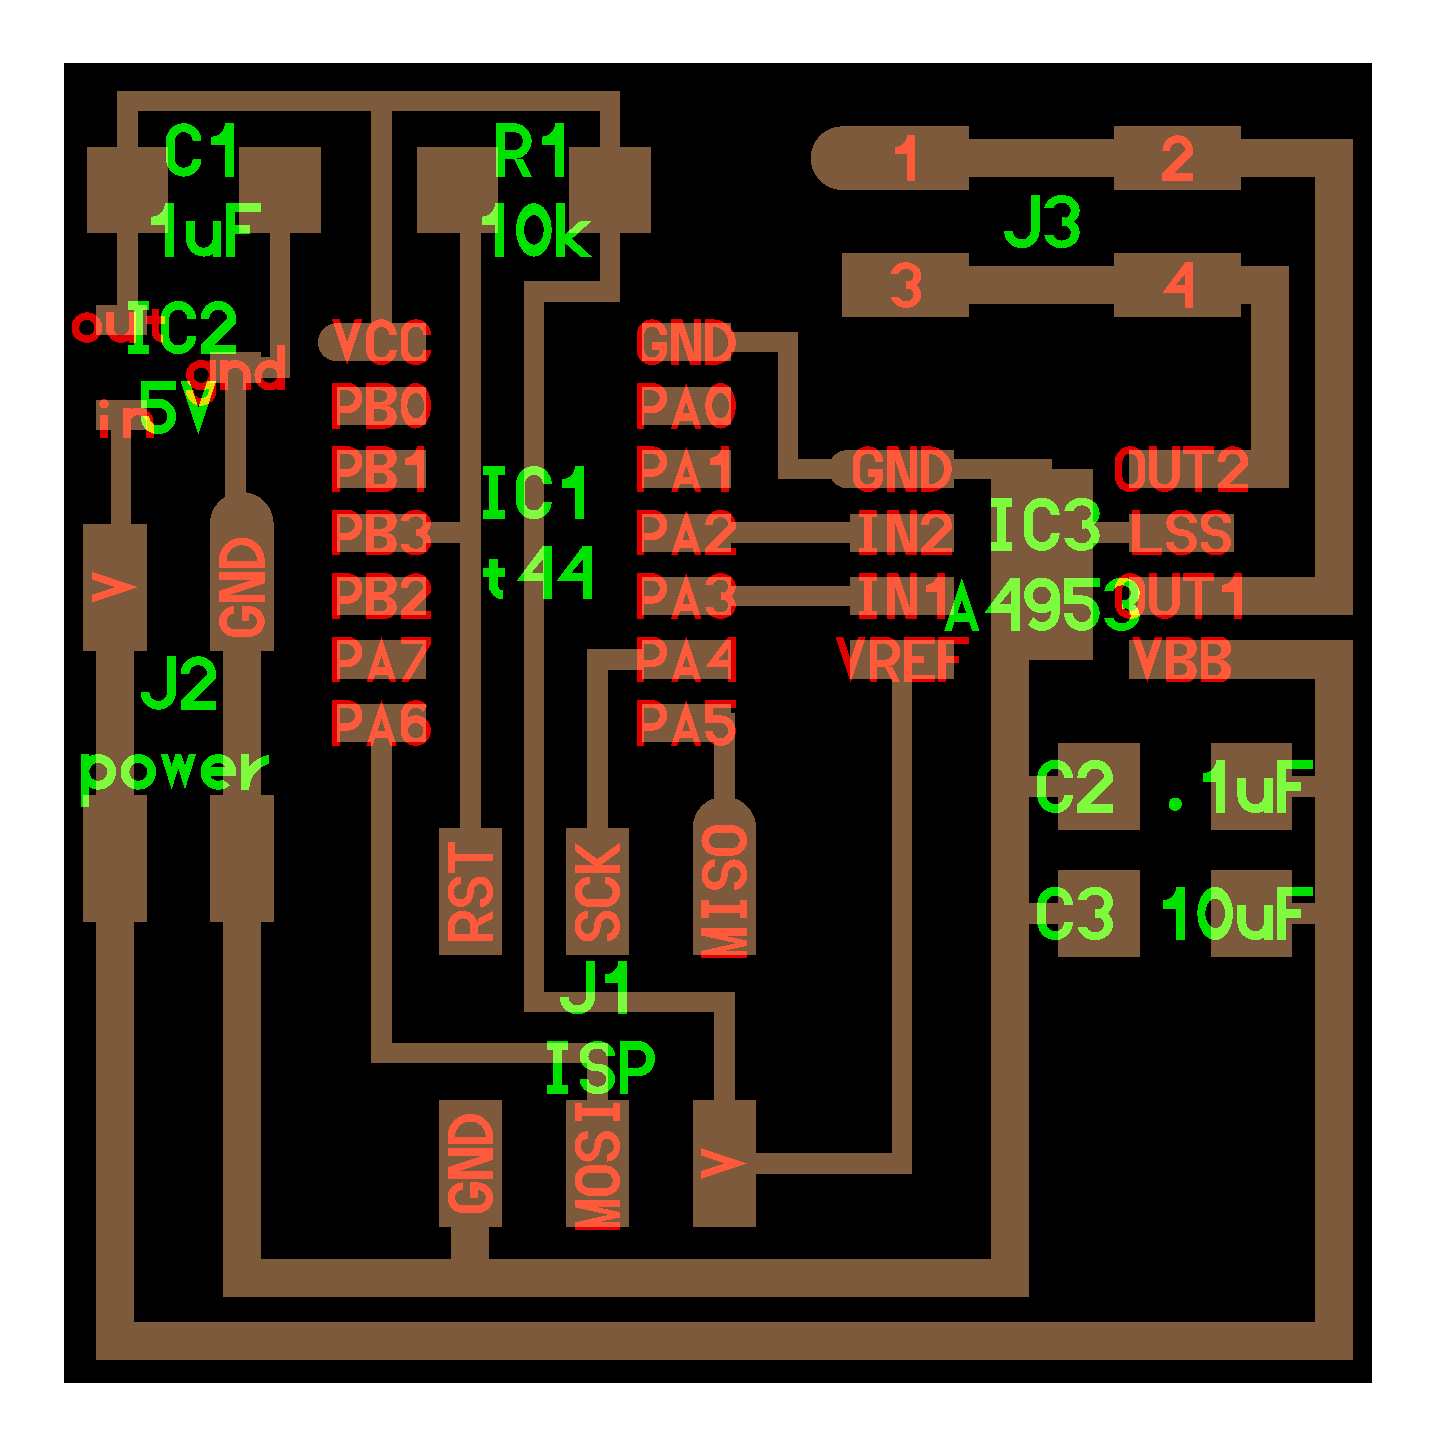
First I had to design my board in Eagle.
I started off by taking a look at Neil’s Hello DC board. The Attiny is used to control the board, it can be programmed to run the motor. There are two voltage requirements for this board. One is 5V VCC to the micro controller, and the other is the 12V supply to the motor. We use an H bridge to connect the micro controller to the DC motor. The H-bridge in this circuit is used as a fast acting switch. The H-bridge consist of two Mosfets one of P type and other of N type. When we give an input to one of its Input pins, It connects the High current circuit to the motor. In this way we can control a high current motor with a Micro controller.
Once I had my mind wrapped around what was going on with it, I moved into designing my own version in EAGLE. I started by adding all the components I knew I would require in this. I used an ATtiny 84 as my microcontroller. I also added a 2x3 header to allow me to more easily access some of the unused pins on the ATtiny84. In designing my schematic, I made a critical error. I forgot to connect VBB to VCC.


Here the output is exported as .png as explained in Assignment 6 Electronics Design.


Milling
Mods
I have used mods in the same way I have explained in week5.


Milling
Like in the previous times, Roland Modella MDX 20 is what I used to mill my board.


Soldering
Soldering the board was pretty straight forward, I just had to make sure that all the pins are aligned and oriented properly. Since this was my fourth assignment to make boards it has become easier to to solder small components. My instructor Rahul gave me the suggestion or a trick for soldering an IC to board, he told me to first put a dab of solder on one of the pads. Then align the IC properly using the tweezers, making sure that all the pins are lined up with the pads. Next heat the pad so that the solder melts and bonds the pins. Then join all the rest of the pins, and come back and solder the first pad properly. This will ensure that the IC is in place.

It was only after soldering my board and I was about to program, when Jogin showed me the mistake in my board file. I haven’t connected VBB with VCC. So I jury wired it and connected VBB of the motor driver to vcc of the connection header.

Programming
I created a simple program for driving the motor. Pin 2 and pin 3 are used for the output.
const int m1 = 3;
const int m2 = 2;


void setup() {
  pinMode(m1, OUTPUT);
  pinMode(m2, OUTPUT);

}

void loop() {
  digitalWrite(m1, HIGH);
  digitalWrite(m2, LOW);
  delay(3000);
  digitalWrite(m1, LOW);
  digitalWrite(m2, HIGH);
  delay(3000);
}
Working
I uploaded the program on to the board using usbtiny just like I did in previous weeks and connected motor to the output pin in the design. I gave external power to the board through the 2X2 connection header.


Now the motor begins to work. Here I tested with a delay in the programme.
Mistakes and Learnings
It was after milling that I realised that I haven’t connected VBB to VCC, so I soldered a wire connecting these two.