My mistakes are my stepping stones to success

HOW TO MAKE ALMOST ANYTHING
FAB ACADEMY 2K19 HEMANG VELLORE

header-frontend
Work frontend
Assignment 17 : Machine Design

Creativity is allowing yourself to make mistakes.
Design is knowing which one to stay put with.
It’s all about making it happen for you.

Task 
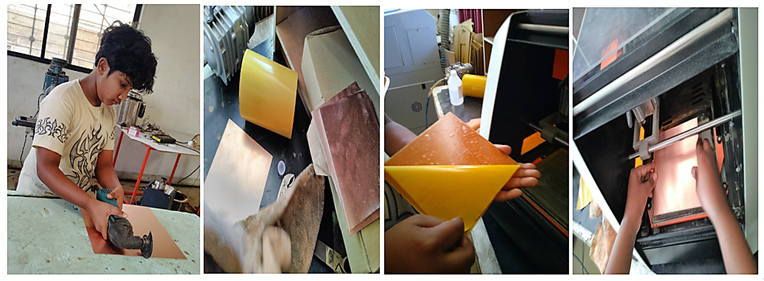
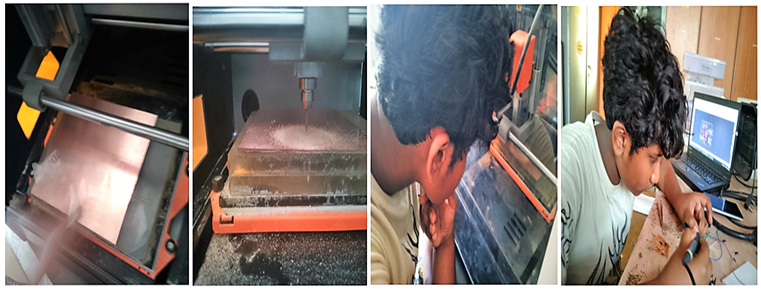
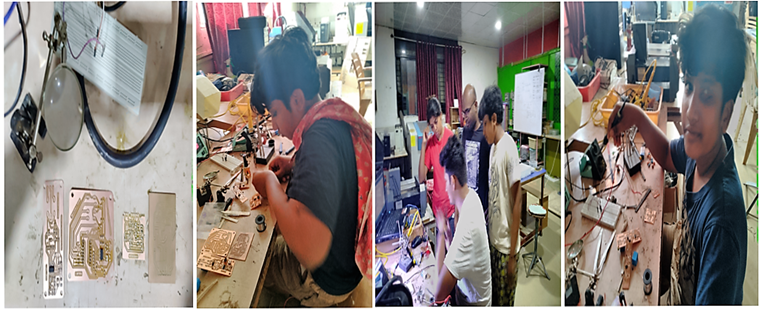
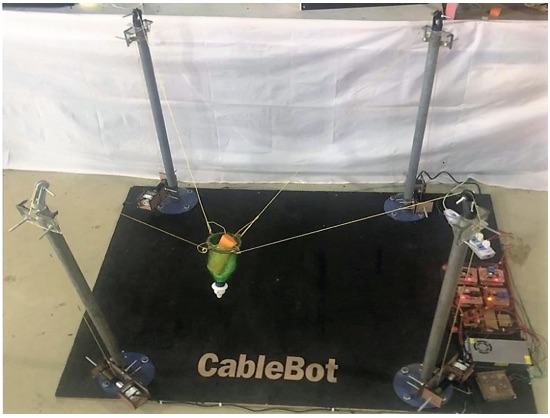
Exhibit the Group efforts in building the machine ideated in the Mechanical Design Assignment.
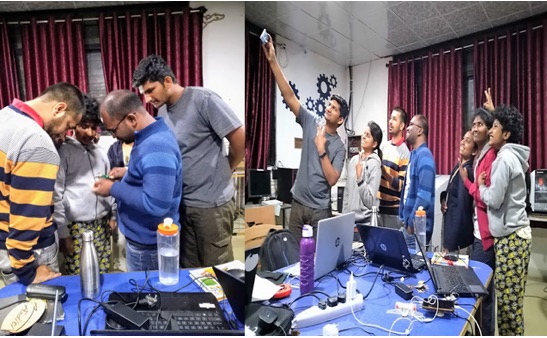
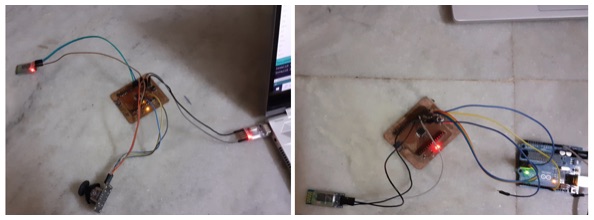
Group Assignment Our Machine – Cablebot

Team involved in the process

Manoj Sahukar, Tushar Kukreja, Jaydip Sarode, Anand Verma, Hemang Vellore, Pooja Jadhav and Aaditi Kharade.
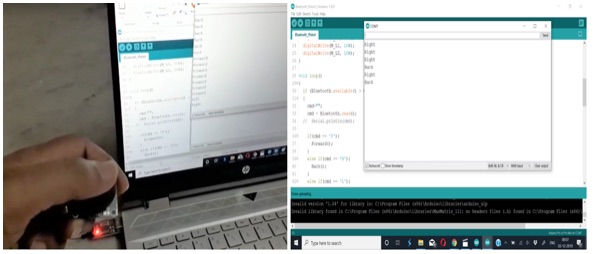

We have divided the group into 4 Teams -
Mechanical Design Task - Tushar Khukreja, Pooja Jadhav & Vaibhav Saxsena – Pulley and 3D design and printing
PCB Design and Milling Task – Aditi and Jaydeep
End Effector – System 2 groups - Task 3 groups Hemang Vellore & Anand Verma.
Control System Programming – Manoj Shahukar worked on the Math developing a tool which controls it from anywhere.
Vigyan Ashram video link for demo shown to Prof. Neil during the Global Class -
https://www.youtube.com/watch?v=WfZerkZYmyw Purpose of Activity – Agriculture Automation, in specific spraying pesticides, watering and putting the fertilizer.
Working Style - Step by Step procedure
Power on the Machine.
Run the application software on the system.
Choose the End Effector – choose the option available, either spraying pesticide, watering or putting the fertilizer.
Job can be manually done or automated.
Remove the End Effector after the job is completed.
Power off.
For the Electronics part we have used Arduino UNO as our master board and made slave boards on our own.
We decided to divide the slave part in 4 designs.
1. Design for Nema-17 motor board -4 boards, one each.
2. End effector board -1 board.
3. Servo motor board-1 board.
4. Shield for Arduino.
For electronic part of nema -17 motor board we referred this tutorial by how to mechatronics -
https://howtomechatronics.com/tutorials/arduino/how-to-control-stepper-motor-with-a4988-driver-and-arduino/

The PCB’s were made by Jaydip and Aditi. Later Anand made an acrylic stand to place them all. The design parts were made by Pooja and Tushar and Manoj added the technical details. Vaibhav made the end effector design. For the design and technical details, please refer to our group page- http://fabacademy.org/2019/labs/vigyanashram/machine/mam.html
Vigyan Ashram video link for demo shown to Prof. Neil during the Global Class

Individual Assignment – Showcase your contribution to the group project separately. Initially I was paired with Anand to research about - End Effector – System 2 groups - Task 3 groups Hemang Vellore & Anand Verma.

Review of literature for the Cable Bot - Make a Machine Project.

Brainstorming to arrive at the correct decision for the vendors list.

We have reviewed and discussed to finalize the procurement of the material to be used for the End Effector part of the Cable Bot. Can check this video - https://youtu.be/t5EWMiDjIhs
Later I was preparing the copper sheets for milling and assisted in soldering the PCB’s along with my Team Mate Jaydip for the Make a Machine Assignment, i.e Cable Bot.


This is how our Make a Machine PCB’s looked like after the soldering is done and tested by our Team.
The Master Slave communication model using Arduino Uno as Master Board.

I was preparing the copper sheets for milling and asisted in soldering along with my Team Mate Jaydip Sarode for the Make a Machine Assignment.
This is how our Make a Machine PCB’s look like after the soldering is done by our Team. Master Slave communication model using Arduino Uno as Master Board – PCB our design
http://fabacademy.org/2019/labs/vigyanashram/students/manoj-sahukar/#!/e15
Testing - https://youtu.be/7coflCRJahA Make a Machine – Cable Bot https://www.youtube.com/watch?v=WfZerkZYmyw

Sharing some happy moments after we completed our Cable Bot Project.

My Add On Contribution –
During the Network and Communications Assignment in extra credits I have integrated a Bluetooth module using Master and Slave Communication Controlled by a Joystick which can be implemented for the Make a Machine – Cable Bot operation in the Group Assignment.

Assignment 14

Video Links - https://youtu.be/G5b52BP4AmM https://youtu.be/CWGRsveRya4 CODE – Code for operating the PCBs with the Joystick -


#include
#define X_Axis A0
#define Y_Axis A1
#define Switch A3
SoftwareSerial Bluetooth(2,3); // pin2- connected to bluetooth Tx
// pin3- connected to bluetooth Rx
void setup() {
// put your setup code here, to run once:
Serial.begin(9600);
Bluetooth.begin(9600);
pinMode(A3,INPUT_PULLUP);
}

void loop() {
// put your main code here, to run repeatedly:
int x_axis, y_axis;
x_axis = analogRead(X_Axis);
y_axis = analogRead(Y_Axis);
if(x_axis > 750){
Serial.print("R");
delay(2000);
}
else if(x_axis < 250){
Serial.print("R");
delay(2000);
}
if(y_axis > 750){
Serial.print("F");
delay(100);
}
else if(y_axis < 250){
Serial.print("B");
delay(100);
}
if(x_axis < 600 && x_axis > 450 && y_axis < 600 && y_axis > 450){
Serial.print("S");
delay(100);
}
}
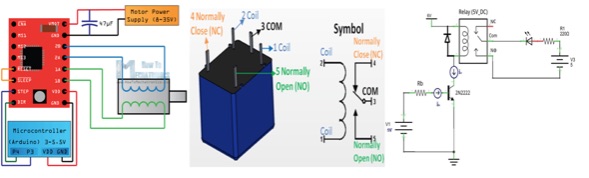
Code – For operating the Cable Bot with Bluetooth #include
#define M_L1 4
#define M_L2 5
#define M_R1 6
#define M_R2 7
char cmd = 0;
SoftwareSerial Bluetooth(2, 3); // pin2- connected to bluetooth Tx
// pin3- connected to bluetooth Rx
void setup() /****** SETUP: RUNS ONCE ******/
{
Serial.begin(9600);
Bluetooth.begin(9600);
pinMode(M_L1, OUTPUT);
pinMode(M_L2, OUTPUT);
pinMode(M_R1, OUTPUT);
pinMode(M_R2, OUTPUT);
digitalWrite(M_R1, LOW);
digitalWrite(M_R2, LOW);
digitalWrite(M_L1, LOW);
digitalWrite(M_L2, LOW);
}
void loop()
{
if (Bluetooth.available() > 0)
{
cmd = Bluetooth.read();
if(cmd == 'F'){
Forward();
}
else if(cmd == 'B'){
Back();
}
else if(cmd == 'L'){
Left();
}
else if(cmd == 'R'){
Right();
}
else if(cmd == 'S'){
Stop();
}
}
}
void Forward() {
digitalWrite(M_R1, LOW);
digitalWrite(M_R2, HIGH);
digitalWrite(M_L1, LOW);
digitalWrite(M_L2, HIGH);
delay(100);
}
void Back() {
digitalWrite(M_R1, HIGH);
digitalWrite(M_R2, LOW);
digitalWrite(M_L1, HIGH);
digitalWrite(M_L2, LOW);
delay(100);
}
void Left() {
digitalWrite(M_R1, LOW);
digitalWrite(M_R2, HIGH);
digitalWrite(M_L1, LOW);
digitalWrite(M_L2, LOW);
delay(1000);
Stop();
}
void Right() {
digitalWrite(M_R1, LOW);
digitalWrite(M_R2, LOW);
digitalWrite(M_L1, LOW);
digitalWrite(M_L2, HIGH);
delay(1000);
Stop();
}
void Stop() {
digitalWrite(M_R1, LOW);
digitalWrite(M_R2, LOW);
digitalWrite(M_L1, LOW);
digitalWrite(M_L2, LOW);
}
//--(end main loop )---

After discussing with our Team about this feature, they have welcomed my idea to be integrated in the Cable Bot Project to control its functional operation. I’m glad that I was able to contribute to the bigger picture.
Learning Outcome – This assignment’s research helped me in reviewing the literature and contacting the vendors to get fair quotations for the material to be procured for the project. Now I can mill and solder the PCB’s in a much better way and connect its related applications as well. Glad that we were all together able to contribute our two cents for the agricultural sector to ease the chores of the large farm holdings.
Reference - http://fab.academany.org/2019/labs/vigyanashram/machine/mam.html

Let's Connect