final project -- weekly assignments -- about me -- fab academy
Week 03: Electronics production
Phase 3: Getting It To Run
Programming a programmer
To flash the programmer firmware, you need to have a programmer already running. Any AVR programmer will do, such as the Atmel ARVISP V2 we have (which only work with Atmel Studio, and are generally not used) or the mySmartUSB light we use in the rare cases we have to work with AVRs. I first tried working along the official tutorial with avrdude from an Arduino installation. It didn't work at all, and I didn't investigate why either, as by that time Daniel had found Anna's tutorial including how to set up avrdude and the needed libraries on linux. Doing that in a VM worked fine, so I got the firmware on my programmer and had hope to just have it working.
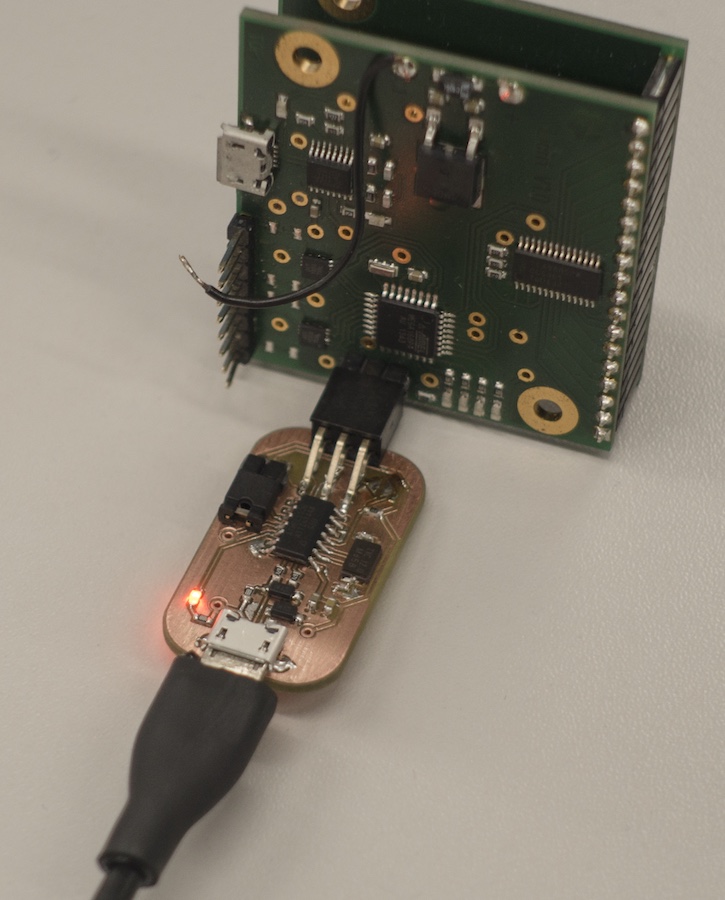
Getting it to actually work
Of course, getting it to actually work was not that easy. Getting it to enumerate was a quick fix (there had been a fine, thin-as-a-hair "wire" of solder from the USB D- pullup resistor to ground). Getting it to actually read or write to a microcontroller was a lot more work.
While enumerating and first USB communications went fine, the programmer absolutely refused to do its work, leading to avrdude throwing "initialization failed, rc= -1". As google and the Adafruit FAQs can tell you this can have a number of reasons, so the only way was to hunt down and resolve each of them. Another google search lead to a thread at the Adafruit user forum, telling me that the whacked usb implemenatation of the USBtiny is treated like a broken device by most newer Apple hardware, even when using an USB 2 hub in between. Using one of our old lab computers (they don't even have USB 3 yet) had the programmer working immediately and flawlessly reading a leftover LED lamp from an old practice assignment.
At this point, the programmer has crossed the line from "nonworking piece of electronic junk" to "device not working with the computer I use" and was considered mostly done.
Getting it to blink
With the programmer running (with some computers, at least), it was time to have a look at those added LEDs. After first having some idea about having them showing different information (USB connection, ISP usage or something like that) I realized that having them on different sides of the board makes that distinction more or less useless. After taking a look at the firmware, I ended up with two functions: When plugging the programmer in both LEDs will light up until the USB connection is made (which is a bit contrary to the USB standard, but we don't have to care about that with a device like this). Then, any SPI activity will switch the LEDs on, while the constantly running main loop will switch them off, effectively having both LEDs on for as long as programming or reading a device lasts, as tested reading one of our old educational LED lamp boards:
I also used having the source code open to rename the device in its USB properties to something appropriate:
[75048.103415] usb 2-2.2: new low-speed USB device number 39 using uhci_hcd
[75048.212450] usb 2-2.2: New USB device found, idVendor=1781, idProduct=0c9f
[75048.212455] usb 2-2.2: New USB device strings: Mfr=0, Product=2, SerialNumber=0
[75048.212458] usb 2-2.2: Product: Censored Expletive
The resulting firmware package is available here.
Conclusion
Material Results
The material results of the assignment are rather unspectacular. I do now have a small piece of electronic equipment that I have no use for as it doesn't work. I'll file it away and hope that I never have to see it again.
Immaterial Results
I have learned a lot during this assignment, and most of that has been really positive. I do know now that while KiCad is still a little rough around the edges, it is a tool that you can use. It takes some getting used to, but it works. I will invest more time into this new (to me) tool, and it seems that the developers appreciate help, even if it's only in the form of reporting bugs (and beating at them with a profiler to help find the elusive bottomless performance pit).
The question of why one would invest rather a lot of time to build something that doesn't really work, while they can buy one for $15 that just works will remain unanswered.
final project -- weekly assignments -- about me -- fab academy
