

Success is a journey, not a destination
Individual Assignment:
- Propose a final project masterpiece that integrates the range of units covered,
answering the questions highlighted in the documentation:
What will it do?
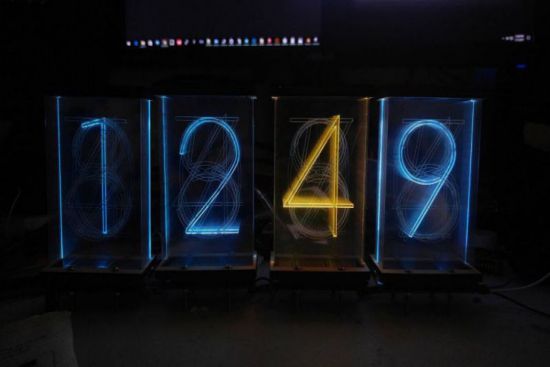
My project idea is based on edge lit displays, its basically a project that employs the best usage of WS2812B RGB leds, along with the digital fabrication tools to yield a beautiful piece of display known as Lixie Tube- LED based edge lit display.The idea is basically inspired from the old Nixie Tubes, which were expensive and required more power to light up properly, but the Nixie tube had their own charm. Th modern version of Nixie Tube is Lixie Tube, which can be used to make the same decorative displays that were made using Nixie earlier; clock, counter, Date / Time dislay,Temperature / Humidity reader, website views etc.

Who's done what beforehand?
Lixie is a simple project, but nothing can be done until you really work hard for it with complete dedication. So, below are listed the things that I have completed and the reamining ones. .
The tasks done so far
- I have completed the CAD modeling for 3d printed parts (base and top)
- I have the 3d printed parts ready, and fixed as per the design requirements
- The laser cut acrylic sheets are ready, and fixed in the 3d printed base.
- ws2812B leds are soldered and tested
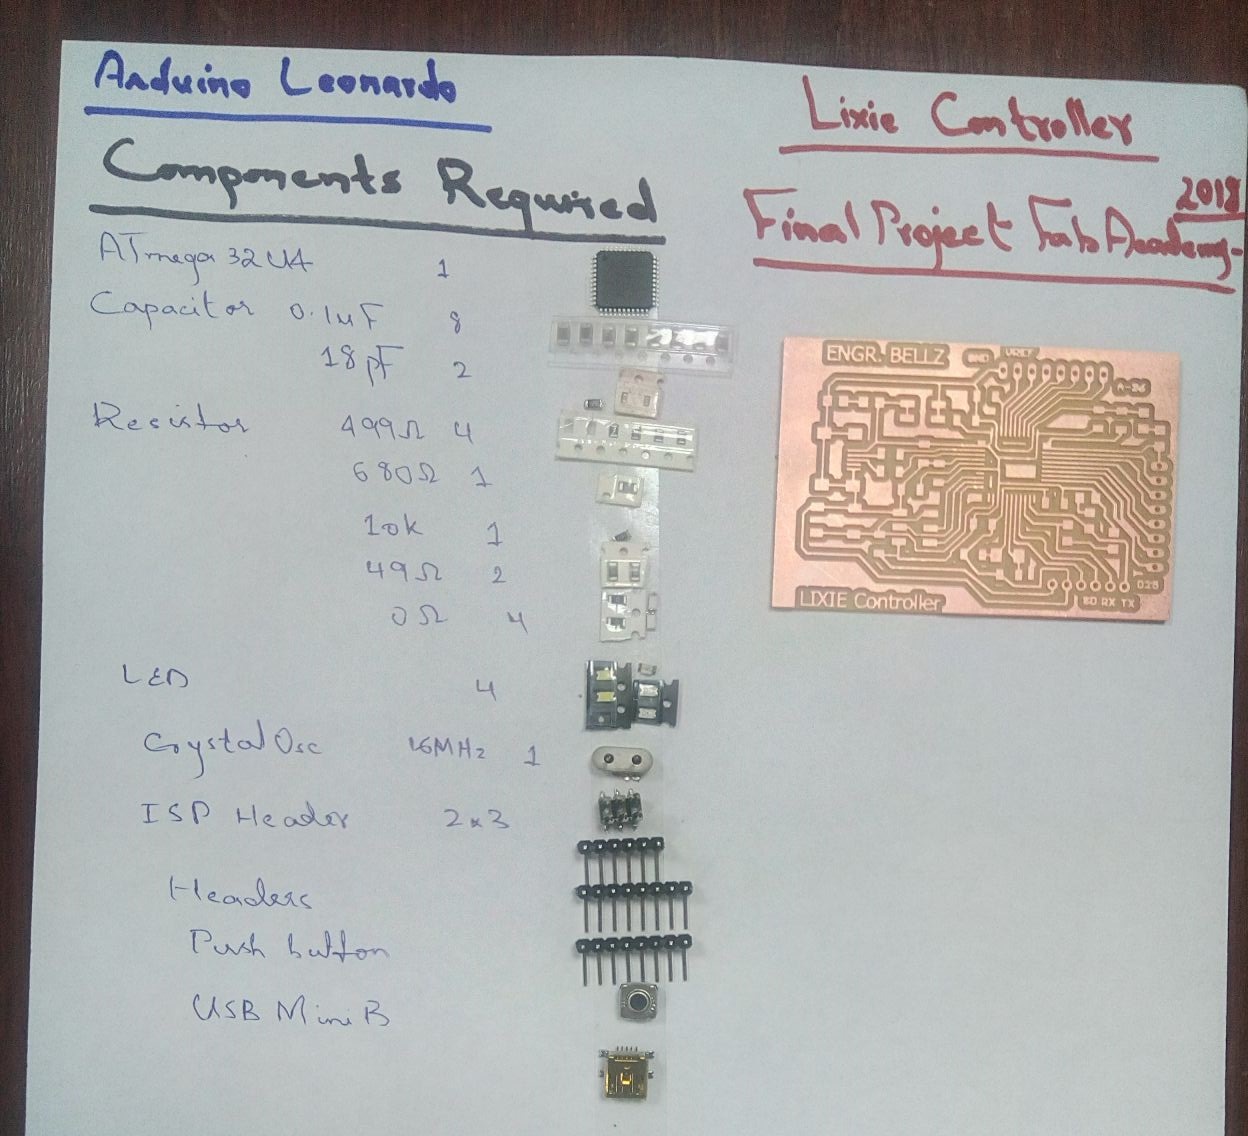
- A single Digit Lixie is ready and work fine as a counter with Arduino Leonardo as counter
The Remaining tasks
- Replicate the design and models for making the other digits
- complete a Lixie clock based on 7 segment -edge lit display
- Interface the digits with each other
What will you design?
I wanted to make something like Lixie based on the edge-lit display technology. So, I decided to search on the internet and I found some interesting projects, and decided to follow the one made by Connor Nishijima- "Lixie", an LED alternative to the Nixie Tube but with slight modifications discussed below:
- Instead of engraving the numbers, I engraved segments to increase the features from just a numeric to alphanumeric display.
- Instead of using the laser cut base , I decided to make 3D printed parts for base and top of the Lixie digit.
- I decided to work on Adafruit-Neopixel and Fastled libraries to make the coding simpler.
At the initial stage, my aim is to make a simple 7 segment Lixie based clock, which can be futher used to make an alphanumeric display too having as many as different features of a Lixie Tube as mentioned earlier.
What materials and components will be used?
- 3mm Transparent Acrylic sheet ( 2 to 3 sheets)
- PLA material for 3D printing the base and top
- WS2812 RGB leds (14 leds per digit)
- Microcontroller board for controlling RGBs
- Power supply
Where will come from?
What parts and systems will be made?
- 3D printed parts for base and top of Lixie Digit
- Laser cut individual segment of acrylic- 3mm
- PCB for RGBS , designed in a way to glow a segmented display
- PCB for microcontroller ciruit board for controling RGBs
How much will they cost?
| Component | Qunatity | Price in $US | Link |
|---|---|---|---|
| Transparent 3mm Acrylic | 5 sheets (24'' by 12'') | $3 | local shop (Karachi ) |
| WS2812B LEDs | 100 | $18.89 | AliExpress.com |
| ATmega32U4 | 1 | 4.7 | Fab Lab Khairpur |
| PLA 3D printed material (500 g) | 1 | $11.5 | Fab Lab Khairpur |
| LEDs | 5 | $0.5 | Fab Lab Khairpur |
| Resistors | 10 | $1 | Fab Lab Khairpur |
| Capacitors | 10 | $1 | Fab Lab Khairpur |
| NTC Thermistor | 1 | $2.5 | Fab Lab Khairpur |
| Crystal 20MHz | 1 | $0.49 | Fab Lab Khairpur |
| Total Cost | - | $43.58 |
What processes will be used?
- 3D modeling using Solidworks:Base for LEDs and base for placing circuitry, top of Lixie
- Electronics:PCB designing of Arduino Leonardo board, and PCB for RGB leds beneath the Acrylics.
- Laser Cut: Segments cut on Acrylic sheet
- 3D Printing: Parts for base, and top
- Programming:Controling RGB leds
- Interfacing: Mobile application sending the command to glow a specified number.
- Networking:Creating a chain of Lixies , for communication from one digit to other.
what questions need to be answered?
- Will the self made WS2812B RGB leds board work as required
- Will the segments engraved on acrylic glow properly?
- Which of the programming libraries work great with the LEDs
- Which microcontroller to use?
- Will the base design be strong enough to hold the acrylic sheets stacked together?
How will it be evaluated?
I focus on fulfilling the following minimum tasks to be acoomplished for th evaluation:
- A Lixie structure; showing 3d printed parts and Laser cut acrylic
- A numeric display should be glowing on the Lixie Digit.
- Connecting at least 2 Lixie Digits
- Video of the results

This work is licensed under a Creative Commons Attribution-NonCommercial 4.0 International License.