Embedded programming
Things to do:
2) Read a microcontroller data sheet
3) Program your board to do something (with as many different programming languages and programming environments as possible)
Have I achieved this week's goals?
Starting from scratch
Embedded programming's week worried me from the beginning. I can't avoid it and I don't want to elude it. Honestly, it does not deny that I would like to tear my hair out! Basically, I started to the basic concepts and meanings. I didn't know anything about programming languages and electronics in general. It will be really hard, but I promise I'll put myself on the line. Will the manual represent the red pill I'm looking for?
I started this week taking a deep breathe and reading Make: AVR Programming. I will try to spend some words on the concepts I'm going to bump into. It probably seems useless, but, on the contrary, I think it can help me in organizing ideas, meanings and a (possible?!) schedule to deal with this week assignment. Starting from the preface, I have to admit I really liked the expression "Microcontrollers are the metaphorical glue between the real world and the virtual world. [...] "Microcontrollers are at the center of an emerging culture of people building the previously impossible". Fortunately, they aroused my curiosity and it has been positive to be motivated in the right way. The best expression until now (yes, I know I'm still reading the preface) is the following one: "One guy had never seen a for loop and another didn't know the red wire is the positive side of a battery pack. Everyone had something to learn, but it has almost never the same thing for everyone.
Facing with main book's concepts, I discovered every microcontroller is programmable in C language and the author already gave his idea about Arduino hardware. More than this, considering the microncontrollers are tiny little computers on a chip, you have to take into consideration their flash program memory space in kilobytes. This space depends on the microncontroller in use and on the chosen programming language too. In addition, it is extremely important to consider the core clocks that can be varied from 1MHz to 20MHz (using an external crystal as I put on my Hello Board during the Electronics Design week. Considering the hardware, the microcontrollers seems a computer and a simple component at the same time. The thing that positively shocked me so much was related to the MCU's pins. I have never imagined they could have different roles and features. Consequently, I understood they can't be linked by chance. This well explains why my board with the ATtiny44 placed on the wrong side would have never worked! (see my soldering failure on week 6).
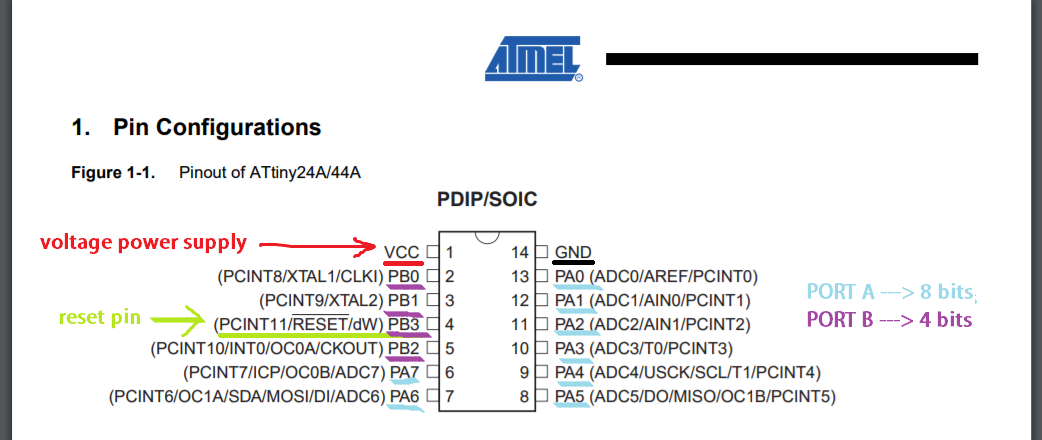
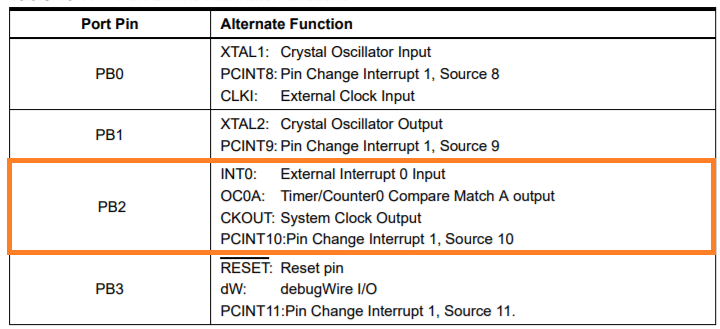
The pinout configuration is put on the first page of each datasheet and as Make: AVR Programming suggests, it is the most important thing to be taken into consideration. Datasheets are very long to be read on the whole and it is better to take them as a quick reference instead of a (never ending) novel. It will be exactly what I'm going to do! Honestly, if you open the datasheet without basic knowledge it results completely useless and that was happened to me the first time I tried reading it. Being patient, I increased the awareness about my lacks on electronics and programming. I didn't want to do things by chance, so I spent lot of my time in studying step-by-step. So, thanks to the discovery about different pins' features, I learned almost all the pins can be set up as outputs and can be configured as digital inputs. I found extremely useful the recap the book did at the end of the first chapter. It summarized the main concepts and only there, I understood I read things clearly. Basically, I can sum up them in a short list:
Up to now, almost all things are theoretically clear. But, moving on the practical part, concepts can't be abstract. How registers must be used? Starting the second chapter, I finally found some explanations to answer all the questions I had. First of all, I clarify the meaning of a 'strange' world I found after few lines on the preface. What is a toolchain? Considering the fact, my days of study will be a never ending story, I decided to look for toolchain meaning to keep up with book's schedule. In software, a toolchain is a set of programming tools that are used to perform a complex software development task or to create a software product. A simple software development toolchain may consist of a compiler and a linker (which transform the source code into an executable program), libraries (which provide interfaces to the operating system), and a debugger (which is used to test and debug created programs). A complex software product such as a video game needs tools for preparing sound effects, music, textures, 3-dimensional models and animations, together with additional tools for combining these resources into the finished product. (Source: Wikipedia)
More than Wikipedia's definition, I liked the book's one too much: Toolchain is a long and winding road from the code you type into your editor to a chip on your desk that turns a light on and off. It's exactly what I'm looking for. This weekly assignment is working on the PCB I've already drawn and understanding the MCU's features written on the datasheet. Doing this, I could be able to switch an led on and includes a button fuction. It seems really easy, but it's practically impossible doing it without studying and understanding what is behind the electronics.
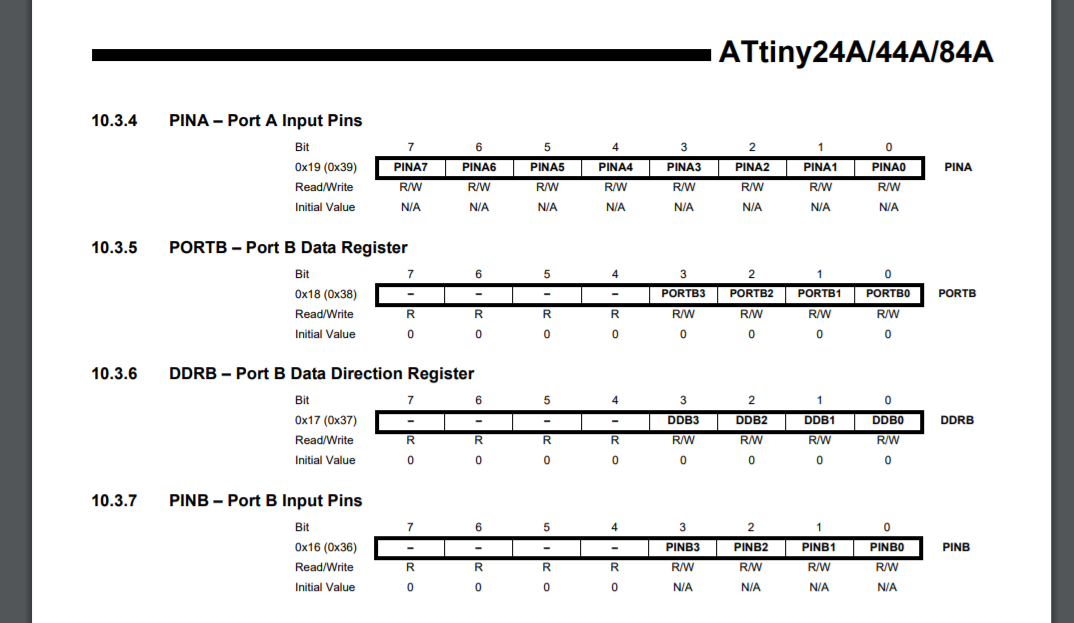
First of all, I learned each PORT has 3 REGISTERS.
By default, pins set at 0 represents the input status.
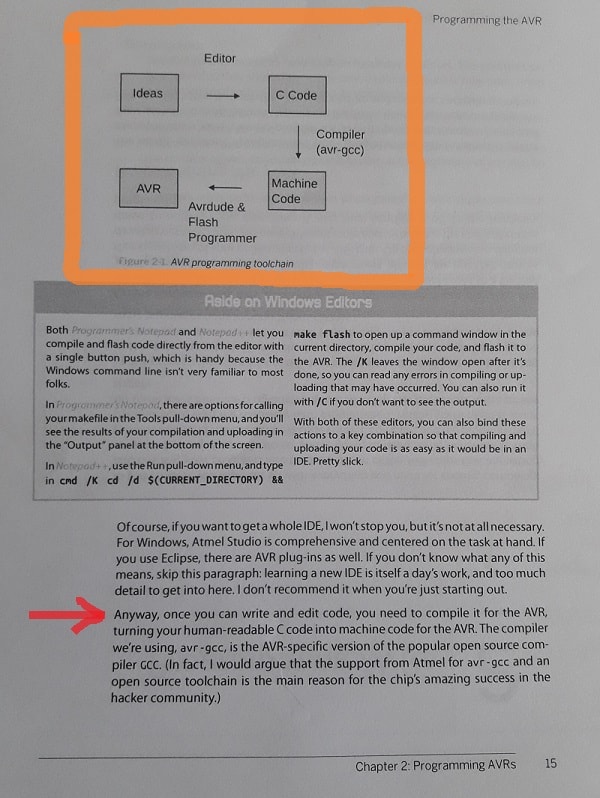
Talking about Programming the AVR I found the diagram at page 15 really explicative and it clarified me the meaning of flashing and compiling. I've just heard about the make flash command during the electronics procution's week, but now it is the first time I have to face with programming language in C.
In addition to the scheme I added above, I really liked the recap box on page 17 (2nd chapter - Make: AVR Programming. Basically, it makes a schedule of needed actions that must be follower step-by-step.
1) PLAN: Take paper, pencils and AVR datasheet2) CODE: Write your code using a text editor (I tried Arduino first, and only then I faced with C language)
3) COMPILE: Turn your C code into AVR machine...Ehm! What does it mean? (*)
4) FLASH: Send the machine code though the programmer (
make flash command)5) TEST: The uploaded code works properly?
6) DEBUG: An unavoidable step, especially for me! Thanks to it, all the mistakes can be figured out.
Now, before I go any further, I have to better understand what point three means. (*) Quoting the lines written before, "Turn your C code into AVR machine", I understood it is fundamental to give the machine a proper language to be correctly understand. In other words compiling is referred to a human-readable C code turned into the machine language. It means the code must be converted in a series of binary numbers (e.g 1100111...). After having clearly learned what flash and compile mean, I read about makefile on page 19. It is an essential kernel of programming part: it is firstly designed to help and avoiding the file compiling manually. More than this, its utility is linked to the rules and instructions. Each makefile contains them and it is sufficient typing make command. Considering it is the first time I'm approaching to this field, how can I include a preconfigured makefile in my weekly blink led's project? I found the answer at the end of the chapter and it suggested me to skip to page 38, where I read about "Configuring your Makefile". I would like to quote the easiest explanation I've found until now "You need a file called a makefile to tell make what to do. Most often, the makefile tells make how to compile and link a program. (Source: www.gnu.org)
What I need?
After having read that paragraph, I just had some opened windows on my laptop and I tried to find a make file example on the Internet too. Thanks to the Fab Academy's schedule webpage, I found this example, and I have to admit it has been very helpful. I also tried to move back to basic concepts and looking for a clear explanation. The website I've already linked, gave me the things I was looking for. Each box well explained the required actions and I suggest the same page to beginners. Moreover, I also found some useful slides for me. I'm just sorry that they're written in Italian, but I couldn't avoid to mention them because they helped me a lot. Last but not least, I also read a simple makefile tutorial. Considering this week complexity, it wouldn't have been enough...but I might start trying something. Before writing codes and so on, I had to settle my scores with my PCB's microcontroller. I tried to unsolder it with the help of a twist and I noticed I removed a great quantity of tin. Unfortunately, it wasn't enough, so I tried to use an hot temperature air gun too. When the microcontroller was completely removed from the traces, I could replace it in the right position. This time, I paid lot of attention and I'm sure I'll remember this thing for the next times! Paying attention to a small dot and a delta symbol put on the microcontroller, you can identify where the VCC is. As I said ath the beginning of this week, pins can't be connected by chance and only now, I finally undestood why.
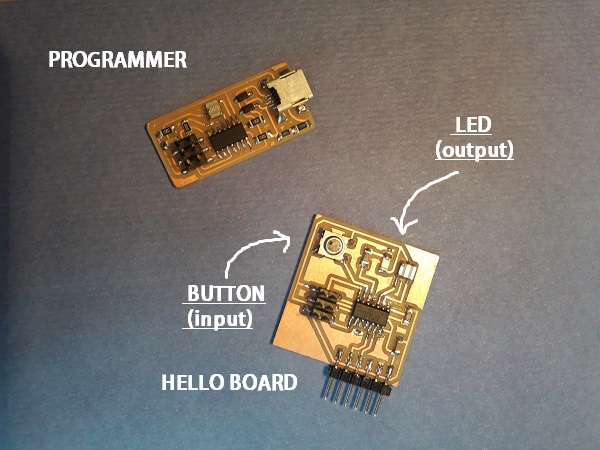
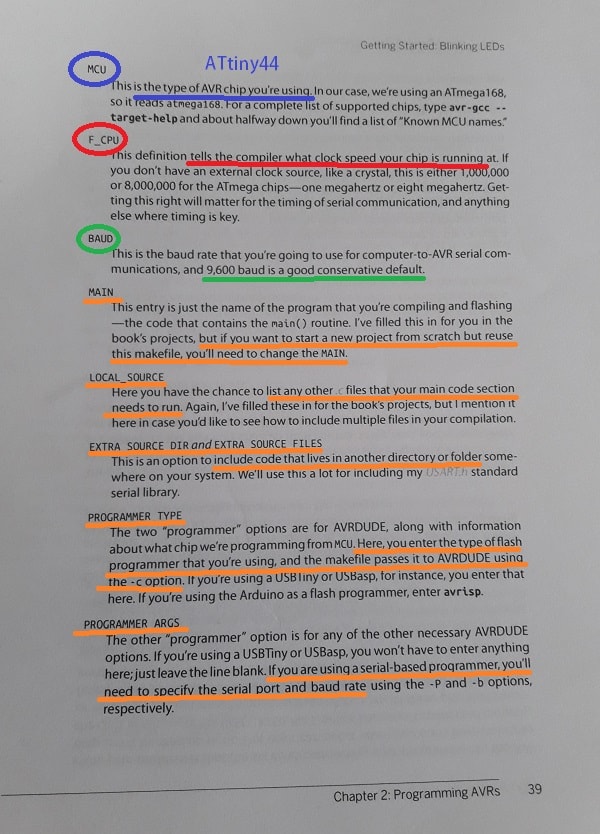
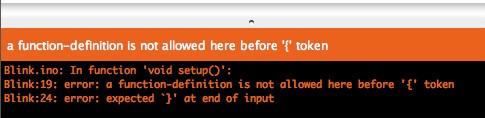
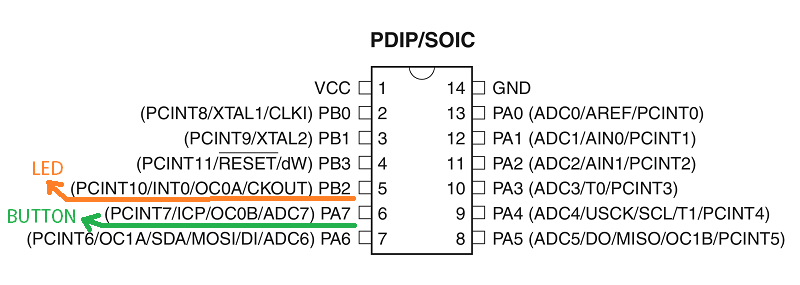
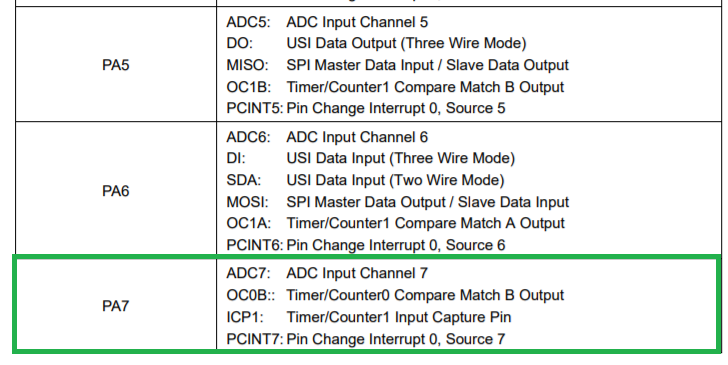
Now, can I start working on the practical part? Considering the fact I'm going to program the Hello Board I redrawn during the electronics' design week, I looked for the ATtiny44 datasheet. I skipped on the sections I needed to look at. Where I connected the led and the button? This week I increased my awareness about this kind of activities and I tried to better understand which pins would have been fundamental to give sense to the assignment. I linked my red led to the PA7 and PB2. So, I would like to start with a programming code to see my led blinking. Only then, I will try to add the button function. I started writing the code on the Arduino sketch and before doing it, I watched some tutorials to better understand the syntax errors I could have been written. Anyway, I forgot some brackets more than once and when I verified the sketch I simply read an error message that reminded me a command like the following ones.
Apart from it (that allows you to upload the well written code), the main thing is to set the right parameters referred to the MCU you're going to use. In my case, I used the ATtiny44 microcontroller and I set the following parameters clicking on tools:
After that, I verify the code clicking on the "✓" icon at the top bar. Then, I clicked on BURN THE BOOTLOADER and I proceeded uploading my sketch through a programmer. As you can see, I set the RED LED as an OUTPUT. In addition, I wanted my led switched on for 2 seconds and switched off just for once. So, here's the code I used to do a first test and it is followed by a short video as a proof.
Moreover, I wanted to try the button function too. How could I added it on the code I previously used? I left the RED LED as an OUTPUT and I added the gave to the BUTTON pin the INPUT function. I opened again the datasheet to see the features about pins I used and I wrote my code commenting the actions.
Thanks to a short video, you can see the led works as an output and the button has an input function. Now, I can try to change the delay or maybe switching off the led instead of turn it on. It could be interesting, but for the moment, I have to deal with the C programming language.
Programming in C
Which beg the question: how can I write my code in C programming language? Our friend Tommaso has knowledge in this field and so, he explained us some things referred to C language. First of all, I opened again the datasheet because I understood the essential role of registers. We did a quick lesson together with some examples written on the blackboard. It has been useful but hard at the same time.

Anyway, the C language structure is the following one:
[#include]

            [#define (it means you declare functions)]

            int main(void){

            [event loop]

            while(1){

            }

            return(0);

            }
Before starting, I wrote my code considering the led and the button functions. I looked at the datasheet to see which pins I connected.
Then, I downloaded the makefile I found here and I edited it to rename the project.
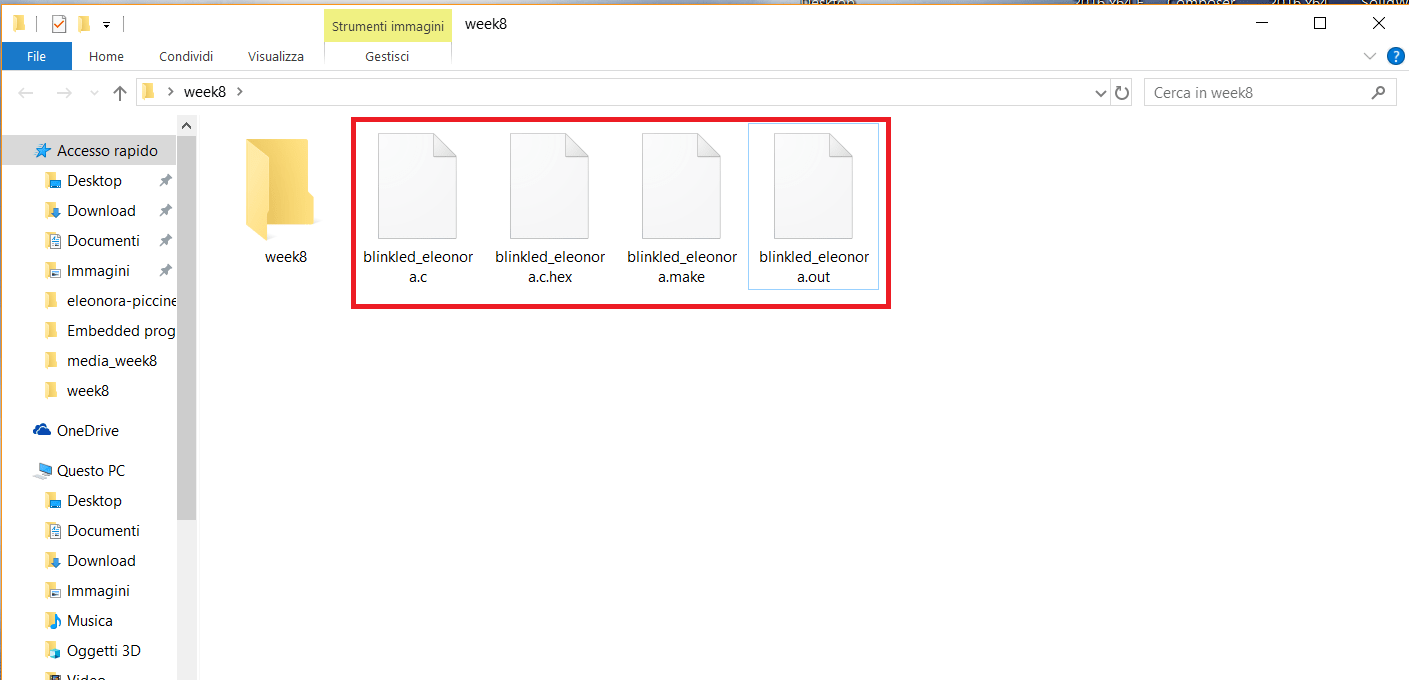
I set the fuses typing the following command make -f blinkled_eleonora.make program-usbtiny-fuses in order to create the .hex and the .out files. So, after that, I found a these files inside my folder:
I had all I needeed and I finally flashed the program onto the ATtiny44
My first code written in C is the following one:
Conclusion
This week has been difficult because I've never used programming language before. I opened many and many files in order to find information for beginners. I have gone to considerable effort to understands basic programming kernels. I would be a liar if I said I totally understood the information at the first reading. I tried to be patient and couldn't put me off. My laptop was full of opened windows and I kept Make: AVR Programming next to me. I found really useful the recap available at the end of each section. More than datasheets features, I also faced with logical operator functions for the first time. For example, when I tried to write the first code using Arduino, I often forgot to close brackets or semicolon. I'm aware I have to familiarize with programming language, but I did my best during this week. I've learned the importance of the datasheet and I understood is a fundamental document in order to know all you want about your MCUs. I didn't know the existance of it and I saw it as something terrible at the first sight. Even if many things can't be learned just in one week, I did my best to be aware of the unknown world of electronics and programming. Honestly, I have always seen the electronics component as something really tiny but I focused my attention only on their physical features. I have never imagined there were too many things to discover and learn behind small elements. Getting to the point, it has been a challenging week...it sum up all the efforts made and the little achieved results.
Useful links:
ATtiny44 DatasheetDigital I/O ports
Introduction to embedded systems
Understanding fuses
What is C Language?
Learning C
Programming AVR microcontrollers in C
Embedded programming
Makefile for embedded programming
AVR downloader & uploader
AVR Input/Output
Write your first AVR program
Programming FabISP
