GIT Tutorial
A lil' bit of history
Git is a distributed version control system that can track changes in source during website or software development. It is designed to help developpers work together and coordinate, but it can be used to track any changes in any kind of file !
One of the great advantages is that is allows any users to keep entire code and history on their location machine. This ways, this person can make any changes without internet access (except for pushing and pulling of course).
It was created by Linus Torvalds in 2005. It is free and open-source (1) software distributed under the terms of the GNU (2) General Public License version 2.
(1) Open source : "The term "open source" refers to something people can modify and share because its design is publicly accessible." (opensource.com)
(2) GNU : GNU is an operating system and an extensive collection of computer software. It is composed wholly of free software,most of which is licensed under the GNU Project's own General Public License (GPL). (wikipedia.com)
Fun fact : did you know that Linus Torvald created GIT ... in only a few days ? :)
- The development of Git began on 3 April 2005. Torvalds announced the project on 6 April; it became self-hosting on 7 April. The first merge of multiple branches took place on 18 April.
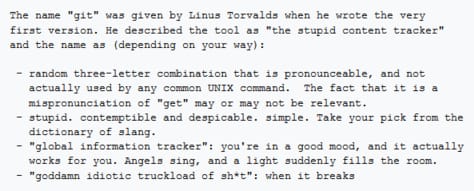
- Torvalds quipped about the name git (which means unpleasant person in British English slang): "I'm an egotistical bastard, and I name all my projects after myself. First 'Linux', now 'git'. The man page describes Git as "the stupid content tracker". The readme file of the source code elaborates further:
VERSIO... WAIT WHAT ?
Now that you know a little bit more about web developping, maybe you made your first website. You're excited, you put it online, you open your web browser to show all your friends and family what you did. But... wait... What ?? It's not working ! What went wrong ? Fortunately, you used Git to version your site !
What does versioning mean ?
Versioning is the creation and management of multiple releases of a product, all of which have the same general function but are improved, upgraded or customized. It allows collaborative development, but also to know who made changes and when and to revert any changes you made and go back to a previous state.
Some definitions
Before seeing how to install and use git, let's start with some commonly used terms in software version control :
| Name | Definition |
|---|---|
| Version Control System | A software application that records changes made to a set of files over time, allowing specific historical versions to be recalled and restored as necessary. |
| Revision | An alteration to a particular file (or set of files), historically recalled and remembered by the VCS using an assigned number or unique identifier. |
| Repository | A shared database with a full revision history of all files under version control. |
| Commiting or commit | When a modified file is placed back into the repository, thus indicating a revision has occurred, this is considered a commit of the file. |
And here are some core features of Git.
| Name | Definition |
|---|---|
| Speed | Git is typically one of the fastest and most responsive VCSs out there, often anywhere from 10 to 100 times faster than Apache Subversion, another popular form of version control. |
| Branching | Easily among the most powerful and somewhat unique features of Git is branching, which allows development within a repository to occur simultaneously within completely separate branches. Revisions in unique branches will have no effect on one another until those branches are merged (joined together) at a later time. |
| Staging | The staging space is an intermediary file area, conceptually similar to limbo, where files go between the standard repository database but before they are committed and saved as a new revision. Within the staging area, files can be edited multiple times before commitment occurs, reducing the number of unnecessary versions in the system. |
| Distribution | Git is a distributed VCS, which means it has no need for a centralized repository where all team members must commit changes. This makes Git particularly well suited for open source projects and workflows spread across large networks or distances. |
LET'S MAKE SOME GIT !
Step 1 : Install Git and create a Github account
I'm using Windows, so to install Git I just had to download it on git-scm.com. You can find on this page all the way to install Git according to the OS you're using.
Note that for this tutorial, we'll use Git on the command line only.
Then create a Github account. To do so, you can follow this tutorial on Wikihow. Note that Github public repositories are free of charge, but if you want private ones you have to pay for it.
What is Github ? It was founded in 2008 and it is the largest web-based git repository hosting service. It allows collaboration with anyone online and adds extra functionnalities on top of Git.
Step 2 : First time on Git ? Let's do the setup !
Open your terminal or command prompt. It is where you'll type in your command lines. I use Windows, as said earlier, and here are some ways to open it.
Now you have to type in those command lines to setup :
| your identity | git config --global user.name "Your name" |
| your editor | git config --global core.editor <any code editor like vim, sublime, etc> |
| enable color in git | git config --global color.ui auto |
| checking your settings | git config --list |
Okay, let's get to the real stuff now ! :)
Step 3 : Create a new repository
Create a new directory, open it and perform a Git init to create a new local git repository.

Step 4 : Get to know important Git commands
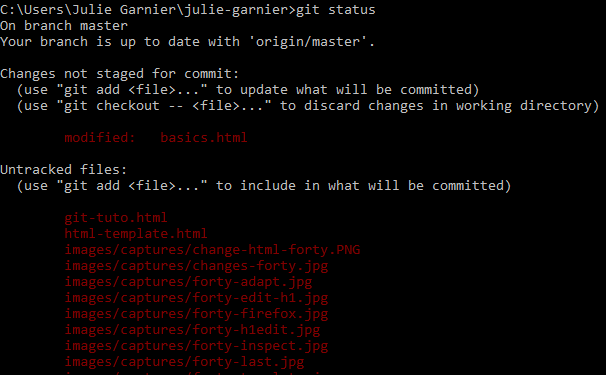
| Get the status of your Git repo | git status |
| Add new file to staging area |
git add <filename>
git add * (will add all changes, without selection) |

| Commit your changes |
git commit
git commit -m "name your changes" (will name your commit) |

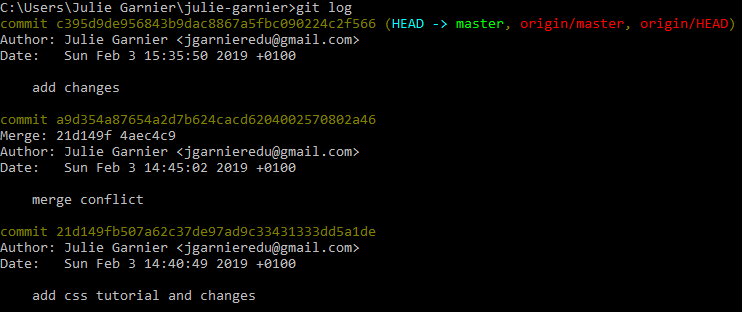
| Get Git commit history | git log |
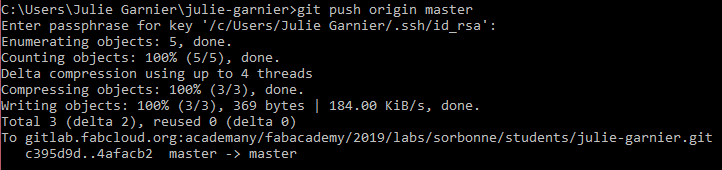
| Send changes to your remote repository | git push origin master |
| Push to a branch other than 'master' | git push origin branch_name |
Step 5 : Understanding branches
I don't use it on my website, but branching is the most important thing to understand when it comes to Git so that's why I'll explain it to you here. Here is an illustration so you can understand it better :
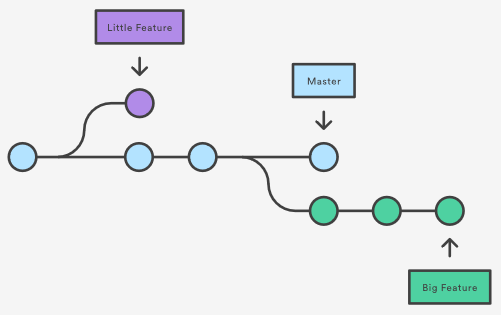
Git kinda works like a tree. There is the "master branch", which can be compared to the trunk of the tree. The "master branch" is the "default" branch when you create a repository.
And there are branches which are used to develop features isolated from each other, may they be little or big.
I created one on my repo as an exemple :
| Create a branch | git branch new_branch_name |

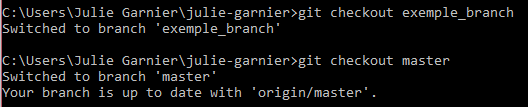
| Switch to a different branch | git checkout other_branch_name |
| Create a new branch and checkout to that branch | git checkout -b new_branch_name |

| Show all the branches | git branch |

| Delete a branch | git branch -d branch_name |

Wanna go further ?
Here are some tutorials :
| Name of the website | Link |
|---|---|
| Atlassian BitBucket | https://fr.atlassian.com/git/tutorials/using-branches |
| Codecademy : learn GIT | https://www.codecademy.com/learn/learn-git |
| GIT, the simple guide | http://rogerdudler.github.io/git-guide/ |
| Grafikart : comprendre GIT (FR) | https://www.grafikart.fr/formations/git |
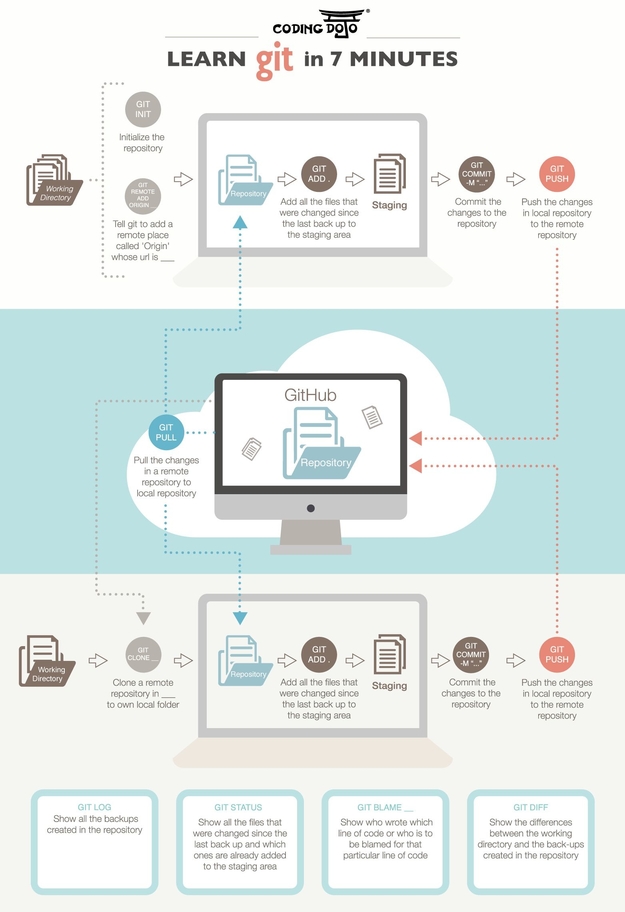
Here is an infography found on Coding Dojo that will help you understand how Git works a little bit better