
Success is a journey, not a destination
Objective:
- Model (raster, vector, 2D, 3D, render, animate, simulate, ...) a possible final project
Learning Outcomes:
- Modelling your final project idea
- Learning 2D and 3D modelling softwares
Following is the list of available softwares used for 2D graphics, click on any link to know more about that software.
These softwares are used to for 2D Raster and Vector Graphics,
In simple words, a Raster or a bitmap image is made of pixels, and the quality of picture depends on pixels. On the other hand, a vector image is made of thin lines and curves known as paths, depending on the mathematical formula. One can use both depending on the requirement. There are different types of raster files: JPG, GIF, and PNG are examples, and each file type has its own nuances.
Raster images are ideal for photo editing and creating digital paintings in programs such as Photoshop and GIMP , and they can be compressed for storage and web optimized images.
Since mathematical formulas dictate how the image is rendered, vector images retain their appearance regardless of size. They can be scaled infinitely. Vector images can be created and edited in programs such as Illustrator, CorelDraw, and InkScape

click here to know more about the differences between Raster and Vector and their specific applications.
Raster Graphics:
- Gimp
GIMP stands for “GNU Image Manipulation Program.” (GNU is an operating system and collection of freely available software.) The best way to think of GIMP is as a powerful tool for hobbyists. It is an open-source project,like Photoshop, GIMP supports the basic functions needed to manipulate images. GIMP supports levels, curves, layers, channel mixing, cloning, healing, transformation, editable text, etc.
- Adobe Photoshop
Photoshop isn’t just a tool for photographers. Graphic designers and illustrators also rely on many of its features to create and manipulate images, including logos, advertisements, and website mockups. It’s a powerful tool with a ton of features for specialized jobs.
- Artwear
Artwear supports many tools, layers and filters. It has a very interactive user interface. It provides a huge variety of configurable brushes.You can even work in a team with other artists on artwear.
- Chasys draw ies
Chasys Draw IES is a suite of image editing applications including a layer-based image editor with adjustment layers, animation, icon editing support and super-resolution via image stacking (Chasys Draw IES Artist), a multi-threaded image file converter (Chasys Draw IES Converter), a fast image viewer (Chasys Draw IES Viewer) and a RAW camera file processor (Chasys Draw IES rawPhoto). The whole suite is UAC aware and is designed to take advantage of multi-core processors, touch-screens and pen-input devices.
- ImageMagick
ImageMagick is a free software, it is capable of providing multiple threads computation to increase the overall performance. YOu can do animation design, color management, command-line processing, decorate, create, edit, or convert bitmap images. It can read or write images in different formats (over 200).
- Ms Paint
Our childhood friend, which has always been a handy tool to draw basic drawings ,and do some basic manipulations
Vector Graphics
- InkScape
- SVG-Edit (it is browser based software)
- Vectr
- LibreDraw
- Adobe Illustrator
- Corel Draw
- Draw Plus
- Affinity Designer
Inkscape is a vector drawing software, which allows you to create objects using shapes, pencil, text and other tools. You can manipulate the drawn object into path, and make layers.Using the fill and stroke commands one can easily change the gradients and outlook.There are several other interesting features , click on the given link and explore more about inkscape.
It is free to use and based on SVG (Scalable Vector Graphicsand supports XML. IT enables you to recreate vector drawings programmatically. There are a few web-based SVG editors that can help you quickly modify an existing SVG file or output SVG. One project that delivers a performance that can rival Adobe Illustrator’s, is the SVG-edit. The program is built entirely as HTML5, JavaScript, and CSS3 without the need for any server-side processing.
It is free and prvodes both facilities of web and desktop cross platform tool.
It enables you to draw powerful diagrams and flow charts.You can create your own picture gallery and create an eye catching graphic document.CLick on the link to know more about its features.
It is a best choice for professional work; creating logos, icons, illustratons for books or magazines,and much more. Better to check the given link , because it has got plenty of surprises.
Click on any of these links to explore more about these 2D raster and vector drawing softwares.
There are many softwares for 3D modelling, below are listed a few:
Parametric Modeling technologies are a great fit for design tasks that involve exacting requirements and manufacturing criteria.
Direct modeling creates geometry rather than features so it supports that conceptual effort where the designer doesn’t want to be tied down with features and their inter-dependencies and the impact that making a change might have.
click here know more about the pros and cons of these designing techniques!
Non-parametric Design tools:
Parametric Design Tools
Following Tasks cover the Learning outcomes of Week-03:
Task1: Raster Drawing
In order to draw a raster drawing of my final project idea, I used Adobe Photoshop to create a simple layout of Lixie Tube clock. I am not an expert at photoshop , but I have some basic know how of making different shapes, editing , enhancing, and creating infographics and presentations. I used my basic knowledge to draw this and it took not more than 10 minutes.
Adobe Photoshop is really easy to use, and mostly used for Rasterizing. Below is an image for showing the workspace environment.

I just wanted to create a rounded rectangle , and some boxes to show time.Following steps were followed to make this design:
- Creating a new document and setting the dimensions.
- Making a rounded rectnagle shape and rasterizing it.
- Making boxes for showing time and digits.
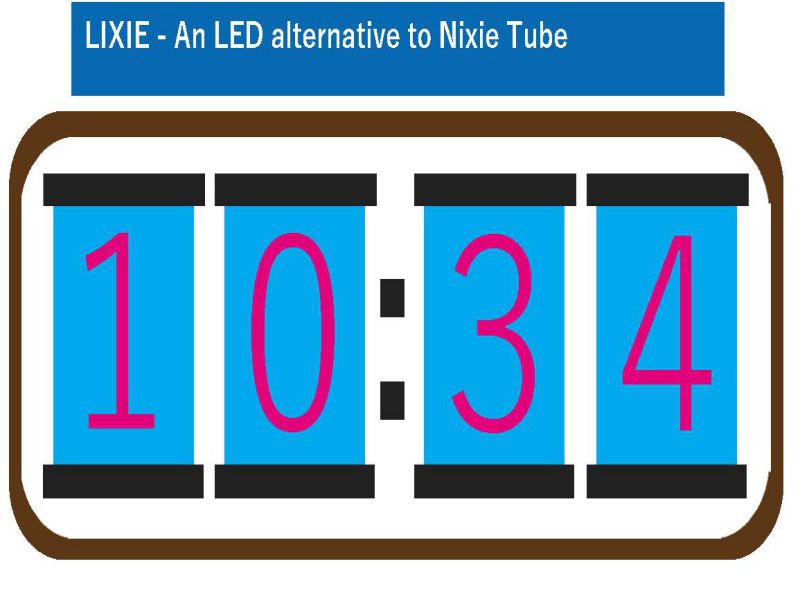
Know more about Lixie Tubes and my Final Project Here
Task 02: Vector Drawing
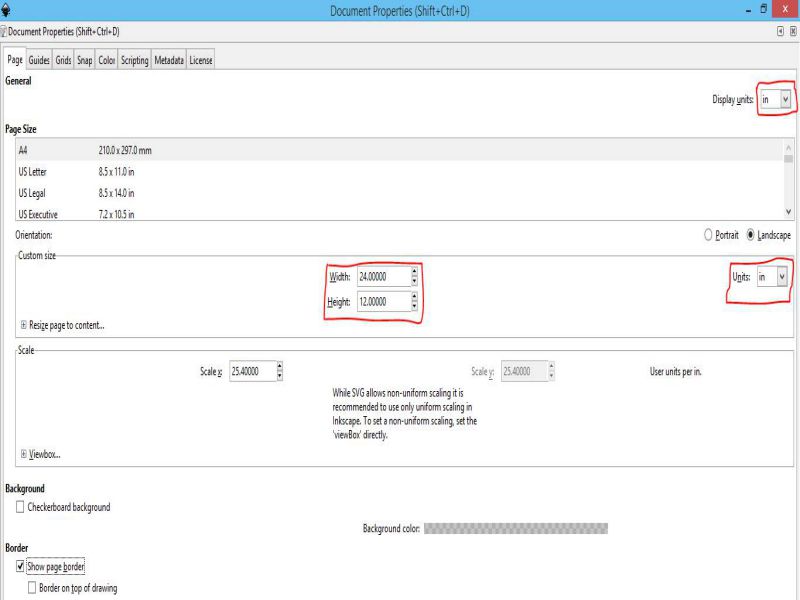
First of all, I selected a 2D vector Drawing tool. I chose Inkscape, beacuse it's easy and I didn't require any complex work. Then, I needed to learn some basics of Inkscape, I watched some useful tutorials, and created some drawings using shapes, Text, and styling. In order to draw a vector drawing of my final project idea,I decided to draw a single LIXIE tube.I wanted to cut this LIXIE tube using laser cut, which is a part of Week-4 Assignment. In this way, I can analyze better about the dimensions required for making my acrylic sheets work perfect.
I followed these simple steps to setup my inkscape environment:
- Setting the document properties
Then I added Fill and stroke, Align and distribute, Object Properties, and Layers to my sidebar menu for easy access.
.jpg)
While searching for tutorials, I found some extensions and thought to try it in inkscape. I found a zipped file on Git hub, for making tabbed boxes.Check it on this link. and follow simple steps to use it.
Open the extensions and select laser tool, then Tabbed Box maker as shown below.
Now, set the settings for the type of tabbed boxes you want, there are many different types available.
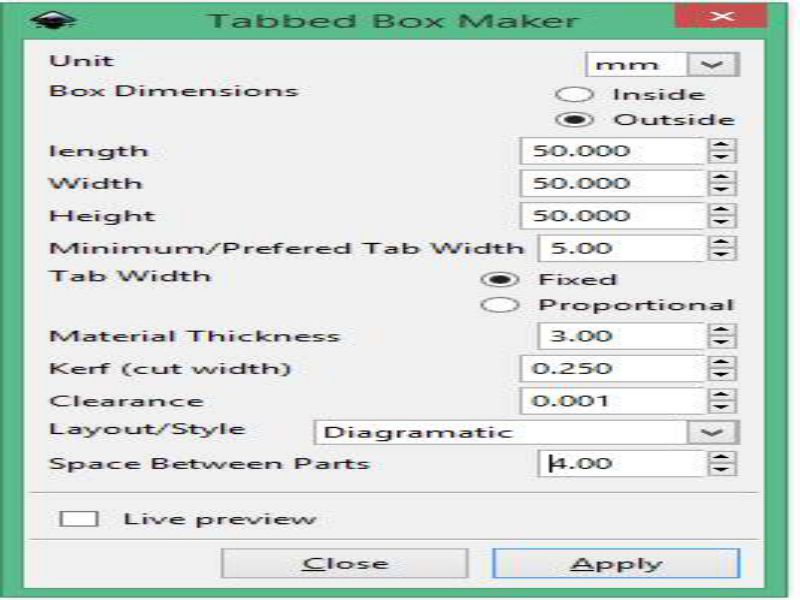
After making the required changes, apply the changes, and it turns out to be like this with the diagramatic layout.

Working on Inkscape is really fun, I made living Hinges design, imported some libraries, created some abstract backgrounds, and made some text based designs. Then, I moved to make a simple design for cutting on acrylic. The design is shown below:
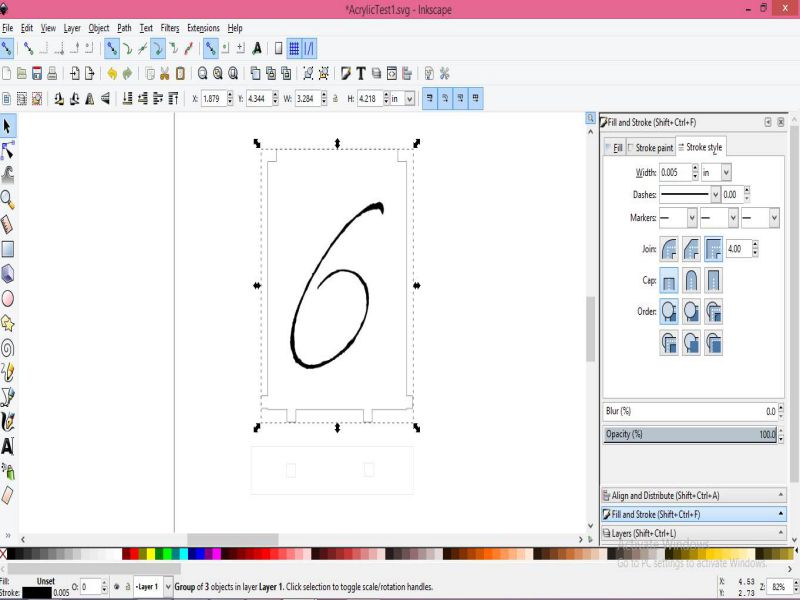
The stroke style will be changed to "0.001 inches" as per EPILOG LASER available in the lab. I have to cut 10 crystal acrylic sheets, and 2 black acrylic sheets.I will do that as a part of week-04 Assignment.
Task 03: parametric Modelling of 3D
1. 3D Modelling with Solidworks!
Solidworks is a powerful parametric 3D modelling tool , for almost everyone, be it engineer, or hobbyist
I started by watching some useful tutorials, given on the official website of Solidworks
There are some useful video tutorials available also for begineers like me!
First I tried to make a simple part.
- Go to File> New> click on Part and a new window will appear.
- Set the dimenions also from the unit system.
- In the upper left corner of window, click on 'Boss Extrude' so that we can give a thickness to our part after setting the dimensions.
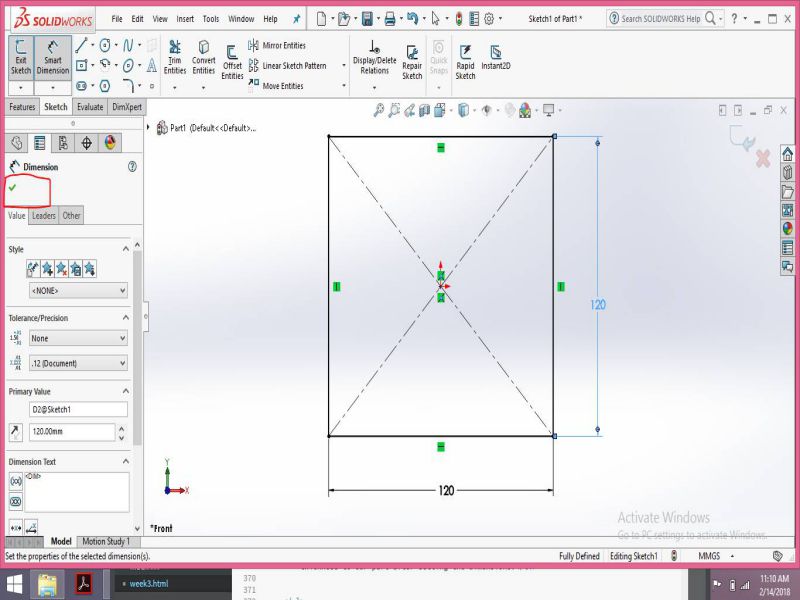
- Now select a rectange, either two corner or center rectangle. I selected center rectangle here. Set the dimensions using 'smart dimension' and then click on the green check mark to apply these changes.
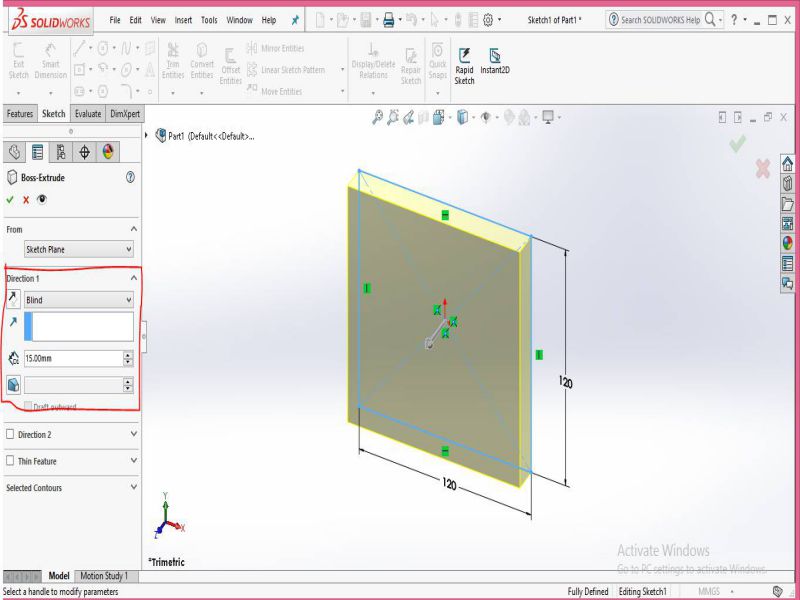
- Exit the sketch, now to give thickness to our part, 'Blind' should be selected. then apply the changes, as shown below.
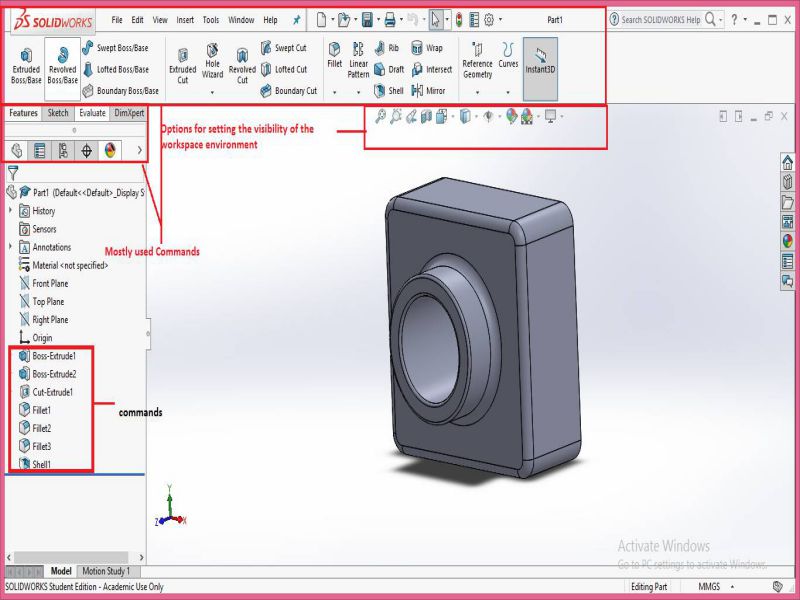
- Then i made a circle at the front plane, and cut it using cut extrude.
- I used Fillet, to set the different radius
- I removed the solid part from the material body to create a thin wall feature using shell.
.jpg)
.jpg)
Following Figure shows the complete part , and in the side bar we can see the features and tools used to make this part complete.
Using Solidworks, I will make a Press Fit Construction that will be cut on Laser .
2. 3D Modelling with Rhino+Grasshopper
I chose to work on Rhino for non-parametric design. click Hereto check it. Currently, I am working on rhino 5.
So, let's get started with Rhino ceros
to get familiar with the interface and what ever there is in the version 5
Check out this useful tutorial!
Session 1 - Getting Started User Interface HD from Rhino Tutorials on Vimeo.
I learnt settings of different viewports,status bars,scaling, osnap, docking the tools libraries and a lot about the gumball tool which is used to rortate, scale, move , to make copies, skew the object, lock a direction when you move in that particular direction. In the bottom right corner we have info panel to check memory usage, cpu use, etc. We cab have named position tab for presentations. We use explode to further explain the individual parts.
The Rhino 5 interface includes new tools for editing and object creation, including:
- Gumball object manipulation widget
- Object and sub-object selection tools enhancements
- Object snap enhancements
- Toolbars with tabs
- Tabbed docking panels
It's just a start, I have to explore it more to do some cool stuff with Rhino!
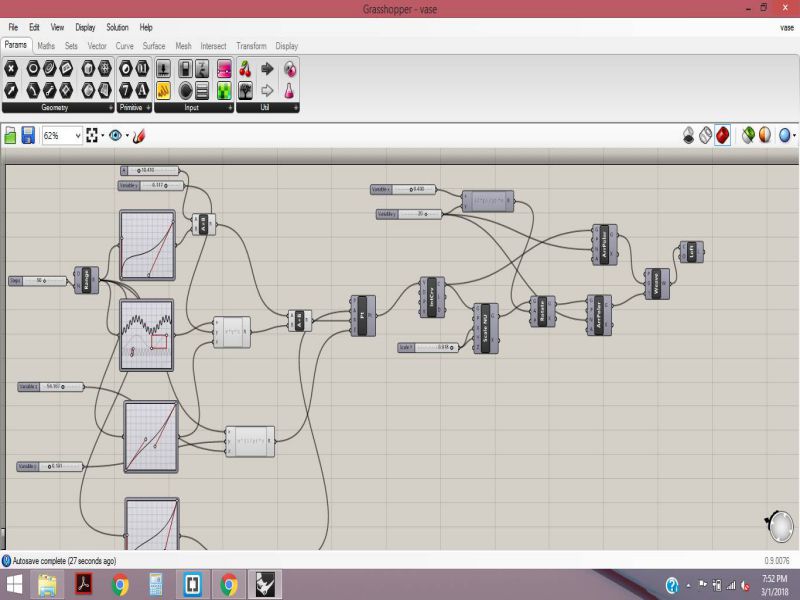
Using Grasshopper with Rhino, I tried to make some parametric Vases. I found some good and easy tutorials on youtube. The work is shown below:

Task 04: Non-parametric Modelling of 3D
3D Modelling with SketchUp!
Sketchup is non-parametric 3D modelling tool , best for architecture designing, furniture , aesthetics, and for hobbyists.
I started by watching some useful tutorials, given on the official website of SketchUp
There are some video tutorials available also for begineers like me!
After watching this tutorial, I made my Lixie Clock Layout in SketchUp. I followed following steps to make my design.
- Add a Rectangle
- Apply 2 point arc tool, to make it rounded
- Extrude the faces
- Insert rectangular boxes for Lixie Tubes
- color and use materials for casing
Then, I finally made this!

For now this is the basic design, I will practice more on Skeketch up and other softwares to make my design accurate and effective.

This work is licensed under a Creative Commons Attribution-NonCommercial 4.0 International License.