
Summary
"What do I wear today?" will show the temperature in three different visualizations: first, similar to a thermometer scale; second, with digits; third, with a scale of clothes (which type of clothes, correspond to each temperature range). Finally, there is a fourth visualization, as each range of temperature will correspond to a different color, that would be the same for all the other three visualizations. So for each range of values, all the leds will have the same value: for example, values between -15 and -5 correspond to green, or values over 15 are red. The thermometer and the digits are built with neopixels. But the clothes have normal LEDs. The reason for this is that I would rather allow the kids to pick the clothes and put them back. The easier way to do that is with normal LEDS. I have a total of 5 ranges, and thus, five different colors: blue, green, yellow, orange and red. The colors chosen are mostly the ones that correspond to LEDS I could easily buy
Then,if desired, the lights can be switched off. For that, I will use the interaction with hall-effect sensors. I was initially planning to switch off the light when the doors were closed. But as my doors are translucent, the different visualizations look nice also through the closed doors. So I decided to use a doll to switch on/off the lights. When the doll in sat, the lights are off. If you remove the doll, the lights will light up. I rely on the kids natural curiosity, and that they will try to grab the doll when they see it: so they will naturally start the system without more instructions.
Thus, I plan to build an structure that will resemble a wardrobe and will hold all the different parts. I have divided the work into several different tasks. Mainly:
- Main Structure: wardrobe , doors, hinges
- Hall-Effect sensor
- Central controller
Structure
The main structure is a frame that looks similar to a wardrobe.Frame Building
Main Frame was built during Assignment 08
Resources
Hinges

Resources
Doors
Doors are from the design made in Assignment 08. Although I cut obs doors, I decided I would rather lighter doors. There would be just "fake" doors, that is, they do not need to hide nor really close anything. There would be an space, as acrylic is much thinner than the obs. This, will give me some extra space to give more depth to the thermometer and the digits holders.
The file has been obtained from Fusion design the same way I did in assignment 04

Resources
- PDF file for cutting the doors
Knobs
Interface Holders
Both of them need a bit of redoing and try and test, until I got the result I wished.
Front holder needs holes for screwing the thermometer box and digits box. It needs holes in the correct places to pass the cables to the back part.
Back holder requires places for the different boards and to guide the cables.
Resources
Scales

Digits
Electronics


Programming
Library. I tried to use the library from adafruit for neopixels. THis implies to use the arduino IDE. Sy Those are OK, but a bit too tight for my ATtinies44 and ATtinies45 (you need to load the library, which occupies most of the space of the ATtiny). I also tried the FastLED library for arduino. This was even tighter. One of my questions was if I could use neopixels with my ATtinies... and yes. I found a library named Light_ws2812 for C . I have been programming with ATMEL framework in C, so this option was great. It´s API is a bit more complex that the adafruit one. But that was not really a problem. It took a while ,though, to understand how to add the library to my Atmel project. But this was not complicated at the end either. 4 steps:- Have the library and the configuration file in the project folder
- Include the library to the project as
#include "light_ws2812.h" - Do not use #define F_CPU 20000000UL to define the value of the frequency (I use a 20MHz external clock, that is why I have that value). Go to
solution explorer>"name of the solution">AVR/GNU C compiler>Symbols>Add Defined Symbolsand add the value there (in my case, F_CPU=20000000) - Open the configuration file (ws2812_config.h) in your project and put the correct pin (the one where your neopixels are connected)
Frame
The frame for the digits is basically a modified press fit box (boxes.py ) that holds the board. On one side, two seven-segment digits are laser cut and a minus in seven-segment format. On the other side, a big hole to introduce the board and holes for screwing to the interface board.I got an svg file that represents a clock display with seven-segment format from wikimedia which was released to public domain.

Resources
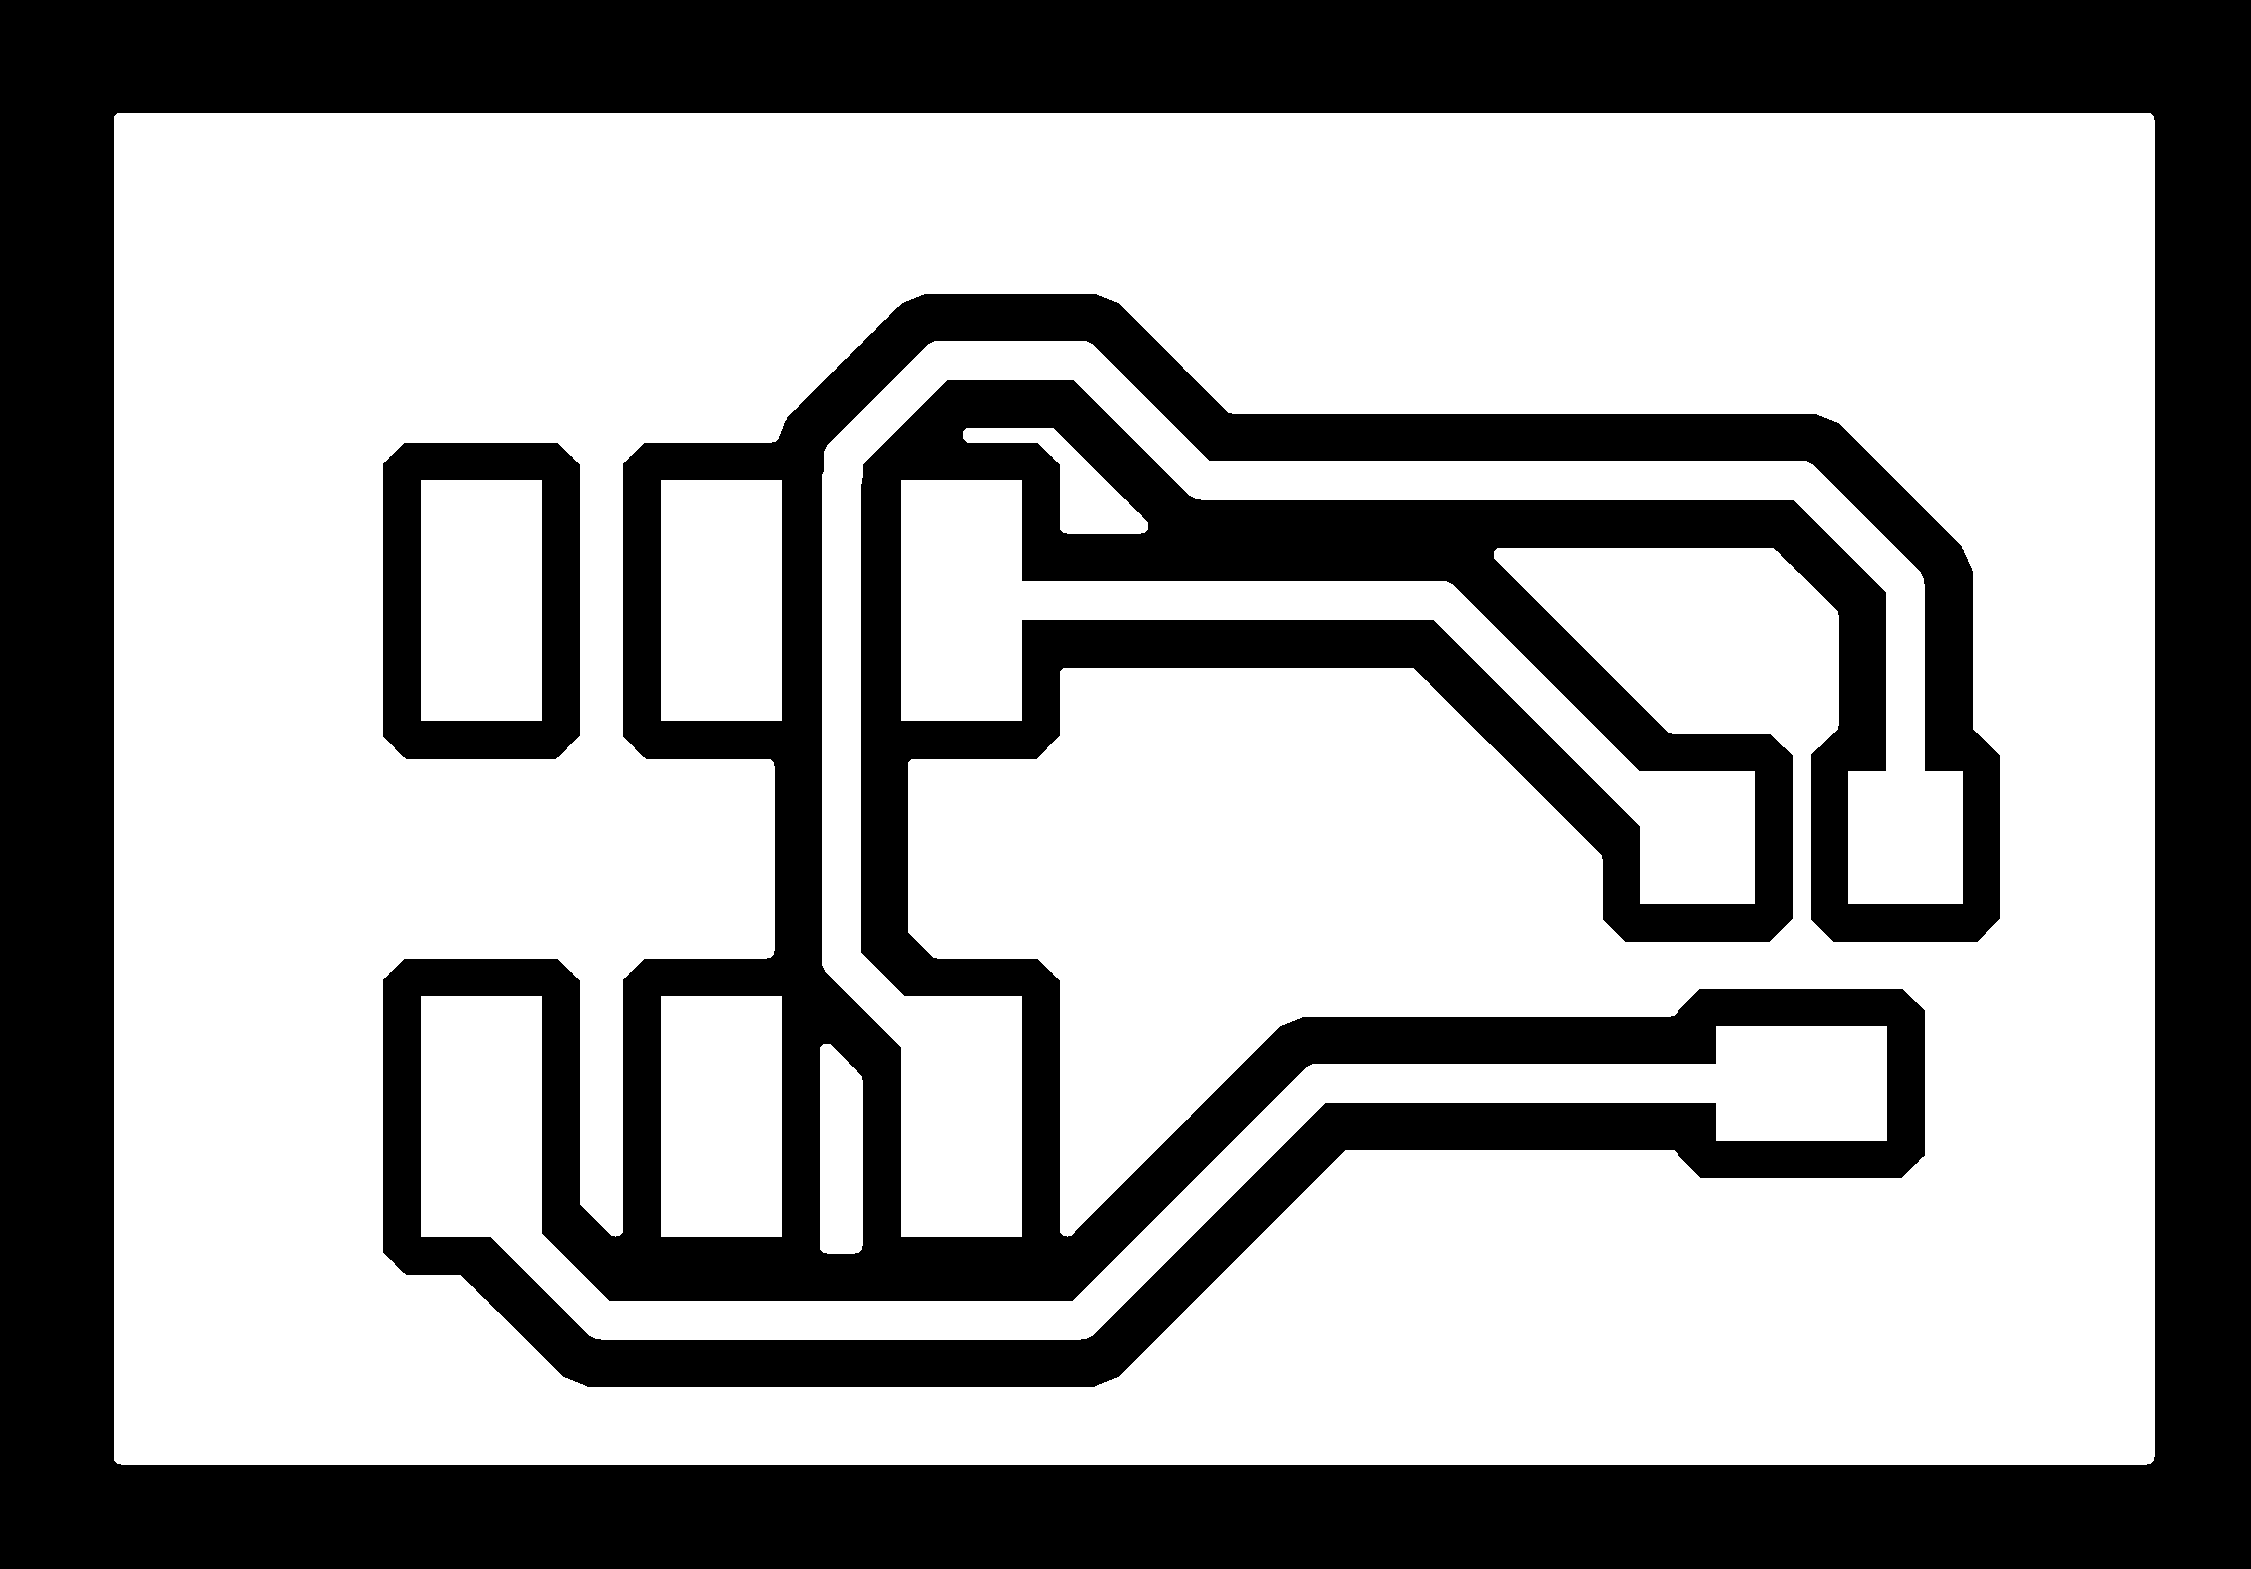
- Traces for the digits board
- Outline for the digits board
- Eagle Schematic file for the board
- Eagle Board file for the board
- SVG for box
- C file for Digits
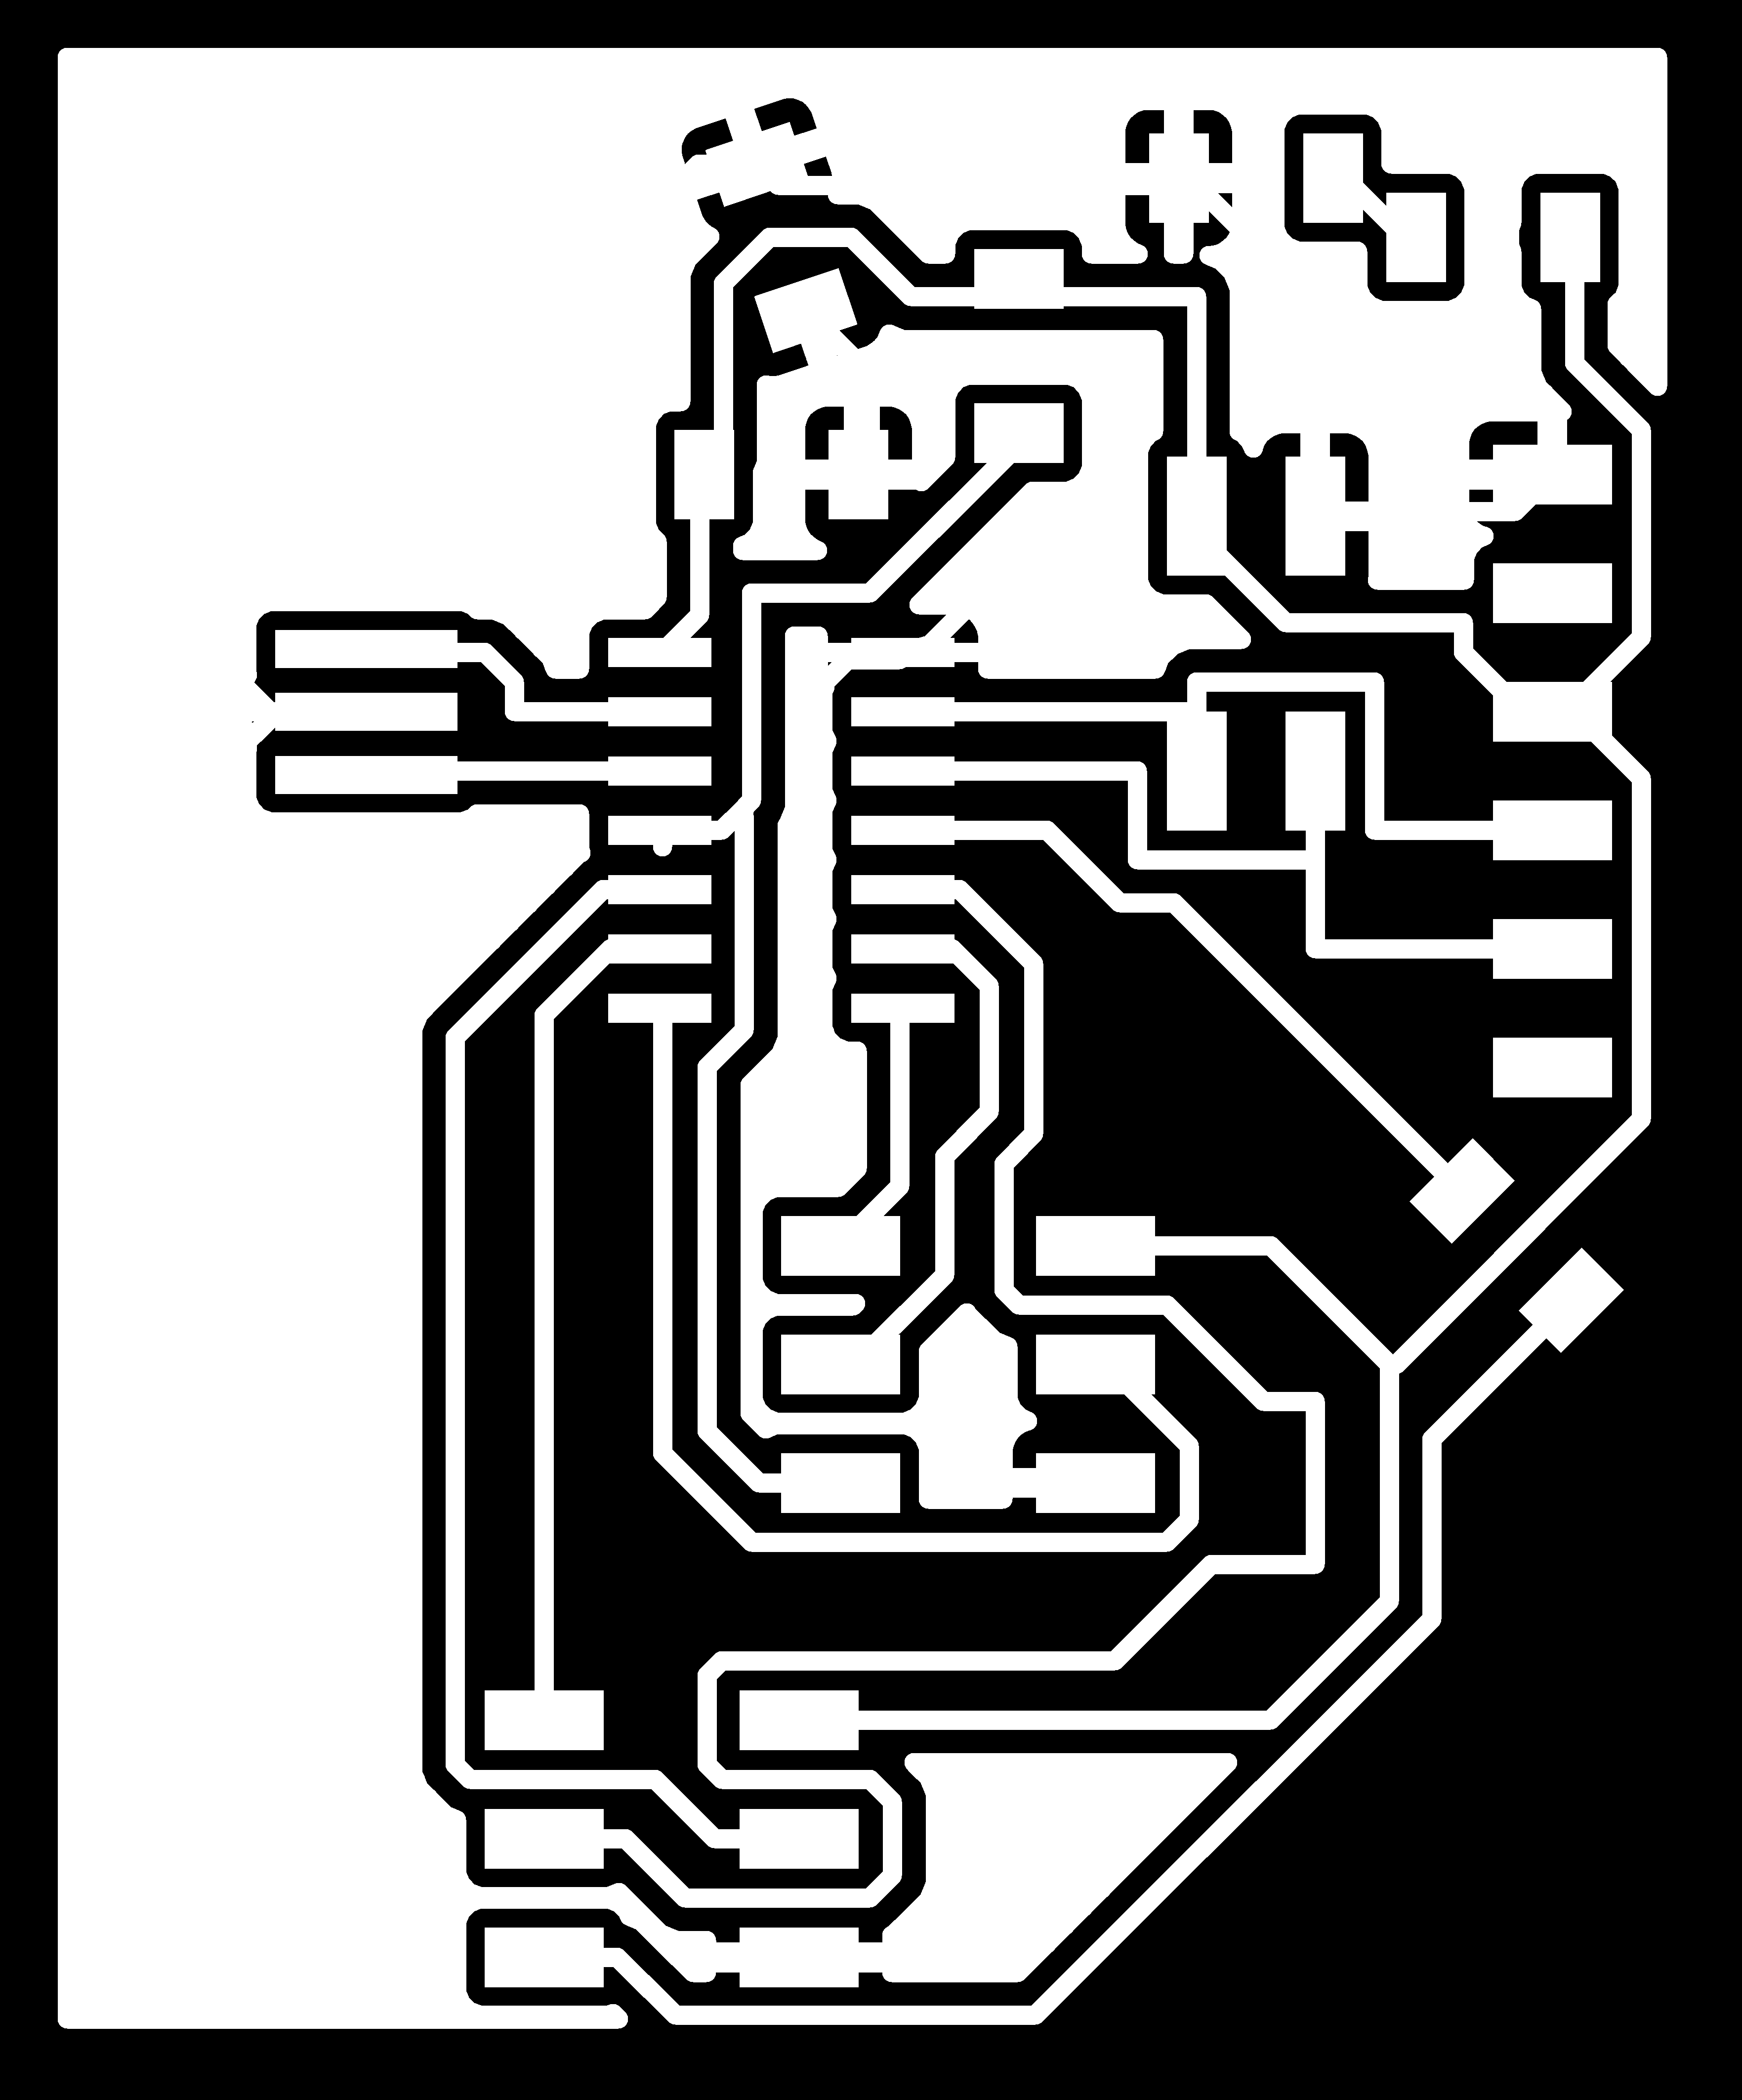
- Outline for the controller board
- Traces for the controller board
- Eagle Schematic file for the controller board
- Eagle Board file for the controller board
Thermometer Scale
Electronics


Programming
I use the same library as in digits.The actual program is listening all the time in a PIN input. When it receives a value, it analyses it, and depending on the value, it leds up the leds in certain positions with a determined color.
Frame
The frame is a modified pressed fit box press fit box (boxes.py ) that holds the boards for the thermometer.
Resources
- Traces for the thermometer boards
- Outline for the thermometer boards
- Eagle Schematic file for the thermometer boards
- Eagle Board file for the thermometer boards
- SVG for box
- modification for back part ofSVG for box
- C file for Digits
- Outline for the controller board
- Traces for the controller board
- Eagle Schematic file for the controller board
- Eagle Board file for the controller board
Clothes Scale
Electronics and Structure
As mentioned in the introduction, I wanted to be able to pick clothes and put them back. So I decided to attach to each piece a small board with its corresponding led. The Interface board will have 5 different sets of shelves (one per range of temperature). With conductive tape, I will be able to ad GND and signal to the shelves. Then, by adding thick cable as small hangers, I can feed the small LED boards.Building the structure:


Programming
The actual program is listening all the time in a PIN input. When it receives a value, it analyses it, and depending on the value, it activates the corresponding pin and deactivates all the others. So just the leds hanging from the corresponding line of pins would lead up.
Resources
- Eagle board file and Eagle schematic file for the controller board
- Outline for the controller board
- Traces for the controller board
- Eagle board file and Eagle schematic file for the led boards
- Outline for the led boards
- Traces for the led boards
- CutStudio file and SVG file for cutting the lines in the vinyl cutter
- C program
Hall Effect sensor
Electronics
Programming
I cleaned the program from assignment 11 (inputs): reading from analog inputs (I still have two sensors, as I was initially planning to use these with the doors. As explained before, I changed this design)Actuator
I made with my kids the doll that will hold the magnet that will actuate on the Hall-Effect sensors. This resulted in an oversize, but nice looking doll. The doll has several magnets that will hold it on the correct place.
Resources
- C code for Hall effect sensors
- Eagle board file and Eagle schematic file for the board: microcontroller
- Outline for the board: microcontroller
- Traces for the board: microcontroller
- Eagle board file and Eagle schematic file for the board:sensor
- Outline for the board:sensor
- Traces for the board:sensor
Central controller
Electronics
This board needs to have enough connectors so I can connect three outputs: 2 lines for the two controllers of neopixels and 1 line for the controller of the leds. Then, it needs one line for the input fromn the controller of the H-E sensor (that will rise an interruption). Also some connectors for communication with Raspberry Pi. And finally, miniUSB connector for feeding all the system.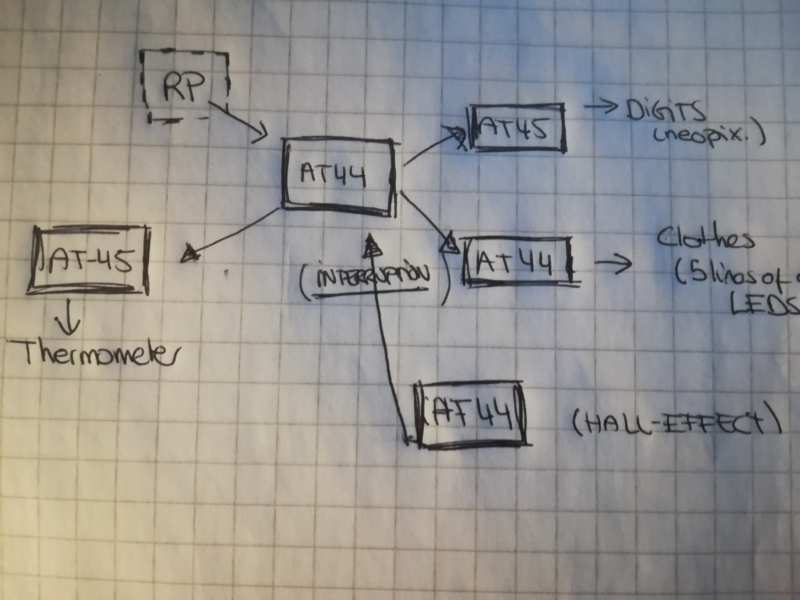
Programming
Resources
- Eagle board file and Eagle schematic file for main board
- Outline for the board: microcontroller
- Traces for the board: microcontroller
- C code for main
Final
