Week assignments
Group assignment
- Compare the performance and development workflows for other architectures
Individual assignments
- Read a microcontroller data sheet.
- Program your board to do something, with as many different programming languages and programming environments as possible.
Performance and workflows architecure comparison
You can find documentation about our group assignement on our group page.
Read a microcontroller datasheet.
What I learned from the datasheet
For this task I used the data sheet linked during class. You can find it here.
I must admit that this document seems very complicated to me and hard to find understandables informations.
I have been able to isolate some of them:
- I read that every I/O pins (portsA and B) have a pull-up resistor built in. I am using this function in the next weeks.
- In outpout devices week I am using an external oscillator but not in input devices week. I read in the datasheet that there is a built in 8MHz Oscillator and this is the one I am using in input devices week. I also read that there is 128kHz oscillator for low power applications.
- Still in the consumption field, I read that it is recommended for the unconnected pins to activate the internal pull-up to save some power.
- Finally, I read the packaging informations on which I could find the dimensions of the microcontroller. For the ATTINY44, I already have the footprint in the library but if one day I need this informations for another microcontroller, I will know where to find them.
What questions do I have?
I am very interested about the capacitive touch sensing. There is some words about it in the datasheet but the capabilities and possibilities stay unclear to me:
- How accurate can it be on a chessboard?
- Through how thick can it detect the pieces clearly?
I wonder also how to inter-connect several microcontrollers to increase the number of I/O pin availables and to have, for example, one dedicated to communications and another dedicated to piece sensing.
I hope the networking week will answer this question.
First lichess linked Programm
My goal for this week was to play a simple chess move on Lichess website thanks to the hello-board button.
I thanks Thibault (another one, not me) who was until Friday 15/03 a co-worker in the Kazlab. He is a web-programmer and helped me a lot through all this process. I whish him a good continuation for all his next adventures. Keep it up!
Play a chess move through code
Lichess offers a very well documented API in which it is explained how to play moves through http requests.
I am a complete beginner in this field but I know a little bit about python and hopefully lichess send us to a Github project "Python general API".
To write in Python I use LiClipse.
I used the code given above to play a simple move.
import berserk

token = "YourToken"
session = berserk.TokenSession(token)
client = berserk.Client(session)
account=client.account.get_email()
game_id='IDofTheGame'

client.bots.make_move(game_id, 'e2e4')
The first line is to import the Python General API.
You have to generate your own token on lichess to allow a personnal authentication.
Keep in mind that the API allow you to play moves through programming only if your account is defined as a bot account (to avoid cheater). And you can convert to bot account only if you have never played any game before. So I created a new account.
The next lines are documented into the github project.
I could have generated a game_id through code but that is not the purpose for now. So I just created a game against AI and copied the ID contained into the webpage URL.
The next move is to play the most common chess move: Pawn from e2 to e4.
Receive a serial information with Python
The next step is to read a signal with the computer coming from the HelloBoard. I didn’t have the FTDI cable which was left to Suriname while I was in French Guyana this week. So I used an arduino digital pin connected to the TXDpin of the 1X06 HEADER of the HelloBoard. Then I uploaded this code to the HelloBoard through the Arduino IDE:
int inputPin = 3; //The ButtonPin
int outputPin = 0; //The TXDPin
int ledPin = 8;
int sensorVal = 0;
void setup() { //To define pin behavior
pinMode(inputPin, INPUT);
pinMode(ledPin, OUTPUT);
pinMode(outputPin, OUTPUT);
}
void loop() {
sensorVal = digitalRead(inputPin);
if (sensorVal == HIGH) { //if the button is pressed
digitalWrite(ledPin, HIGH); //switch on the LED
digitalWrite(outputPin, LOW); //send a 0
} else {
digitalWrite(ledPin, LOW); //switch off the LED
digitalWrite(outputPin, HIGH); //send a 1
}
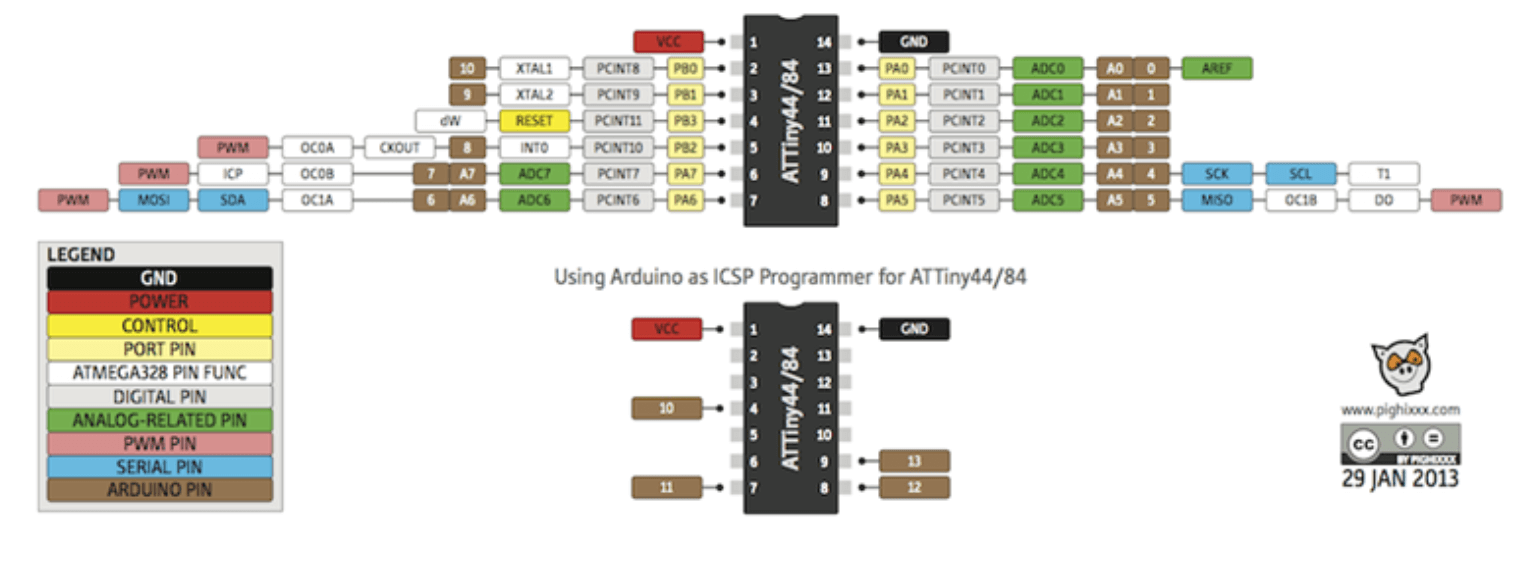
}This code is understandable through comments. Since I am working with ATTiny44, I found the correspondance for the arduino pin numbers and the ATTINY44 on the picture below.
You might be surprised by the choice to send a 0 if the button is pressed and vice versa. This can be explained thanks to the code sent to the Arduino Board:
int inputPin = 2;     // Pin that need to be connected to the ground to switch on
int sensorVal = 1;    // Initializated to 1 in INPUT_PULLUP mode
int oldSensorVal = 1; // Same here

void setup() {
  // Configure input pin with internal pull-up resistor
  pinMode(inputPin, INPUT_PULLUP);
  pinMode(LED_BUILTIN, OUTPUT);
  Serial.begin(9600); //This allow to use the Arduino serial monitor.
  Serial.println("Arduino started!");
}

void loop() {
  sensorVal = digitalRead(inputPin);

  // Keep in mind the pull-up means the pushbutton's logic is inverted. It goes
  // HIGH when it's open, and LOW when it's pressed. Turn on pin LED_BUILTIN when the
  // button's pressed, and off when it's not:
  if (sensorVal == HIGH) {
    digitalWrite(LED_BUILTIN, LOW); //So, this means: If the HelloBoard button is not pressed, then switch off the LED
  } else {
    digitalWrite(LED_BUILTIN, HIGH);//Otherwise, switch it on.
  }

  // Only send data to serial port when the value change, not on every loops
  if (sensorVal != oldSensorVal) {
    // Logic is inverted here also
    if (sensorVal == LOW) {
      Serial.write(1); //If the HelloBoard button is pressed, then send a 1
    } else {
      Serial.write(0); //Otherwise send a 0.
    }
    oldSensorVal = sensorVal;
  }
}
In this code, I use the PULLUP arduino pinmode option. It activates the pullup resistor and inverses the pin logic. The signal (pressing the button) was bouncing because of the switch physical properties. This option allow to overcome this effect.
Connect a serial signal to my previous python code
The Pyserial is a python library which allow to access the serial port. Through the device manager I can find the serial port used by the arduino which is a COMxx. Therefore I can use this code to play my chess move when the button is pressed:
import berserk
import serial # Pyserial library

token = "YourToken"
session = berserk.TokenSession(token)
client = berserk.Client(session)
account=client.account.get_email()
game_id='IDofTheGame'

ser = serial.Serial('COM4', 9600) # COM4 is the serial port and 9600 is the data rate in bits per second
while True: # We repeat this loop forever
    state = ser.read() # We assign a variable to the serial port state
    if state[0] == 1: # According to the last code, this means "if the button is pressed"
        print("hello")
        client.bots.make_move(game_id, 'e2e4')
This code is easily understandable with the comments. And then, here is the result: