
Assignments
- read a microcontroller data sheet
- program your board to do something
Datasheets
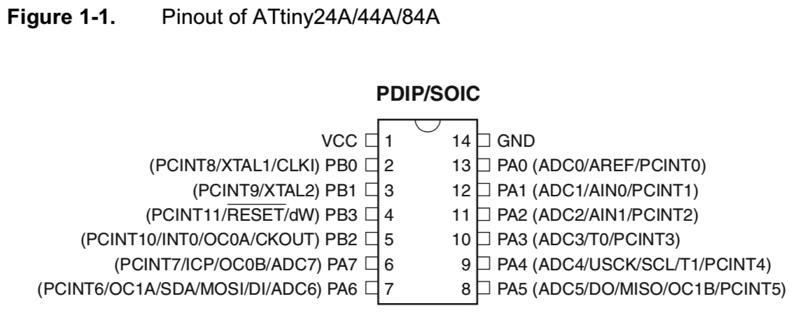
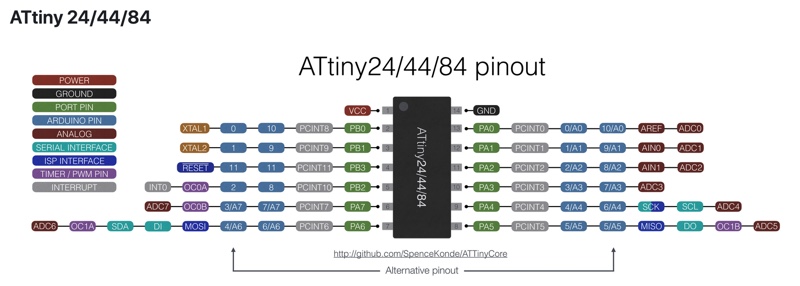
ATTiny 44 pinout
To familiarize myself with the technical data of microcontroller and especially to know the specifics of each pin, I read the ATtiny44 A datasheet. I also had to look for the correspondence between the different pins according to the languages and programming tools used. Especially to make the serial communication work.
ATtiny44 and ATTiny45 differences
The subject that I chose for the week 11 forced me to explore in detail the datasheets of ATTiny 44 and 45. I have tried to run the code in C ++ that Neil wrote for an ATTiny 45 on an ATTiny 44. To do this I compared the registers, channels, ADC (Analog to Digital Converter) prescaler selections and the clock prescaler. I learnt how to define them and use them in a C++ code.
Issue to program the hello echo bord with my Fab Tiny ISP
During the week07 i tried to program the hello echo board with the Fab Tiny ISP i made week05 but it didn’t work… During the class week08 Neil gave us important information: the Fab Tiny ISP is not supplying power to the board to be program. So we need to use an other source of power.
To do this i used an FTDI Friend from Adafruit that i plugged on FTDI pin header of the hello echo board.
Program with Arduino IDE
During my previous programming experiences I used to use the arduino IDE to program microcontrollers, mainly those present on Arduino, Dagu or similar single-board microcontrollers. For this assignment, I did not change my habits and used this tool.
Board manager: ATTiny core
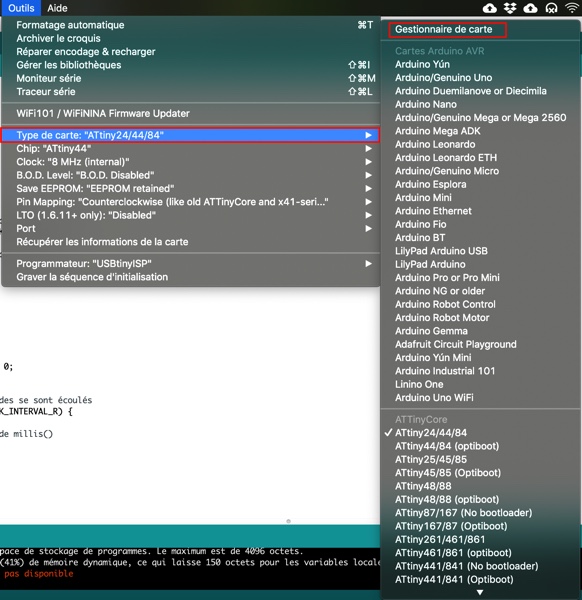
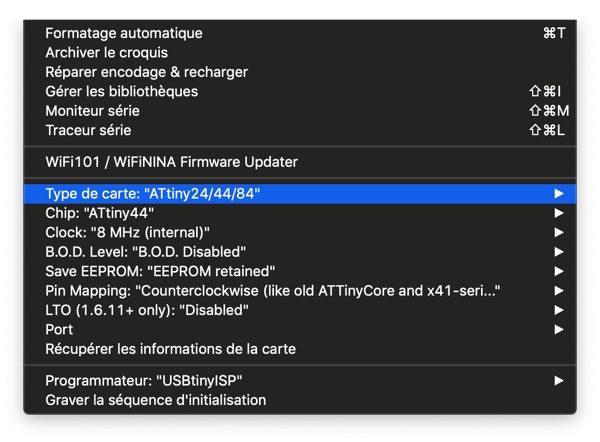
Some steps are needed before uploading a code to a microcontroller. Here are the ones I did for my hello echo board (with ATTiny44). I used the ATTiny core which offers many options to program ATTiny microcontroller.
| Use board manager | Install ATTiny core | Choose the right options |
|---|---|---|
 |
 |
 |
Set the options
- Choose the card type: here, ATTiny24/44/84
- Choose the chip: here ATTiny44
- Choose the clock: here, external 20Mhz
- Choose the pin mapping: here, Counter clockwise (note)
- Choose the good programmer: here, USBtinyISP
Counter clock clockwise
It is necessary to choose this option to use the alternative pinout
Burn bootloader
Before uploading for the first time it is necessary to burn the initialization sequence. This operation will configure the fuses of the microcontroller. It is also with this step that we will define if the microcontroller uses its internal clock or an external crystal.
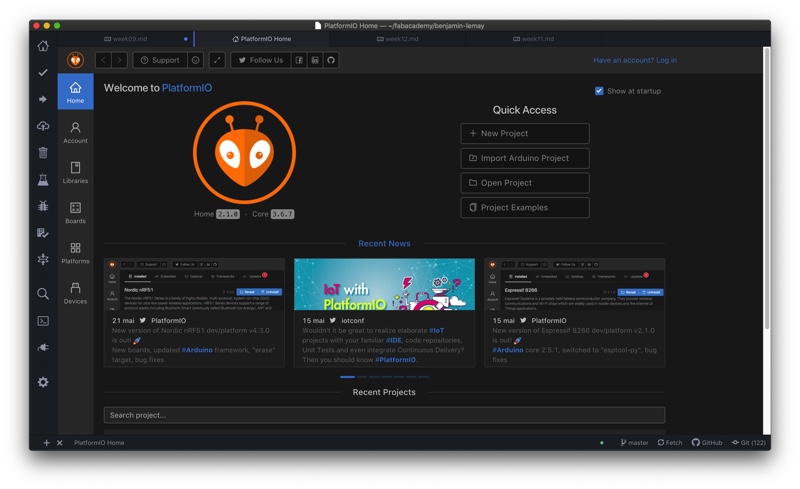
Program with Platformio IDE for Atom
Platformio is an open source environment for IoT development which runs with Atom or Vscode.
Platformio is multi-platform, support many boards, integrates many libraries, has a built-in terminal and serial port monitor.
Problem met with Platformio
The first time I used Platformio to program the ATTiny44 of my hello echo board I received a successful message. The program was supposed to turn on the led after 4 presses on the button, but nothing happens. My colleague Adrien who encountered the same problem found the answer to this problem. Platformio uses the alternative pinout by default with the ATTiny44. But when we try to program the ATTiny44 with Platformio we used the normal pinout. So the program was corectly uploaded on the microcontroller but with the wrong pinout !
Other important information for programming with Platformio
Platformio.ini file
In the root of the Platformio project there is a file named platformio.ini. This file contains the configuration informations as :
- the type of chip: platform = atmelavr
- the chip model: board = attiny44
- the operating framework: framework = arduino
- the programmer used: upload_protocol = usbtiny
- the clock used: board_build.f_cpu = 20000000L (20Mhz)
Bootloader
Before to use Platformio to program a microcontroller for the first time it’s necessary to burn the bootloader with the right option using Arduino IDE.
The code experimented on my Hello echo board
At La Machinerie we have an associative bar. We count the number of beers served on a piece of paper but often there are mistakes… I suggest to use an electronic counter to avoid mistakes. The principle is simple, every time a beer is served, we press the button. When a specific number is reached a LED will turn on to indicate that the beer keg will soon be empty.

This program turn on the led after 4 presses on the button:
const int  buttonPin = 8;
const int ledPin = 7;
#include <SoftwareSerial.h>

SoftwareSerial mySerial(0, 1); // RX, TX for ATtiny44 PA0 et PA1

int buttonPushCounter = 0;
int buttonState = 0;
int lastButtonState = 0;
// Variables will change during the program

void setup() {
  pinMode(buttonPin, INPUT_PULLUP);
 // set the pin 8 as INPUT
  pinMode(ledPin, OUTPUT);
 // set the pin 7 as OUTPUT
  mySerial.begin(9600);
 // Set the speed for the serial communication
}

void loop() {
  buttonState = digitalRead(buttonPin);
  // to read the current state of the push button and stores it in the variable "buttonState"

  if (buttonState != lastButtonState)
// to compare the current state of the push button to the previous stored state
  {

    if (buttonState == HIGH) {
      buttonPushCounter++;
 // if the state of the push button has changed and is HIGH, increment the count variable

      mySerial.println("PRESS HOLD");
      mySerial.println("PRESS HOLD NUMBER:  ");
      mySerial.println(buttonPushCounter, DEC);
// to send to the serial the push button number

    }
    else {
      mySerial.println("PAS D'APPUI");
    }
    lastButtonState = buttonState;
    // to store the current button state
  }

  if (buttonPushCounter % 4 == 0) {
    digitalWrite(ledPin, HIGH);
    // turn on the LED every 4 push button
  }
  else {
   digitalWrite(ledPin, LOW);
   // turn off the LED
  }

}
What I would have liked to learn
I would have liked to learn more about C ++ programming and especially about bitwise operation and analogue-to-digital conversion. It’s a method that Neil uses a lot in his codes, but it’s pretty obscure for me.
Downloads
My Hello.echo.board Eagle Schematic
Links
AVR analogue-to-digital conversion (french)
C++ operation (french)