Week 19: Project development
Learning outcomes:
Evaluate project plan
Apply time management techniques
Summarise and communicate the essence of a project
Project Plan Evaluation
My idea was to build an assistant device to measure the indoor air quality, to navigate people to an energy efficient heating and ventilating behaviour and at the same time to clean indoor air. This lead me to the name of the device "naviGAirE" which means "navigation to good air (quality) and energy efficiency".It was important for me to make the information easy readable throught coloured lights and changing shapes of the device.
Project Plan and Time Management
At the beginning of the design process of naviGAirE I had to develop a plan of the electronic architecture including the sensors, actors I wanted to use, motor driver, main MCU and conection device. I planed to test each sensor and to proof the reaction time of the sensor and to calibrate them. I also wanted to program the sensors one by one.At the same time I changed the design Idea of the casing from the sun shape over air foil to the final shape of surf board.
Afterwards I wanted to start to develop the 3D design and mechanichs of naviGAirE. Then I wanted to programm the whole network and graphical user interface with data logging charts.
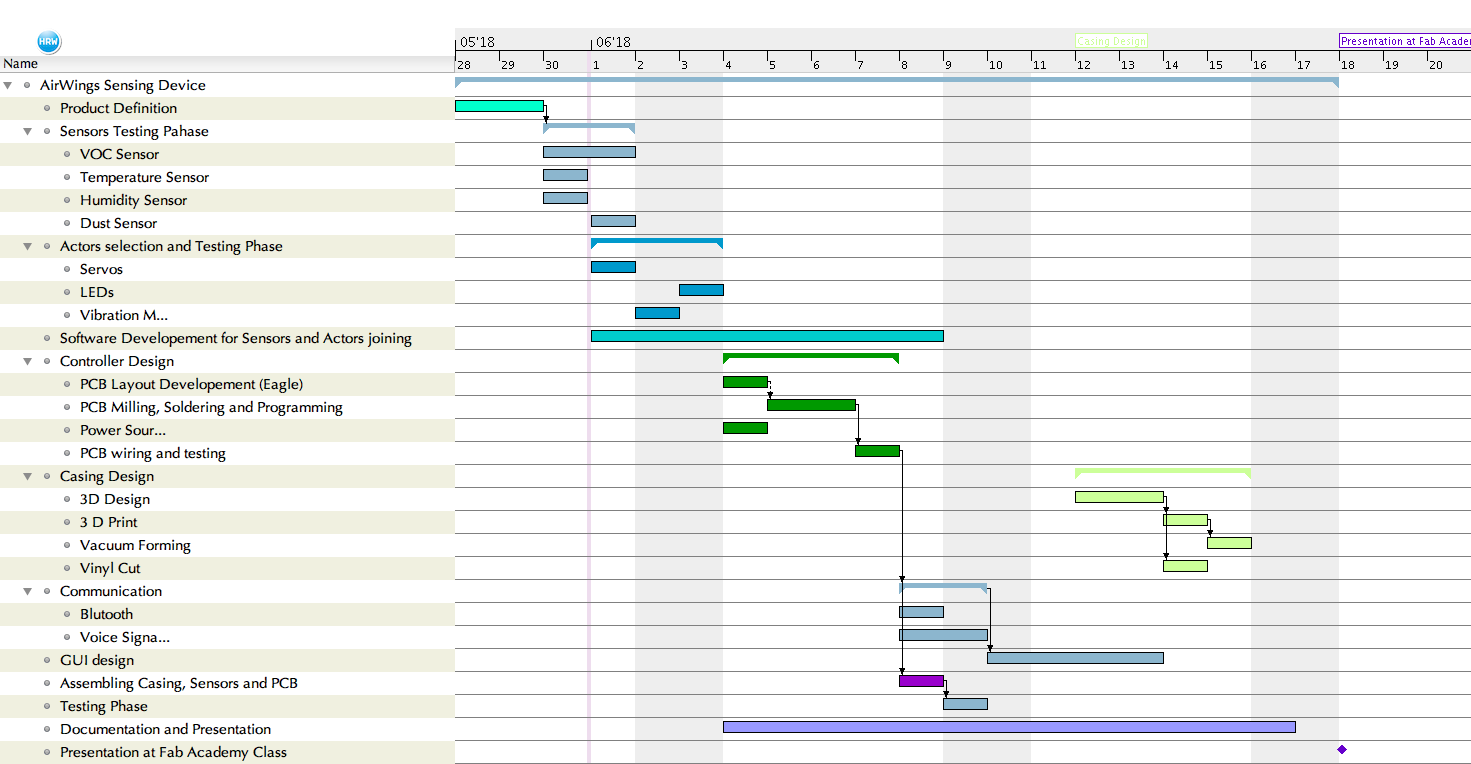
Following chart shows the Gant diagramm which I made at the behinning of the Final project time managemant as I taught that I would have about three weeks time for that.
What is the deadline? How much time do I have left?
Very soon I realised that my nice time management plan would not work. I had to do the update of my 18 weekly assignments. This needed about two weeks. After that I was very sad as I ralised that I would only have one week time for my final project... I did not know how everything works about deadlines of Fab Academy. That is why my final project became a catastrophy....After my bad presenstation I planed to mill a brand new board including power adaptor, FTDI chip and also the stepper motor driver. For this I needed help from someone who has more experience concerning the elctronics design than I do. Christoph Niess gave me many tips how to implement FTDI or which power connection to choose. But on that day as I planed to finish my layout design in Eagle, there was no one there to control if that is wright. So I had to switch to a small version of the board and to make only simple power divider including connectors for the sensors.
Today is Wednesday, 26th of Jun and we have normaly time until Friday 29th of Jun to complete the assignemments, the final documentation and the final product.
What tasks have been completed, and what tasks remain?
I have completetd documentation for almost all weeks excepting the correcture of the week 4, Embeded programming. Here I started to make a new programmer and I have milled it. Now I am going to solder it and hope to programm it.Concerning my final project I am not completly finished with my documentation. Here I wanted to finish it on Thursday or Friday.
I am not so happy with the solution of separate ATmega board and power devider board. I think it would be better to mill a completly new board including the power adaptor and FTDI chip as I allready purchased it. I hope to do this in next week too.
How will I complete the remaining tasks in time?
As there is not so much to do (soldering and programming the programmer, completing the the documentation and checking the VOC data callculation) I think that I am going to make it until Friday 29th of June.What has worked? What hasn't?
The connecting of the temperature sensor to the board and rading the data had worked. Als the callibration of the VOC (HCHO) sensor worked well. The VOC sensor data callculation is not working well. The value is not changing as fast as it should. I have to read up on this callculation too. Integration of the LED and stepper motor also worked very well. The only problem with the steper motor is that I did not programm the interrupts jet. That is why the motor is getting hot even if it does not work. This is not so good for the MCU and the sensors which are placed not so far from it.3D Printing was very difficult as the printer slicer software chrashed often and the printing prozess stopped. One day the printers did not want to print at all. There was an red area besides my object and I lost one day trying to find out why.
I have missed a milling machine, which I could have used for the casing in combination with vacuum forming or casting.
The connection between Eagle and Fusion 360 is very nice option. But it does not work very well. At least I could import the Eagle Board to Fusion 360 file and to use the dimensions of the board for my design.
It was very nice to design the screw therads where I placed my ATmega board and to connect it with it. I was so happy that it worked so well!
It was also such great fun for me making the sail move using stepper motor and the gear wheels as a drive mechanism.
What questions still need to be resolved?
I tought also about further funcionality of my final project. At this moment it is just at the beginnig of the design process. Acctually I planed to connect it with other sensors from different rooms and to collect the indoor air quality and temperature data of all rooms. I also planed to detect the state of the window opening what should prevent heatt energy losses.This is something I would like very much to ralise in next time. I would like to add data logging and data evaluation to. Nice GUI should be also available to have an overwiev at the logging data from the past. Further on it should make a forcast of the efficient energy consumption and to give the user the opportunity to change the airing behaviour in this direction.
What have you learned?
I have learned so much during last 6 months. Each week I learned something new because I did not have experience with any of the toppics before. It was great fun to see if something was working after preparing it for some days.I have learned:
- how to make my web site
- how to use version contoll platform as Git Lab
- how to use 2d and 3d design software
- how use laser cutter and transform 2d part into 3d objects
- how to use 3 d printer for the prototyping
- how to design, produce and prgramm a circuit board which cann control almost anything
- how to mill something big out of wood using big milling machine
- how to make almost any shape using milling machine to make a mold and how to cast a shape with it
- how to read digital and analog devices data an to show tha logging data in tha chart
- how to move something or tho light it up using motor or LED
- how to connect to an electronic device wirelessly
- how to make machine which could make another machines and finaly
- how to document everything properly :) (for this I would like to thank Aleksandra Konopek for her structure making energy which she patiently shared with me) so any one cann use this acknowlage later on if needed.
I am so tankfull to became the oprotunity to take part on Fab Academy. For this I would like esspeciallt to thank to Marcel Kellner and Florian Papproth, who had the Idea bringing me to this project.
Fab Academy is such a great idea to spread those skills all over the world. I would like to give some of those things I have learned, back to the community, to teach other people tings I have learned and to help making world a better place.