Assignments
1. Principles and practices
2. Project management
3. Computer Aided design
4. Computer controlled cutting
5. Electronics production
6. 3D Scanning and printing
7. Electronics design
8. Computer controlled machining
9. Embedded programming
10. Mechanical Design
11. Input devices
12. Molding and Casting
13. Output devices
14. Networking and communications
15. Interface and application programming
16. Wildcard week
17. Applications and implications
18. Invention, intellectual property and income
19. Project development
2. Project management
This week I worked on my project management.How I cope with Git
To be honest, despite thinking Git as being rather important, I despise it. Why? It's annoying and I tend to forget all of the commands. That's why I like to use Git integration in IDEs (integrated development environment). I'm using Visual Studio Code right now because it's very customizable. I'll explain this in the next chapter.First of all, I'll explain what Git exactly is and how I use it.
By far the most widely used modern version control system in the world today is Git. Git is a well-engineered, actively maintained open source project originally developed in 2005 by Linus Torvalds, the famous developer of the Linux operating system kernel. A dizzying number of software projects rely on Git for version control, including commercial and open source projects alike. Job-seeking software developers include many who are familiar with Git, and Git combines well with a wide range of operating systems and IDEs.
With its distributed architecture, Git is an example of a DVCS (Distributed Version Control System). Instead of the full version history of the software residing in a single location, as was common in previously popular version control systems such as CVS or Subversion (also known as SVN), in Git each developer's working copy is also a repository containing the full history of all changes.
See? Git is very important. What would we do without version control? Think of all the salty tears developers left in the past on their keyboard after their computer crashed. I'm glad we don't have to deal with that in this course. Now I'm going to show you how you clone your Git repository into your IDE (in this case Visual Studio Code).
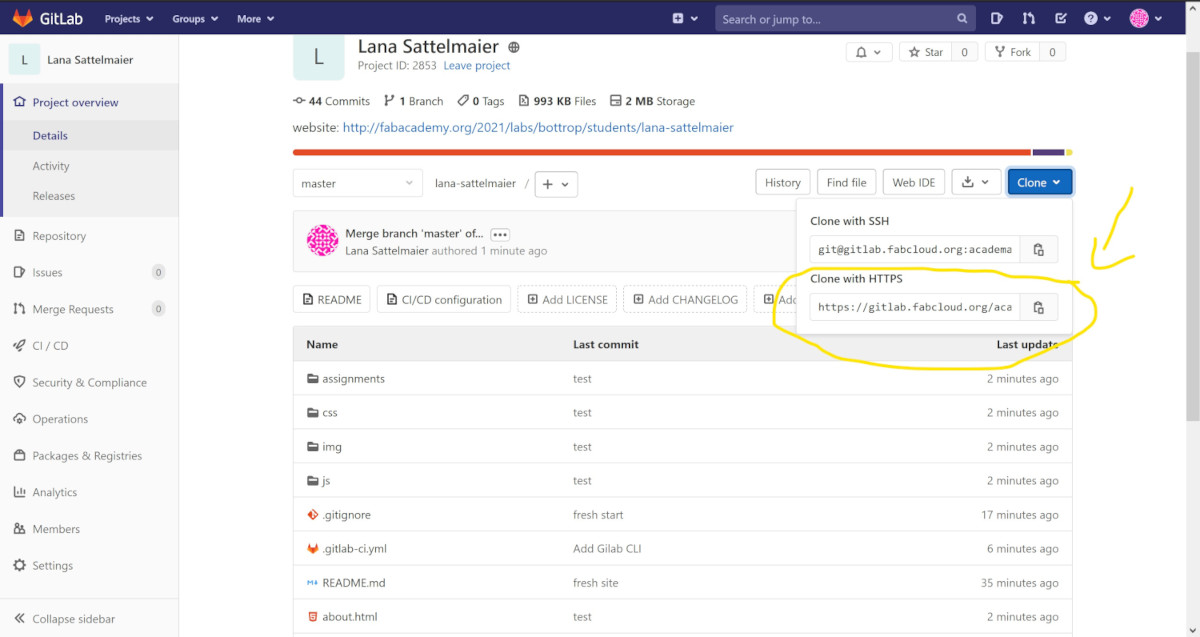
This is how your repository should look. On the right side (see above yellow circle) you'll see the button "clone". Yes, this is the one which helps you clone your repository when you click it. I usually copy the https url. Look at the next pic to see what we do with it.
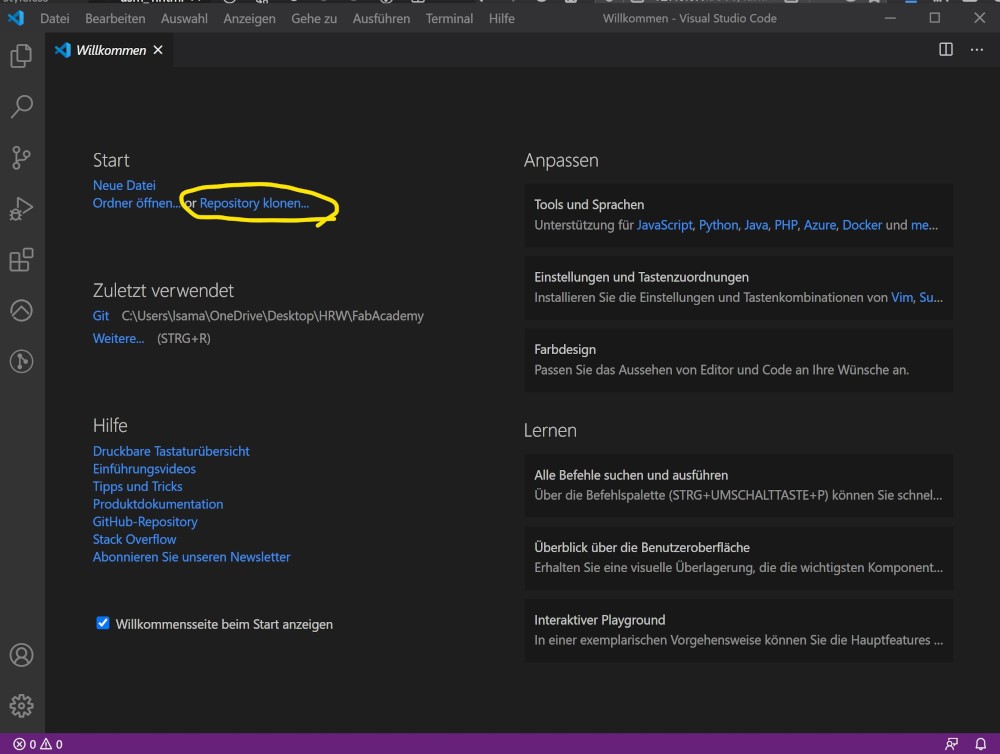
If you open your Visual Studio Code you'll see a fresh page and this is where your url comes into play. Click on "clone repository" (see pic) and the program will tell you what you have to do. First, paste the url into the newly opened line, and then the IDE will ask you for your username and password (those are the same as the ones from your Git- platform). After doing that, your IDE will ask you in which folder it should put your repository content in. You can make a new folder and select it. You're done!
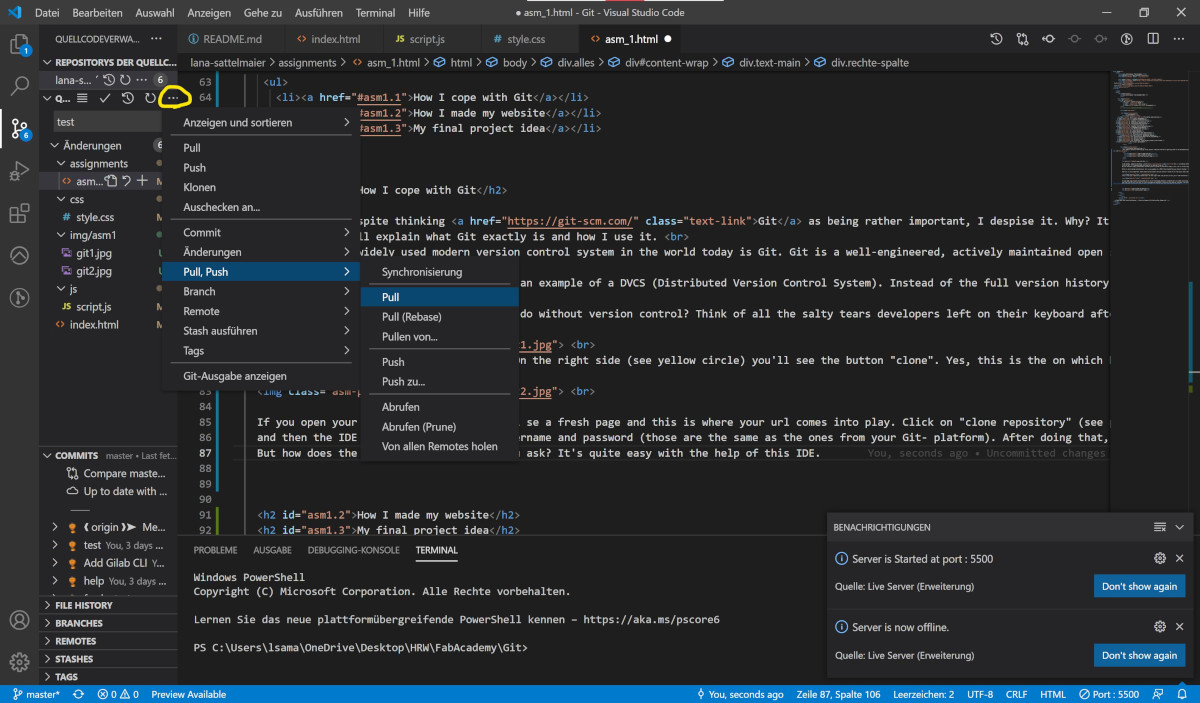
But how does the version control work, you ask? It's quite easy with the help of this IDE.
Well, before you'd do anything, you should always "pull" first from your repository. This is to make sure you don't overwrite important files.
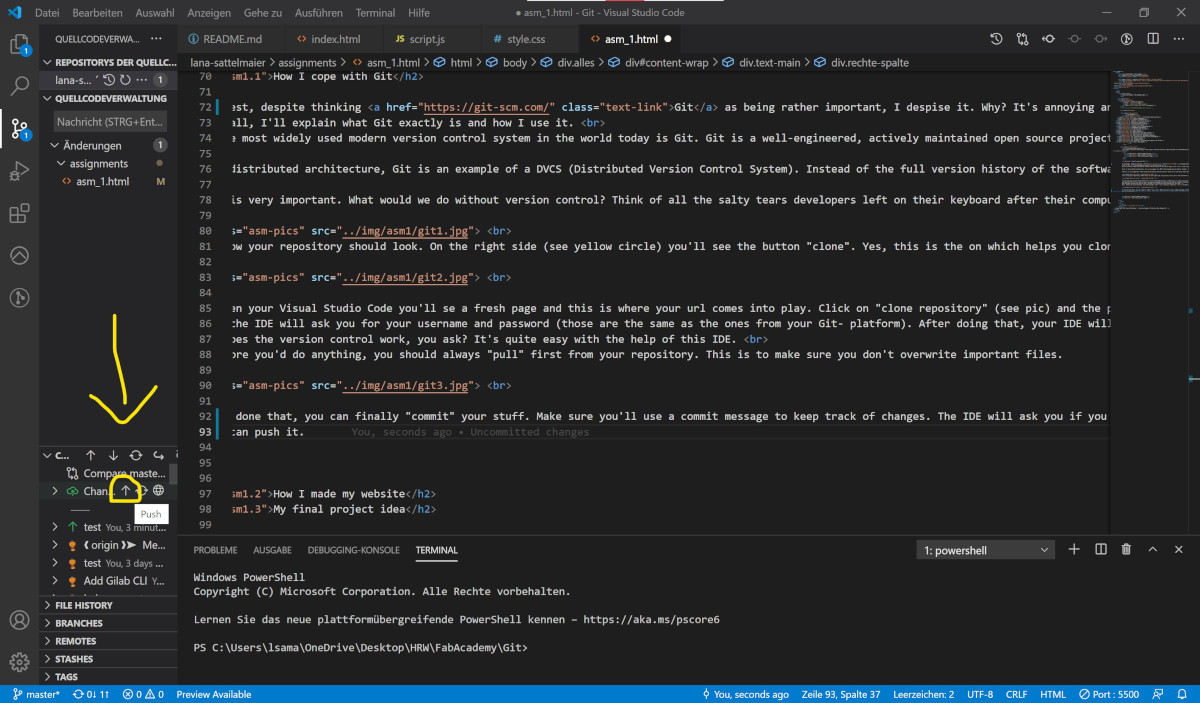
If you've done that, you can finally "commit" your stuff. Make sure you'll use a commit message to keep track of changes. The IDE will ask you if you should save everything before committing. I usually say "yes" to that.

Now, you can push it. Done! Your changes should be visible in your repository.
Cloning with SSH
I already knew what SSH was, but I was lazy to be honest. SSH cloning takes a lot longer than HTTPS but it's easier in the long run. You don't need your credentials for every time you want to push something.
With HTTPS it's simpler to access a repository from anywhere as you only need your account details to write to the repository, that's why I chose this before. However, if you like to set up an SSH, I'll show you how.
Here are the steps:
- 1. Open your terminal as administrator
- 2. Type ssh-keygen -t rsa -b 4096 -C "my_adress@example.com"
"rsa 4096" determines the encryption here, authentication is done via your mail address specified at GitHub. Now follow the instructions in the terminal: First, specify a name for the keys. It is best to leave it at the path "~/.ssh" and the name pattern with "rsa.pub" in it to keep it clear. Then assign a password of your choice. However, both steps are optional, you can also use the default filename and omit a password to save a little work.
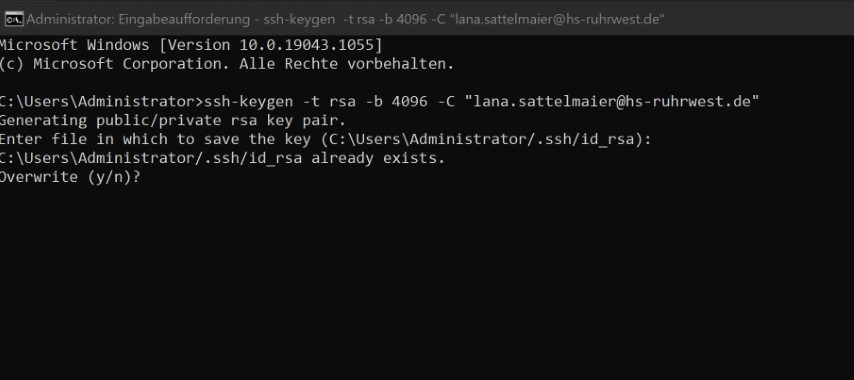
This is what I did when I redid it, of course it's telling me that I already have my file. But it doesn't matter, your console tells you when your key is generated.
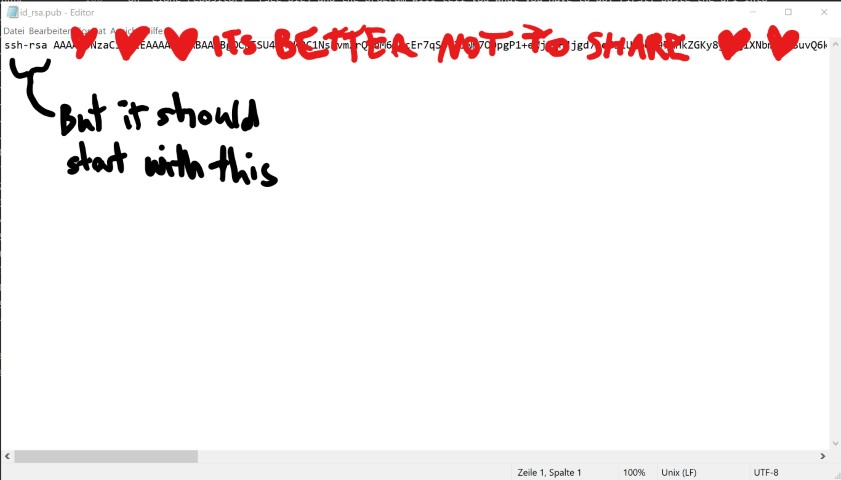
- 3. Copy your SSH Key into Git
Navigate to your saved file. For me it's in the folder ...users/myname/.ssh and the key is in the pub file.
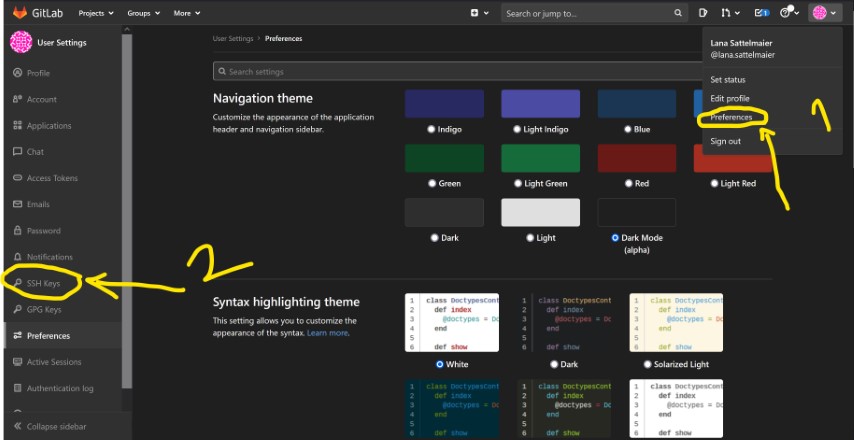
Now find your user settings in GitLab, here's a little help:
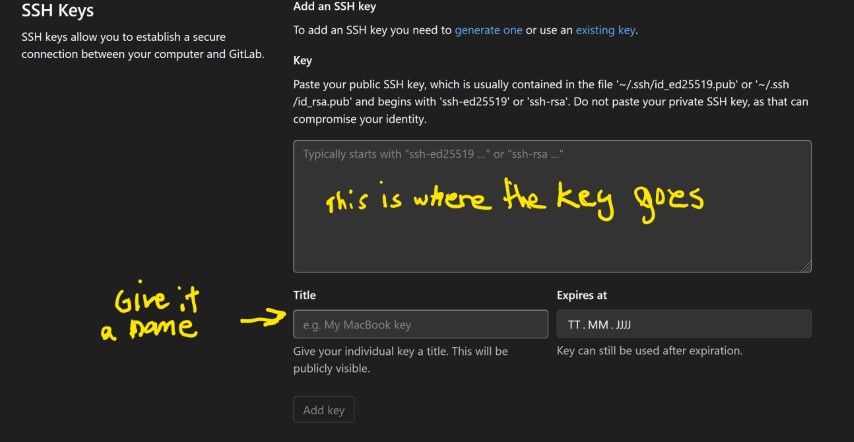
Now paste everything from the .pub file into this little window:
- 4. Clone using SSH
Same steps as before in HTTPS, you just use the different link ("Clone with SSH").
How I made my website
First, let's talk about Visual Studio Code. Due to its extensions it's
really customizable and I use this especially in website development.
I like to use the extension "Live
Server" because with this I can see live in the browser what I'm doing via code.
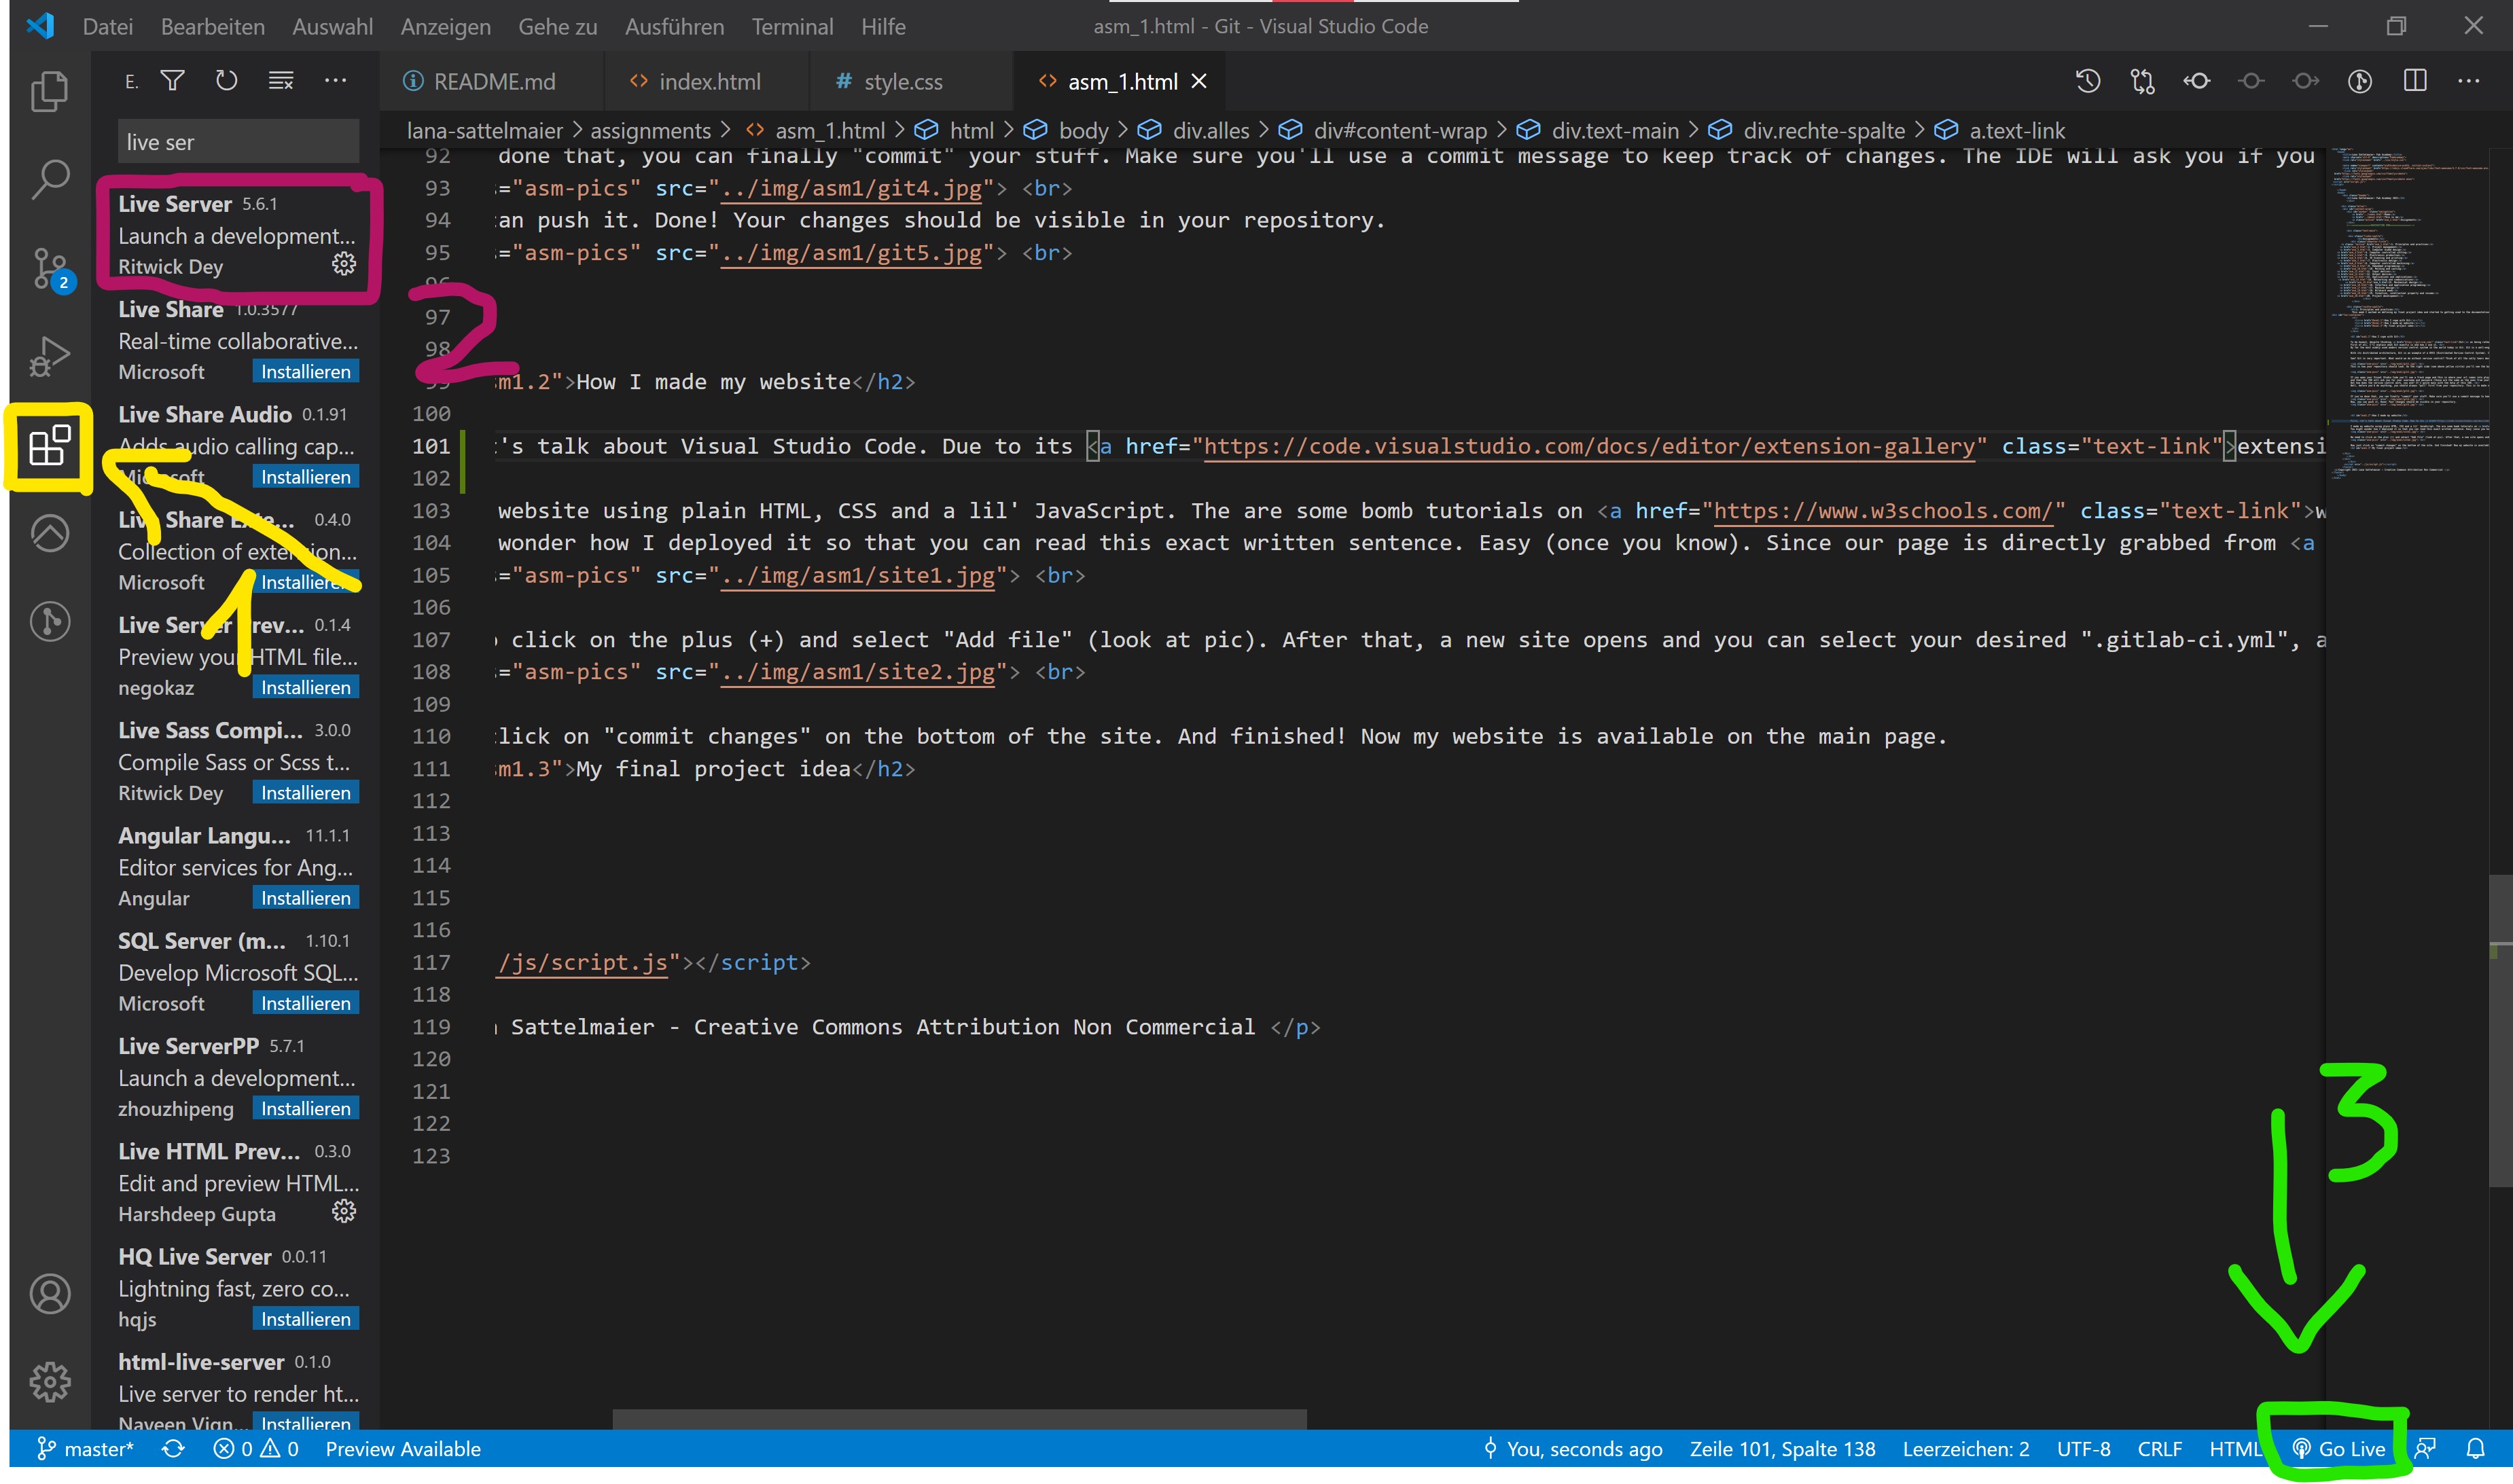
In the following pic you see how the extension system works. First you click on the extension button (1), then
you search for "live server" (or click my link above)(2) and after that, you can go live (3).
I made my website using plain HTML, CSS and a lil' JavaScript. The are some bomb tutorials on w3schools, I highly recommend it.
Right now my page is quite simple structured, I'll (hopefully) professionalize it as I go.
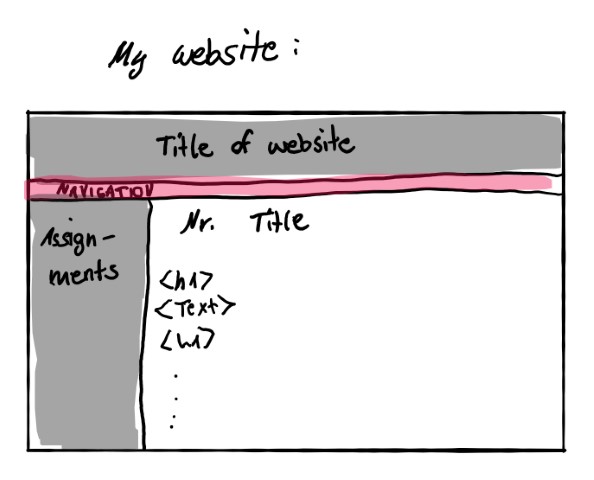
Well, here you can see my "plan", a wireframe if you like:
I first started to work on the "navbar", and it looked like this:
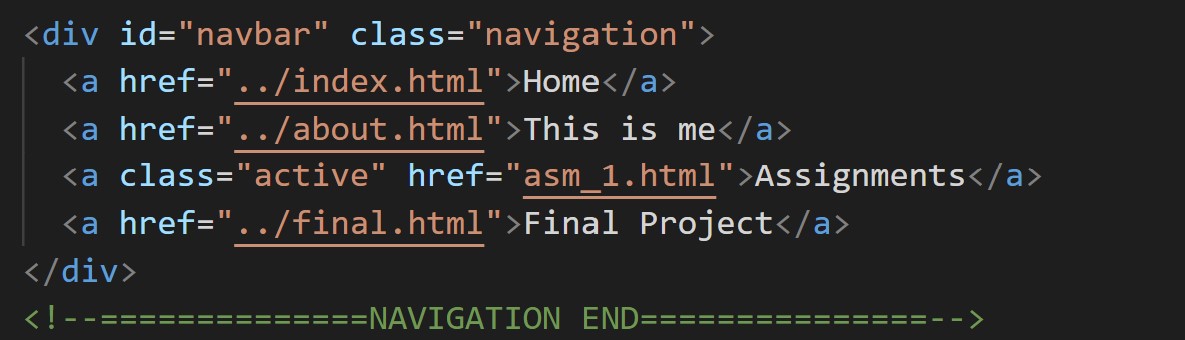
As you can see, I added the class "active" so that the user will know on which site they are. I also like to use giant letters and symbols and put them in a comment to structure my code. If my code gets long, I tend to feel more easily lost.
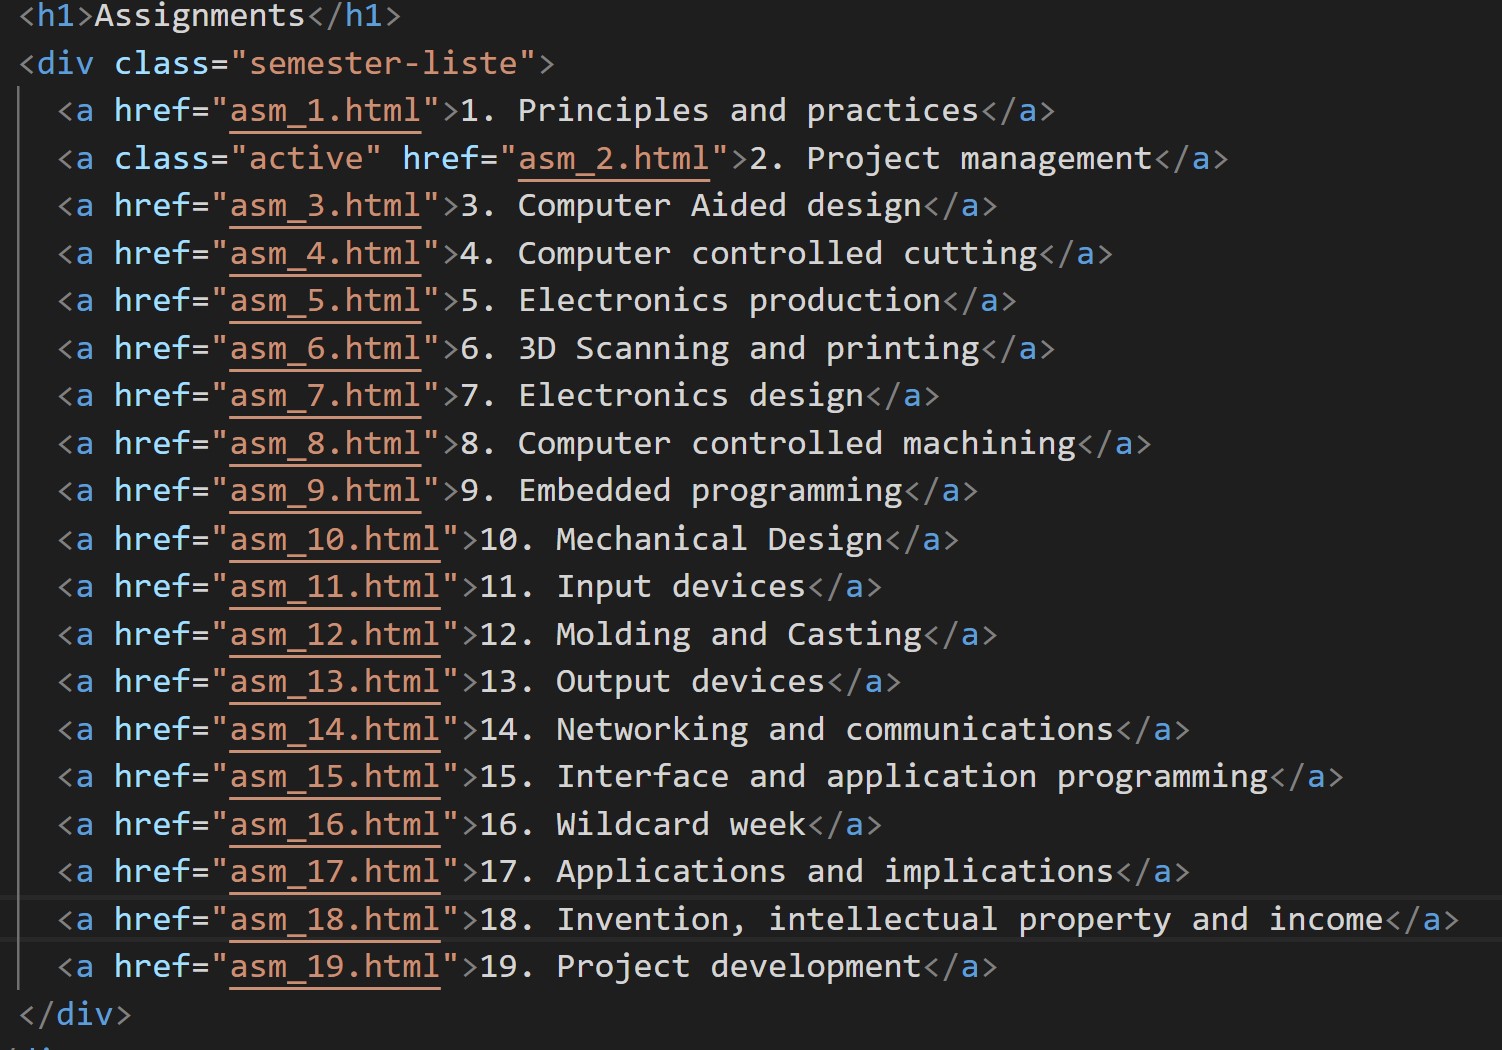
I did the same with my assignemt menu:
I decided to go against a wireframe because I didn't like any of the ones I found. I wanted a fully customizable website. At the end it was not a good idea because I had wayyyy less time than I thought I'd have.
However, it is very important for a DIY website to have structure everywhere. That's why it's also very important to have a folder structure which is easily understandable.
For me it was the following folders:
- assignments
- css
js
- downloads
And the main "index.html" plus the pages which can be seen in the navbar I put in the main folder.
You might wonder how I deployed it so that you can read this exact written sentence. Easy (once you know).
Since our page is directly grabbed from GitLab, we'll need a certain file.
This file is called ".gitlab-ci.yml" and you
can add it directly via GitLab.

We need to click on the plus (+) and select "Add file" (look at pic). After that, a new site opens and you can
select your desired ".gitlab-ci.yml", add a template --> we use HTML since we have a plain HTML site here.
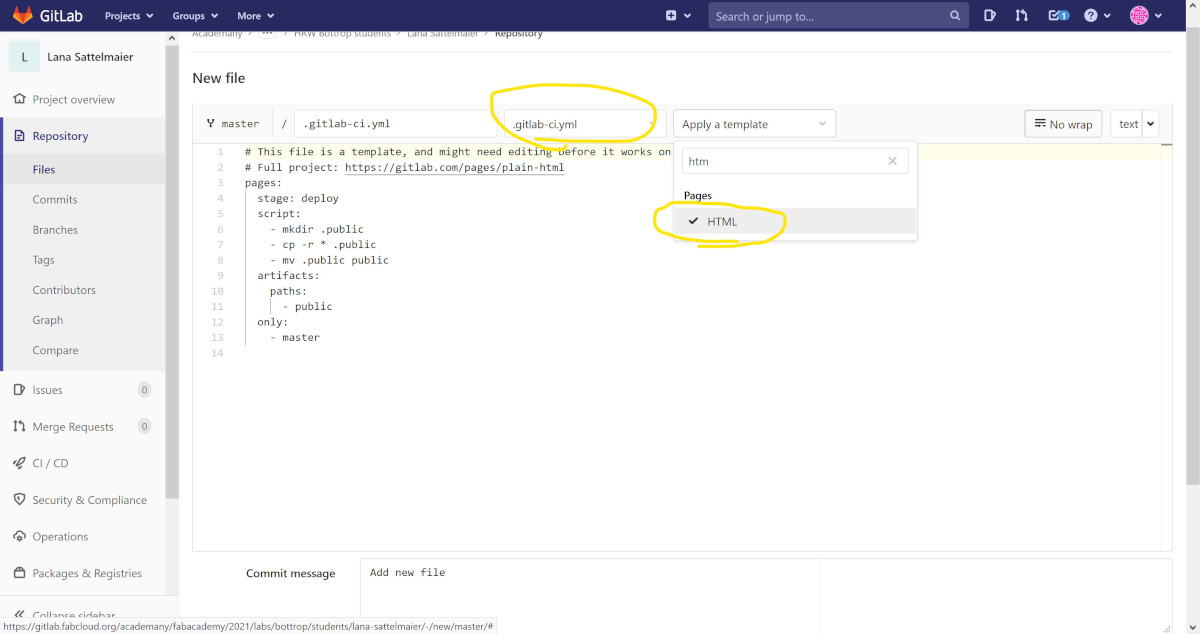
Now just click on "commit changes" on the bottom of the site. And finished! Now my website is available on the
main page.
Bits and pieces about my documentation
To write all of this, I'm using my brain and google. My
screenshots are made using Windows Ink (the pen icon which is integrated in the Windows 10 task bar), you can
find a tutorial here, but I think this program is self-explanatory.
My pics needed to be resized due to no infinite storage available on our GitLab page; I used GIMP for that. Simply open your desired pic and
click on the tool bar above image>resize image.
After that, you can make your pic smaller and change the resolution. I aim for 70ppi since I want my pictures
to stay readable. Just save your work and boom, your pic needs less storage!
This is what I did when I redid it, of course it's telling me that I already have my file. But it doesn't matter, your console tells you when your key is generated.
Now find your user settings in GitLab, here's a little help:
Now paste everything from the .pub file into this little window: