Exercise, Week 09 - Input Devices
This is week topic is on input devices using different sensor.
Group Assignment - Probe an input device(s)'s analog and digital signals.
This
is a group assignment done with Ting Kok Eng and Noel Kristian.
Our collective work is documented on the SP Fablab Website Assignment 7 - Input Devices and
hence only my learning and reflections are documented here.
The sensors used are;
1. Ultrasonic sensor HC-SR04 that produces digital signal (3).
2. Temperature/humidity sensor DHT-11 that produces digital signal (9).
3. Light Dependant Resistor (LDR) that produces analog signal (10). No programming is required when measuring this sensor.
Individual Assignment
I had designed and fabricated an ATtiny44 board interface with an Ultrasonic Ranging Module HC-SR04C. I will programmed the ATtiny44 board to read the distance measured by this input device.
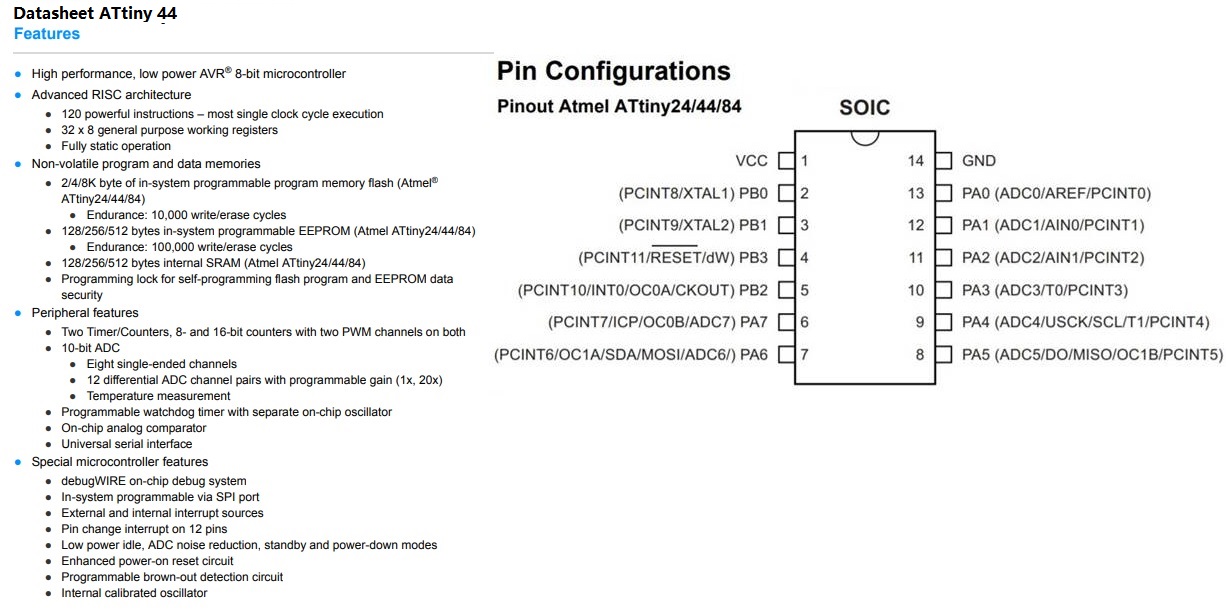
ATtiny44 Microcontroller
ATtiny44 is a high-performance, low-power Microchip AVR RISC-based CMOS 8-bit microcontroller combines 4KB ISP flash memory, 256-Byte EEPROM, 256B SRAM, 12 general purpose I/O lines, 32 general purpose working registers, an 8-bit timer/counter with two PWM channels, a 16-bit timer/counter with two PWM channels, internal and external interrupts, an 8-channel 10-bit A/D converter, a programmable gain stage (1x, 20x) for 12 differential ADC channel pairs, programmable watchdog timer with internal oscillator, a internal calibrated oscillator, and three software selectable power saving modes. By executing powerful instructions in a single clock cycle, the device achieves throughputs approaching 1 MIPS per MHz, balancing power consumption and processing speed (1) (2).
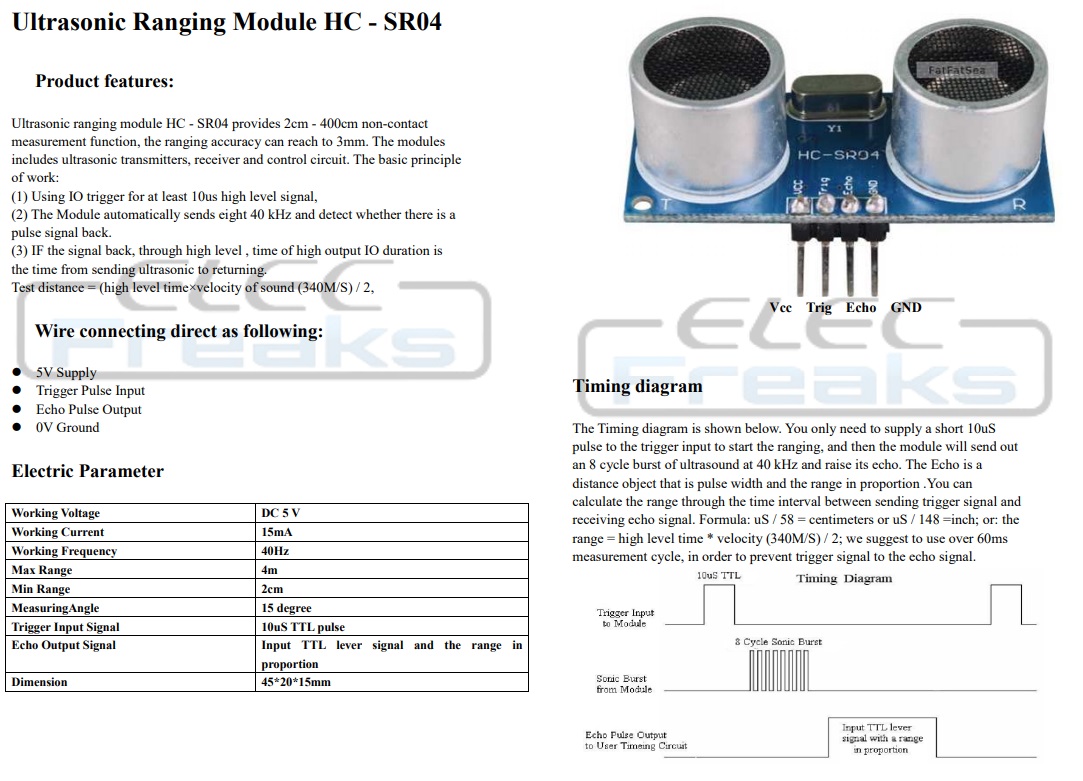
Ultrasonic Ranging Module HC-SR04C and how it works
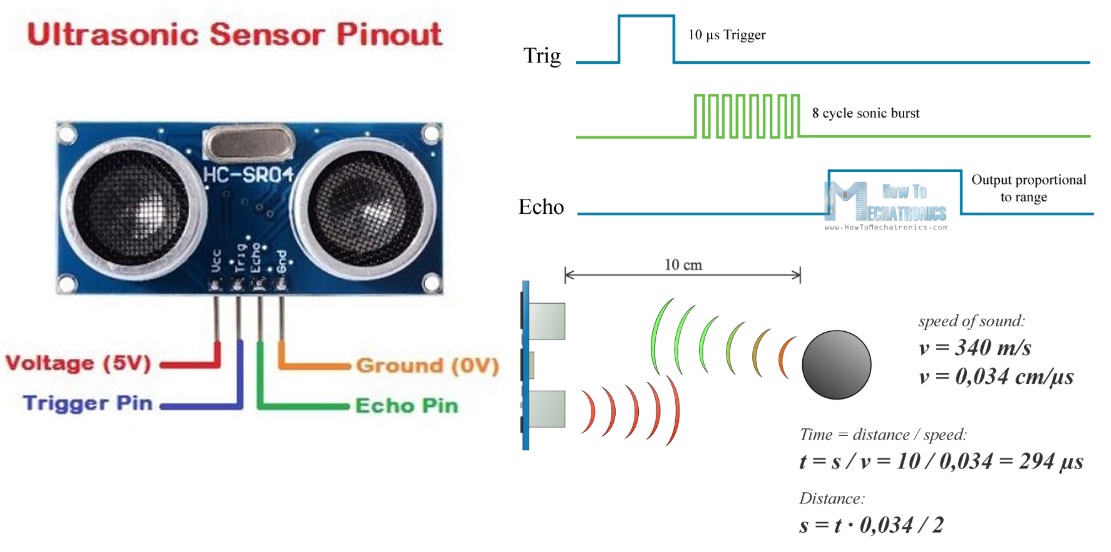
The sensor used is an input device with control circuit that can transmit an ultrasound at 40 KHz which travels through the air and if there is an object or obstacle on its path It will bounce back to the module. Considering the travel time and the speed of the sound (0.034 cm/μs ) we can calculate the distance of an object or obstacle at distance from 2cm to 400cm.
TEST DISTANCE = HIGH LEVEL TIME x VELOCITY OF SOUND / 2
More information about Ultrasonic sensor working principle are shown below (3)(4)(5).
Using Eagle to design ATtiny44 Board
After understanding ATtiny44 and Ultrasonic Ranging Module HC-SR04C, next
is to design and fabricate my ATtiny44 Board using Eagle and STEPCRAFT.
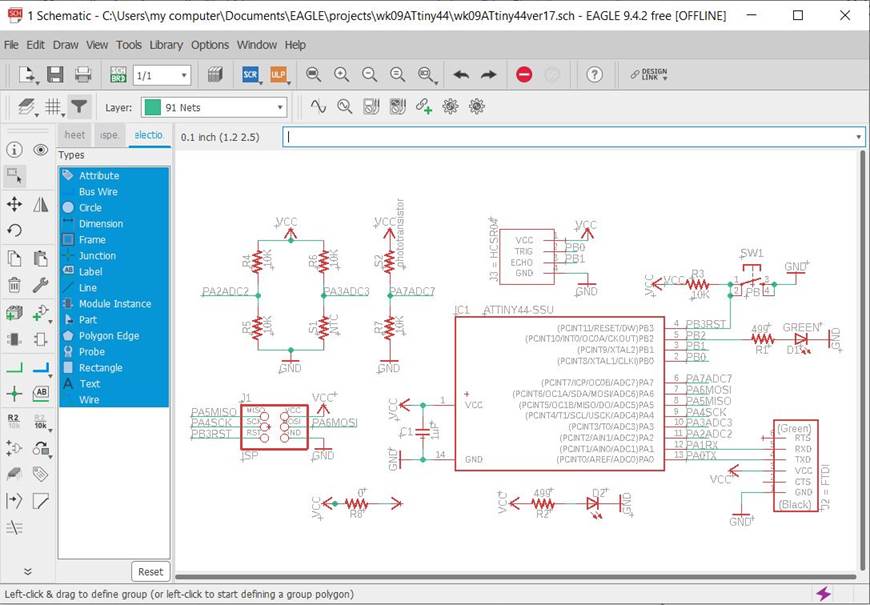
Created this schematics for my ATtiny44 boards using Eagle. No ERC error for schematics. Please refer to Electronics Design to understand the design process of creating a schematics using Eagle.
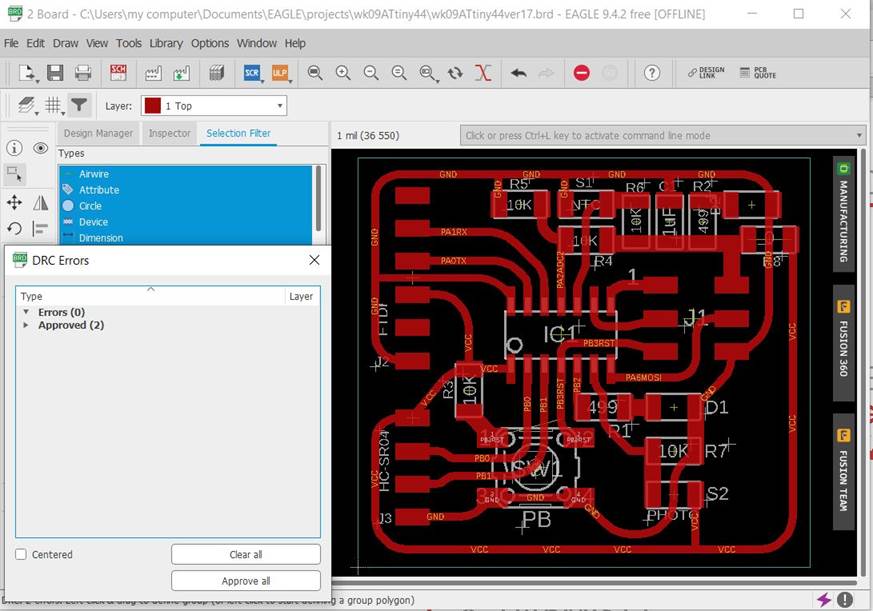
Created this PCB for my ATtiny44 board using Eagle. No error for my PCB design. Please refer to Electronics Design to understand the design process of creating a PCB using Eagle.
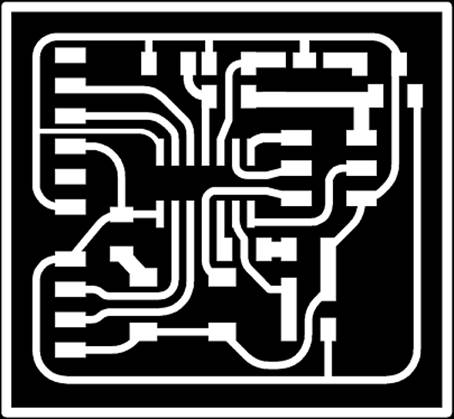
Ready to fabricate my PCB for ATtiny44 board. First, I used Mods to generate the G-code for my ATtiny44 board. Please refer to Electronics Production to understand how to use Mods to generate the G-code (8).
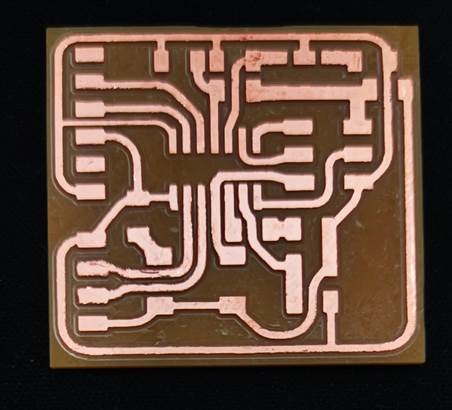
Next, I used a STEPCRAFT (CNC machine) to fabricate my ATtiny44 board. This is the PCB fabricated using STEPCRAFT. Please refer to Electronics Production to understand how to use STEPCRAFT (8).
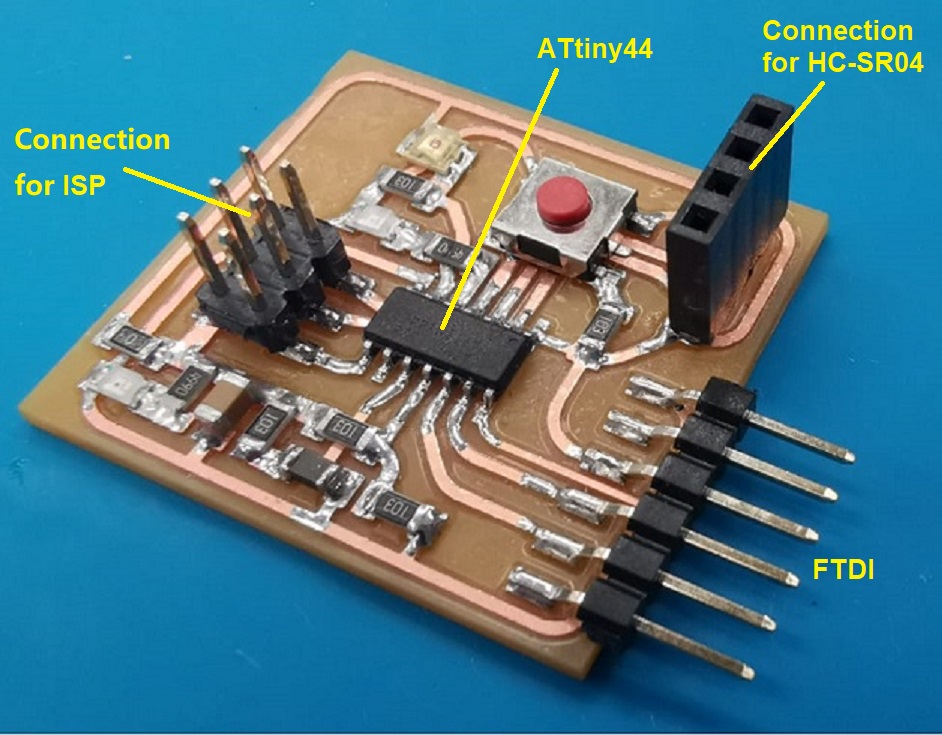
Components on ATtiny44 Board, and the Connections for ATtiny44 Board to Ultrasonic Ranging Module HC-SR04C.
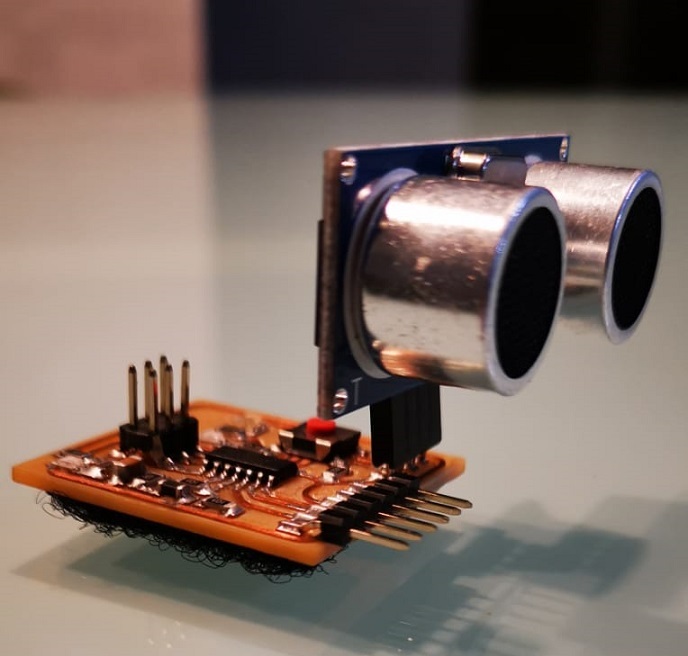
This is the assembled PCB for my ATtiny44 board, and is connected an Ultrasonic Ranging Module HC-SR04C. Ready to use Audrino IDE to program the ATtiny44 board with Ultrasonic Ranging Module HC-SR04C.
1. Attiny44 PB0 (equivalent to Audrino pin 10) is connected to Trigger pin on Ultrasonic Ranging Module HC-SR04C.
2. Attiny44 PB1 (equivalent to Audrino pin 9) is connected to Echo pin on Ultrasonic Ranging Module HC-SR04C.
3. ATtiny44 VCC is connected to VCC pin on Ultrasonic Ranging Module HC-SR04C.
4. Attiny44 GND is connected to GND pin on Ultrasonic Ranging Module HC-SR04C.
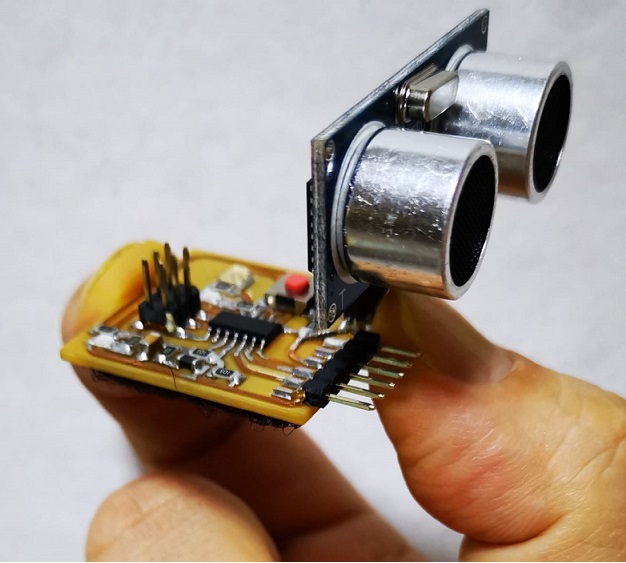
Connected an Ultrasonic Ranging Module HC-SR04C onto my ATtiny44 board, now hardware is ready for programming.
Using Audrino IDE to program ATtiny44 board with Ultrasonic Ranging Module HC-SR04C
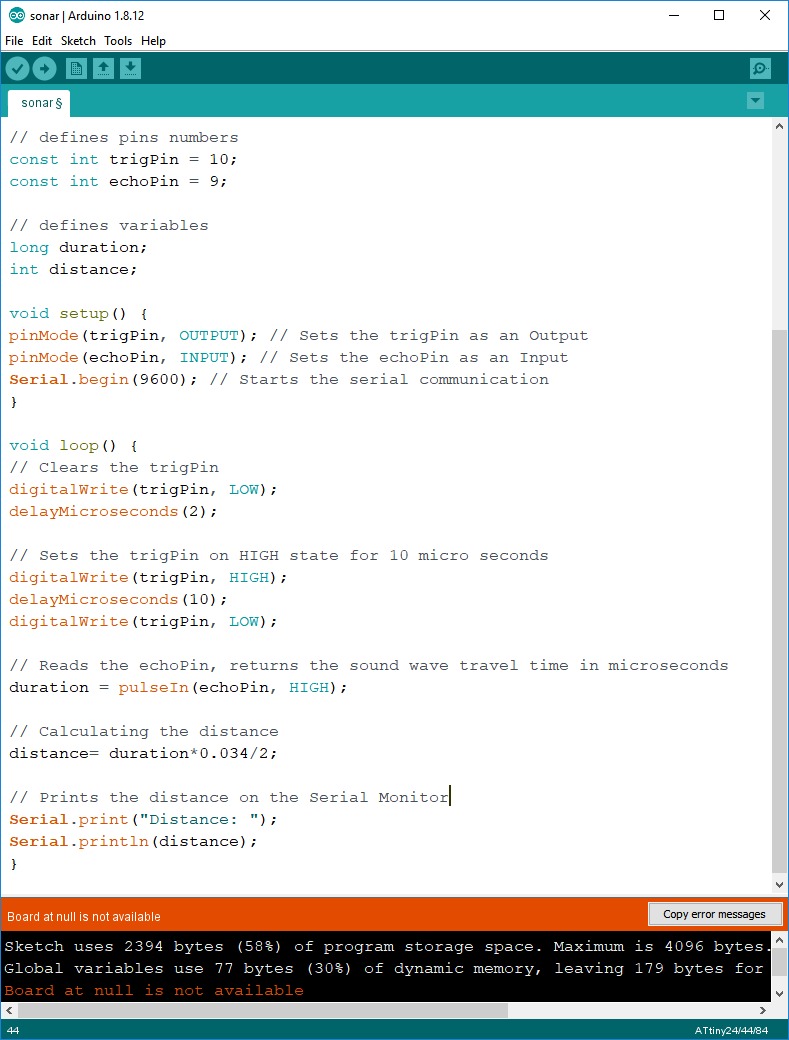
This is a program code for Arduino UNO to communicate with a computer using a hardware serial and displaying the computed distance of an object or obstacle using an Ultrasonic Ranging Module HC-SR04C (5).
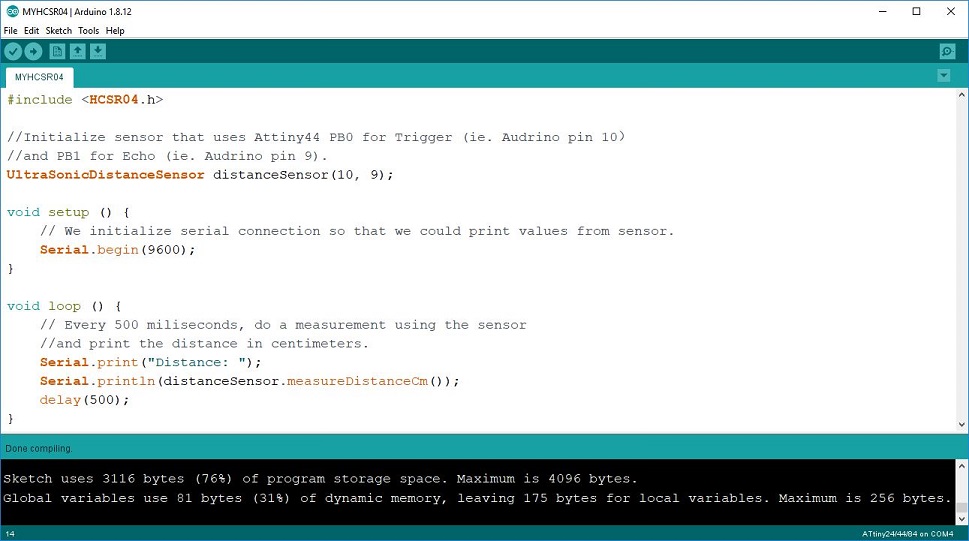
I had downloaded an Audrino library (HCSR04.h (6)) for my ATtiny44 board to communicate with a computer using a software serial and displaying the computed distance of an object or obstacle using an Ultrasonic Ranging Module HC-SR04C. And, software serial will reduced the memory size required on my ATtiny 44 board.
Description of Arduino Program Code
1. Initialized triggerPin and echoPin at "UltraSonicDistance distance (10, 9)" that uses ATtiny44 PB0 for sensor Trigger to Audrino pins 10, and ATtiny44 PB1 for sensor Echo to Audrino pin 9, refer to the diagram below for the pins used (7).
2. Define the triggerPin as an output pin "pinMode(triggerPin, OUTPUT)", and the echoPin as an input pin "pinMode(echoPin, INPUT)". And also start the serial communication "Serial.begin(9600)" for showing the results on the serial monitor.
3. In the "measureDistanceCm()" the triggerPin is set on a LOW State for just 2 µs "digitalWrite(triggerPin, LOW)" to clear trigger pin.
4. To generate the Ultra sound wave which is the signal for sensor to measure distance, set the trigger pin on HIGH State "digitalWrite(triggerPin, HIGH)" for 10 µs "delayMicroseconds(10)". The module automatically send eight 40 Khz and detect whether there is a pulse signal back. Then, set the trigger pin on LOW State "digitalWrite(triggerPin, LOW)".
5. To measure the length of echo signal, which is equal to the time needed for Ultra sound wave to go there and back, "durationMicroSec = pulseIn(echoPin, HIGH)" will read the travel time and put that value into the variable “durationMicroSec”. This function has 2 parameters, the first one is the name of the echo pin and for the next one can write either HIGH or LOW. In this case, HIGH means that the pulsIn() function will wait for the pin to go HIGH caused by the bounced sound wave and it will start timing, then it will wait for the pin to go LOW when the sound wave will end which will stop the timing. At the end the function will return the length of the pulse in microseconds (5).
6. To get the distance we will multiply the duration "durationMicroSec" by 0.034 and divide it by 2. At the end we will print the value of the distance on the Serial Monitor "Serial.println(distanceSensor.measureDistanceCm())".
ATtiny44 Pins to Audrino Pins Equivalents
I had used ATtiny44 PB0 for sensor Trigger which is equivalent Audrino pins 10, and ATtiny44 PB1 for sensor Echo which is equivalent Audrino pin 9.

Testing the Ultrasonic Ranging Module HC-SR04C with ATtiny44 board
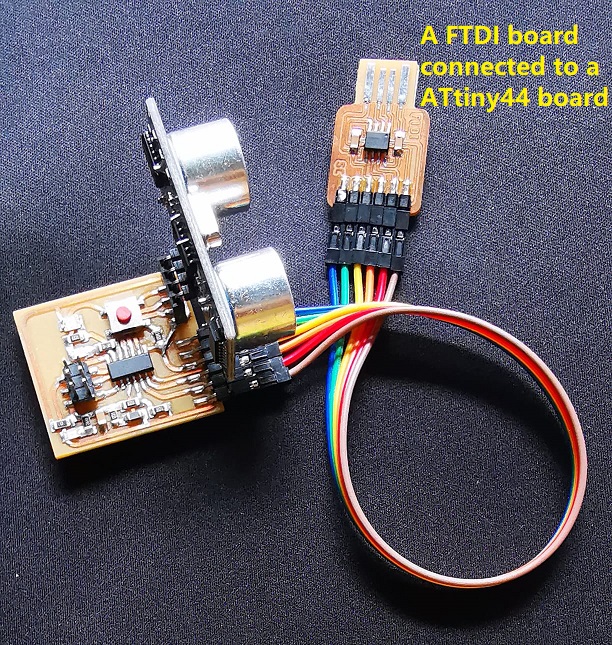
Using Audrino IDE to compile the program and uploaded it to my ATtiny44 board using an ISP prgrammer. Changed the connection to a FTDI board, then connect it to allow communication between ATtiny44 board and my computer.
In Audrino IDE, select the Port used for FTDI and launched Serial Monitor to display
the distance of an object or obstacle from the Ultrasonic Ranging Module HC-SR04C.
This is the video of my working Ultrasonic Ranging Module HC-SR04C using ATtiny 44 board.
Source Codes for ATtiny 45 Microcontroller
1. Schematics for my ATtiny44 boards using Eagle, right mouse click and save link: wk09ATtiny44.sch
2. PCB for my ATtiny44 board using Eagle, right mouse click and save link: wk09ATtiny44.brd
3. Control the communication between the Arduino UNO and a computer using a hardware serial and display the computed distance of an object or obstacle using an Ultrasonic Ranging Module HC-SR04C, right mouse click and save link: wk09sonar.ino
4. Control the communication between the Arduino UNO and a computer using a software serial and display the computed distance of an object or obstacle using an Ultrasonic Ranging Module HC-SR04C, right mouse click and save link: wk09MYHCSR04.ino
What I have learned:
1. Using software serial allows me to create a serial connection on any of the digital I/O pins on the Arduino.
2. Using software serial communication allows me to reduce memory usage.
3. Dark environments have no effect on an ultrasonic sensor’s detection ability. But will produce inaccurate data when the objects for detection have rough, irregular or small surface. Detection outside the measuring angle (15 degree) and curved items will also lead to inaccurate data issues.
5. Ultrasonic Ranging Module HC-SR04C measured distance on a flat surface is about 3 mm to 5 mm less than the physical measured distance.
Citation
(1)
Reference from URL on 26/04/2020: https://www.microchip.com/wwwproducts/en/ATtiny44
(2)
Reference from URL on 26/04/2020: http://ww1.microchip.com/downloads/en/devicedoc/Atmel-7701_Automotive-Microcontrollers-ATtiny24-44-84_Datasheet.pdf
(3)
Reference from URL on 26/04/2020: https://cdn.sparkfun.com/datasheets/Sensors/Proximity/HCSR04.pdf
(4)
Reference from URL on 26/04/2020: https://www.theengineeringprojects.com/2017/08/ultrasonic-sensor-arduino-interfacing.html
(5)
Reference from URL on 26/04/2020: https://howtomechatronics.com/tutorials/arduino/ultrasonic-sensor-hc-sr04/
(6)
Reference from URL on 26/04/2020: https://github.com/Martinsos/arduino-lib-hc-sr04/blob/master/examples/simple/simple.ino
(7)
Reference from URL on 26/04/2020: https://github.com/SpenceKonde/ATTinyCore/blob/master/avr/extras/ATtiny_x4.md
(8)
Reference from URL on 26/04/2020: http://fabacademy.org/2020/labs/singapore/students/gausiong-yeo/exercise04.html
(9)
Reference from URL on 26/04/2020: https://www.mouser.com/datasheet/2/758/DHT11-Technical-Data-Sheet-Translated-Version-1143054.pdf
(10)
Reference from URL on 26/04/2020: https://components101.com/sites/default/files/component_datasheet/LDR%20Datasheet.pdf