With my new Bueno Board board milled and soldered, I was able to play with Processing and arduino - sending the data collected live form Arduino to Processing and translated into a visualization of increase and decrease in collected data.
Having hooked up the bueno board to a soft touch sense potentiometer, and gotten readings from the serial monitor, and gotten my LED to be controlled by the live data being read from the soft touch potentiometer, I decided to move onto the next step - my interface.
The inital hope was to figure out how to hook Arduino to Pure Data or even Pure Data to Arduino, as I have a code that I made at University sometime ago - a self generating generative instrument, which I wanted to use the soft touch potentiometer to start to control or control an aspect of the instrument.
The Arduino to Pure Data code....
http://nf-interactive.blogspot.co.uk/2011/02/arduino-data-to-pure-data.htmlAnd the Pure Data to Arduino code...
http://nf-interactive.blogspot.co.uk/2011/02/pure-data-to-arduino.htmlI think the main problem here was not being able to see the images on their site as they are seeminly either blocked, no longer function or have been removed. I'm not entirely sure.
I also attempted to follow the code on the fab academy website "Pure Data to Arduino Over Serial" .
Unfortunetly this did not work out for me. I am not sure why this is though. I ran into my problems when trying to save the Pure Data document in the method instructed.....
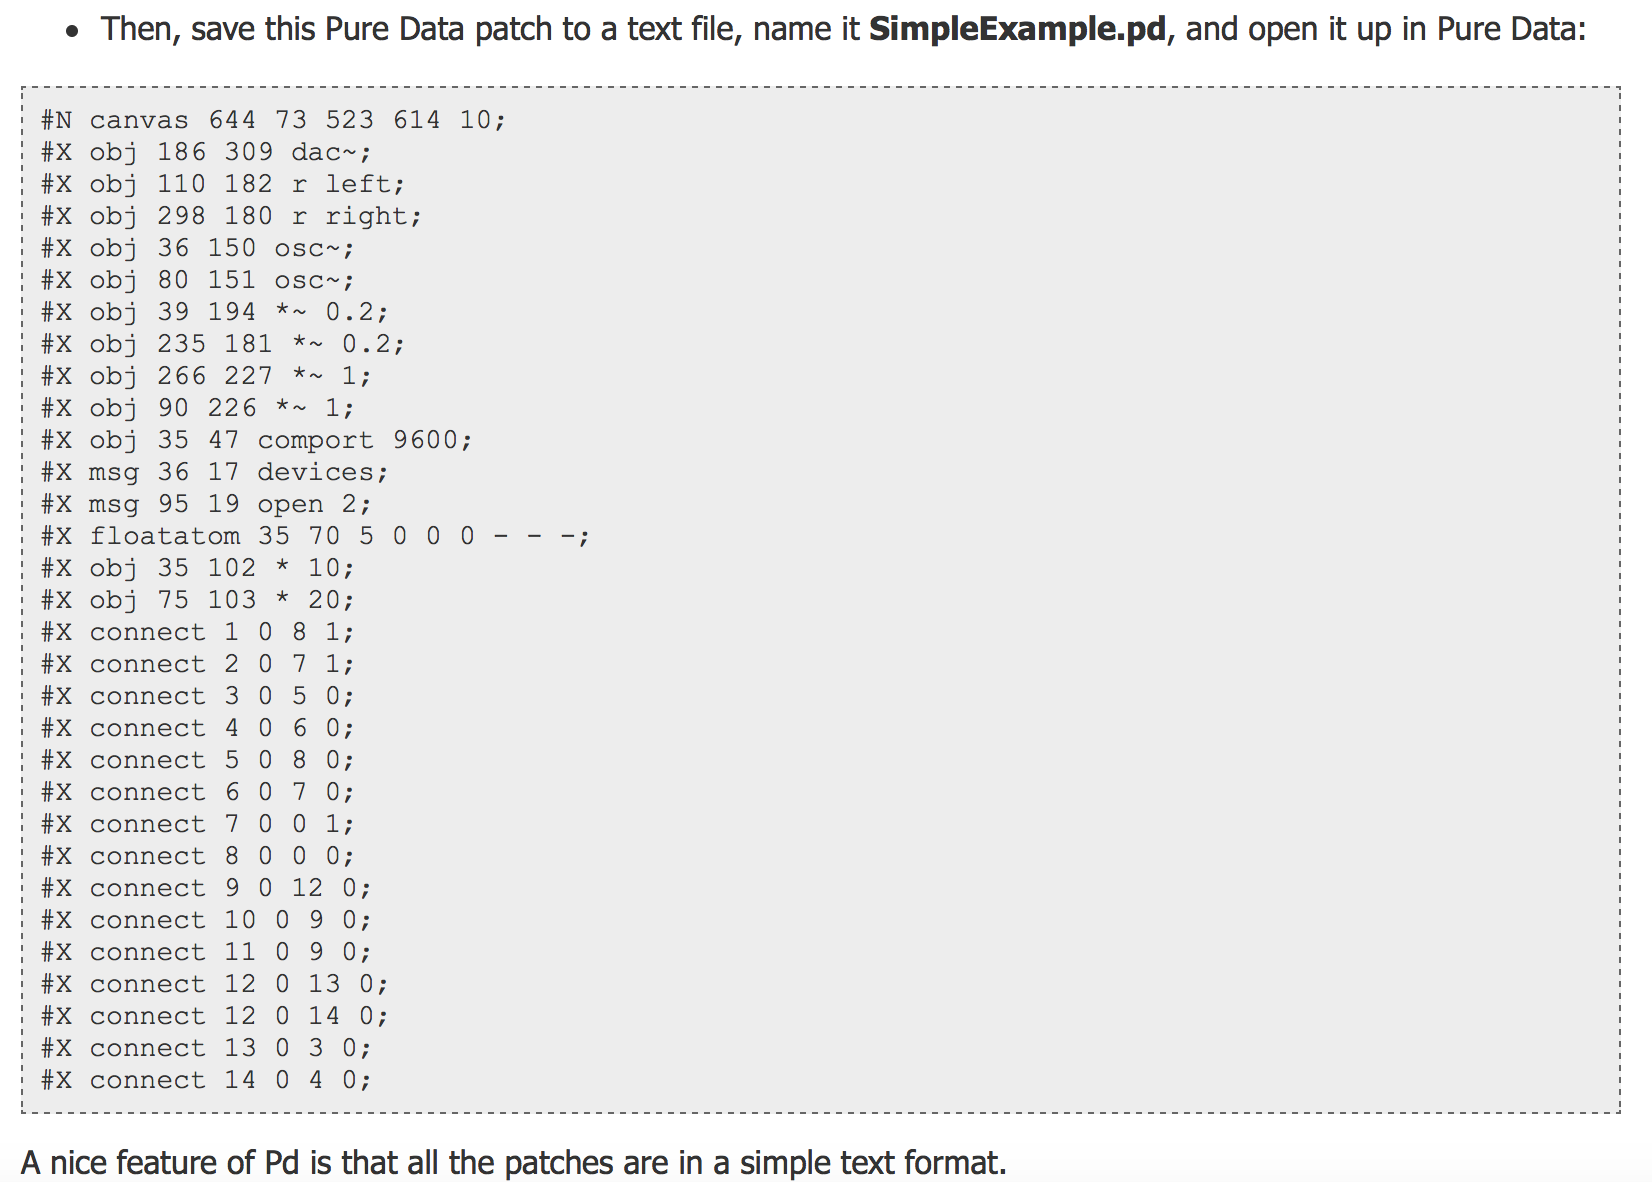
When I copied and pasted this into TextEdit on my Mac, I refused to left me save it as a pde doc, insisting it had to be .rtf (rich text file). My alternative was to save it as pde.rtf. I tried to both open the file like that on PD and also later remove the .rtf bit afterwards, but PD was unable to read or identify the file. Instead I got error messages in the PD window.
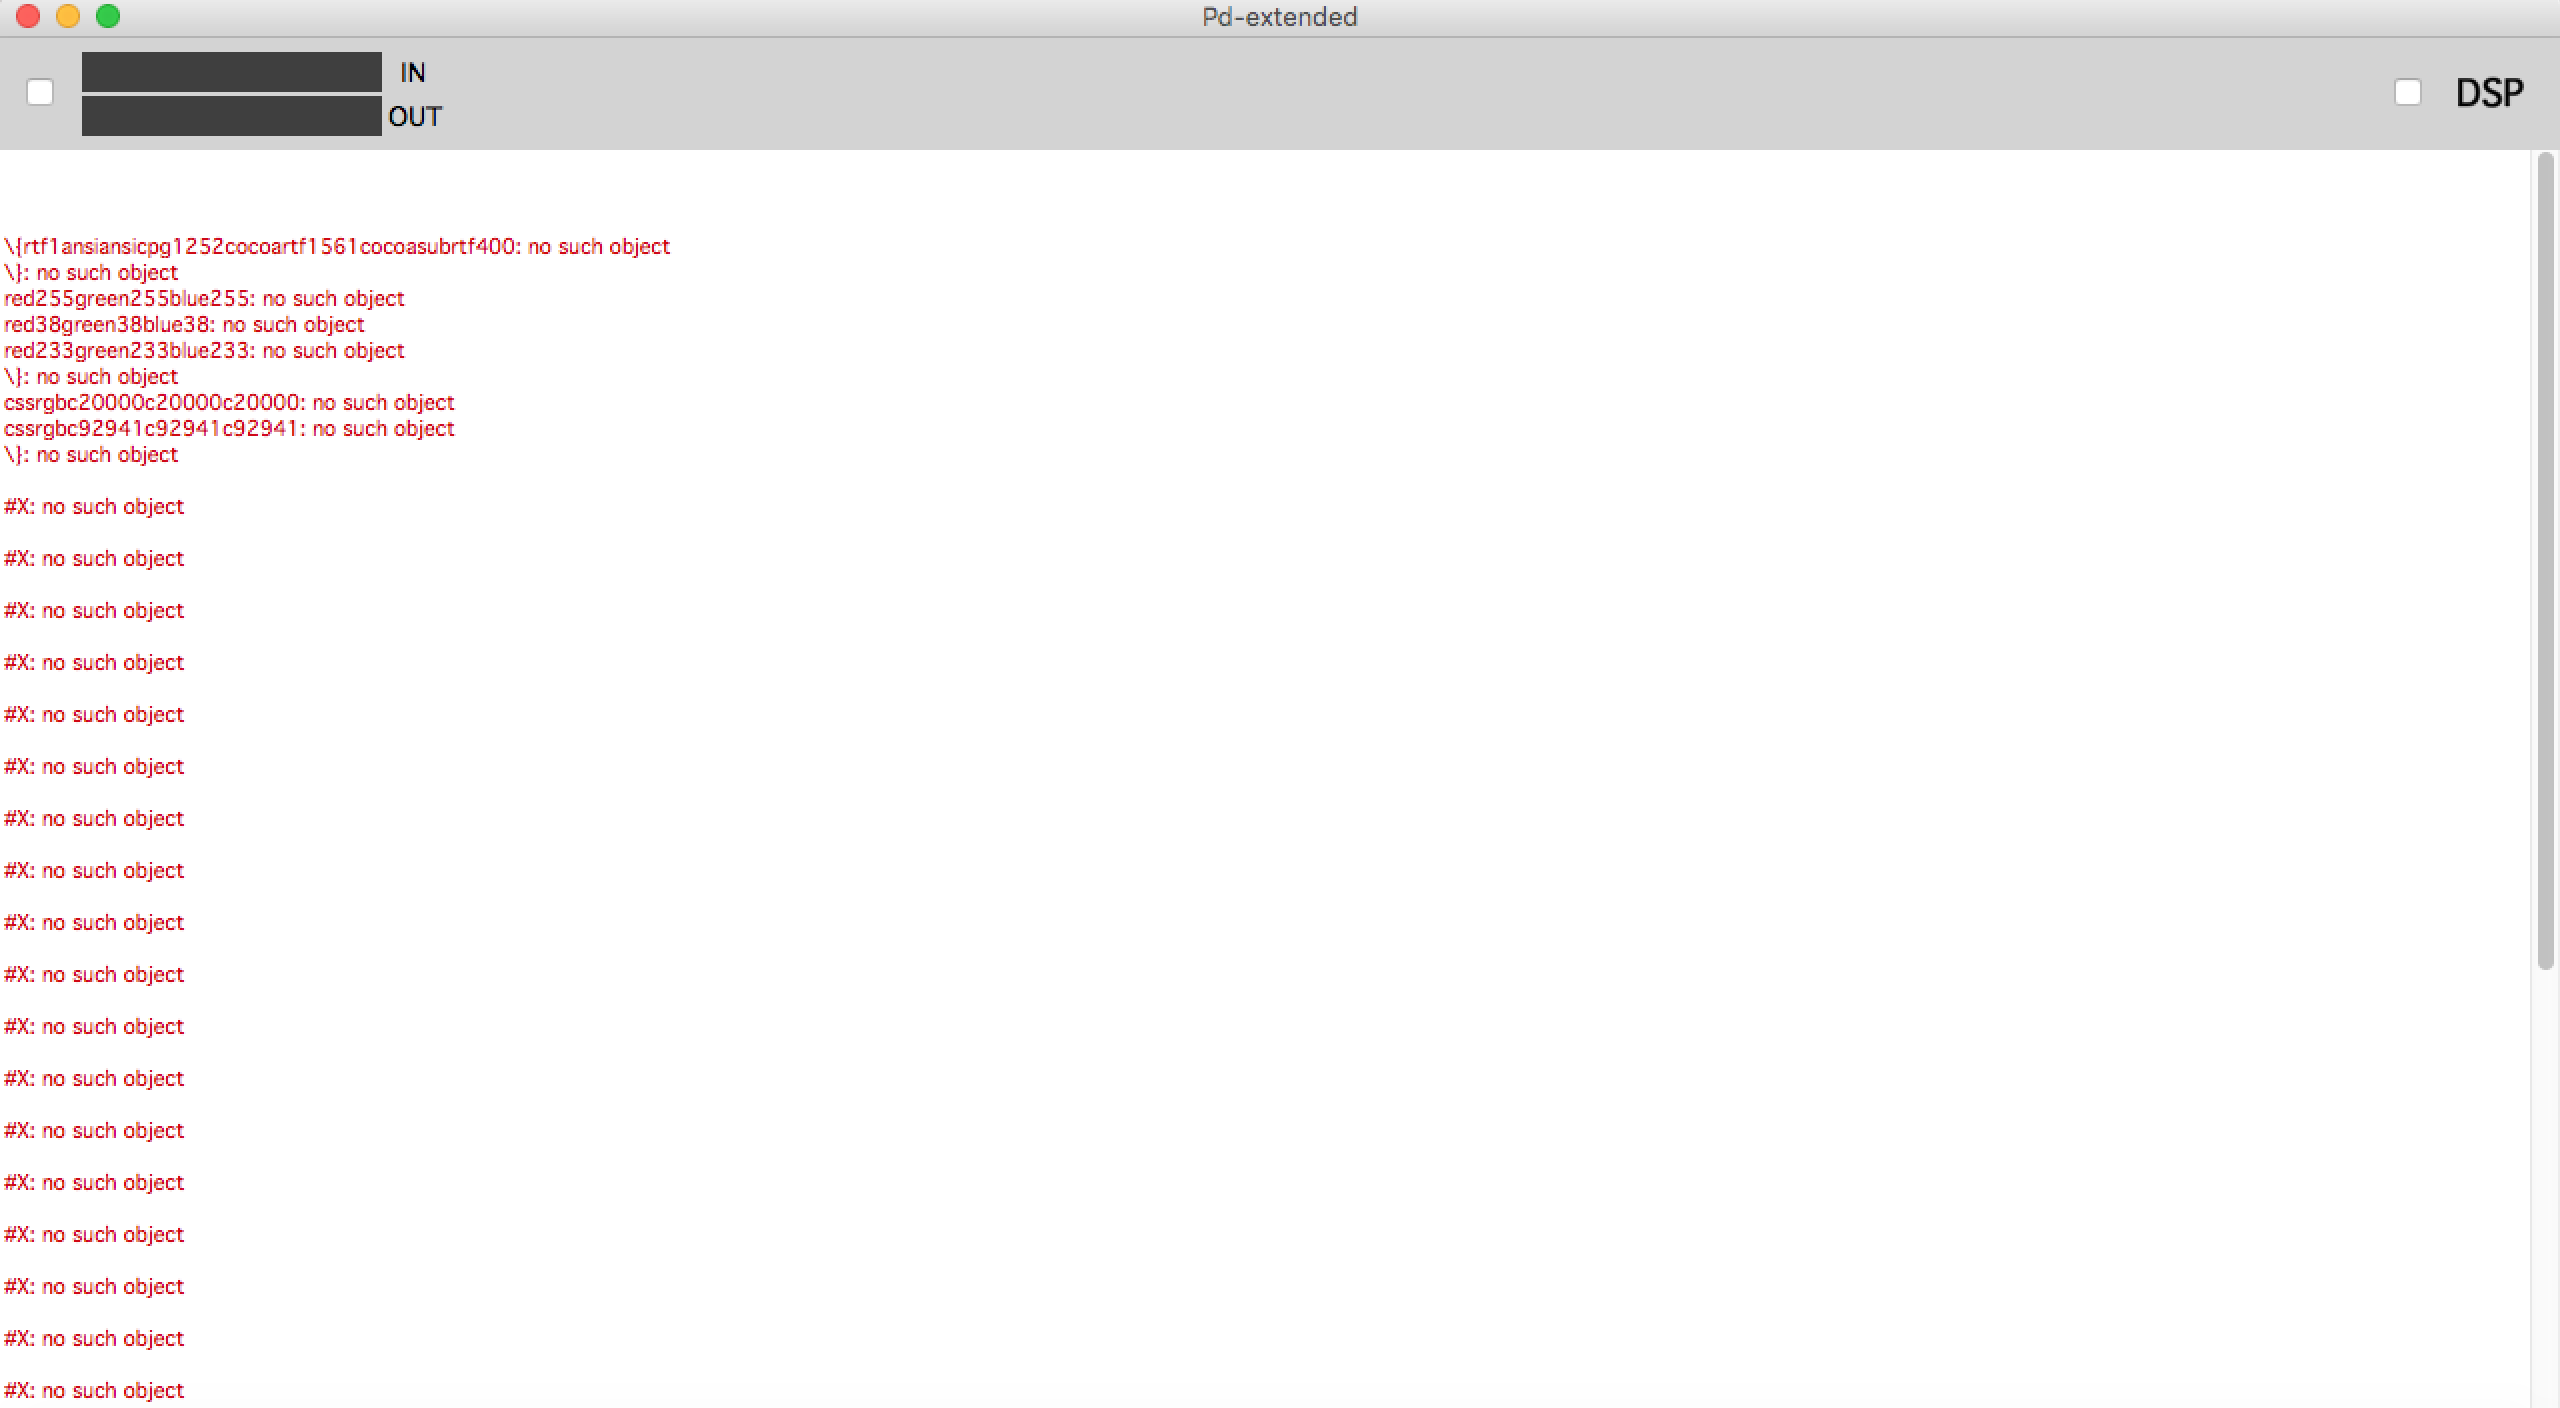
So because of time, I had to drop this project.... :(
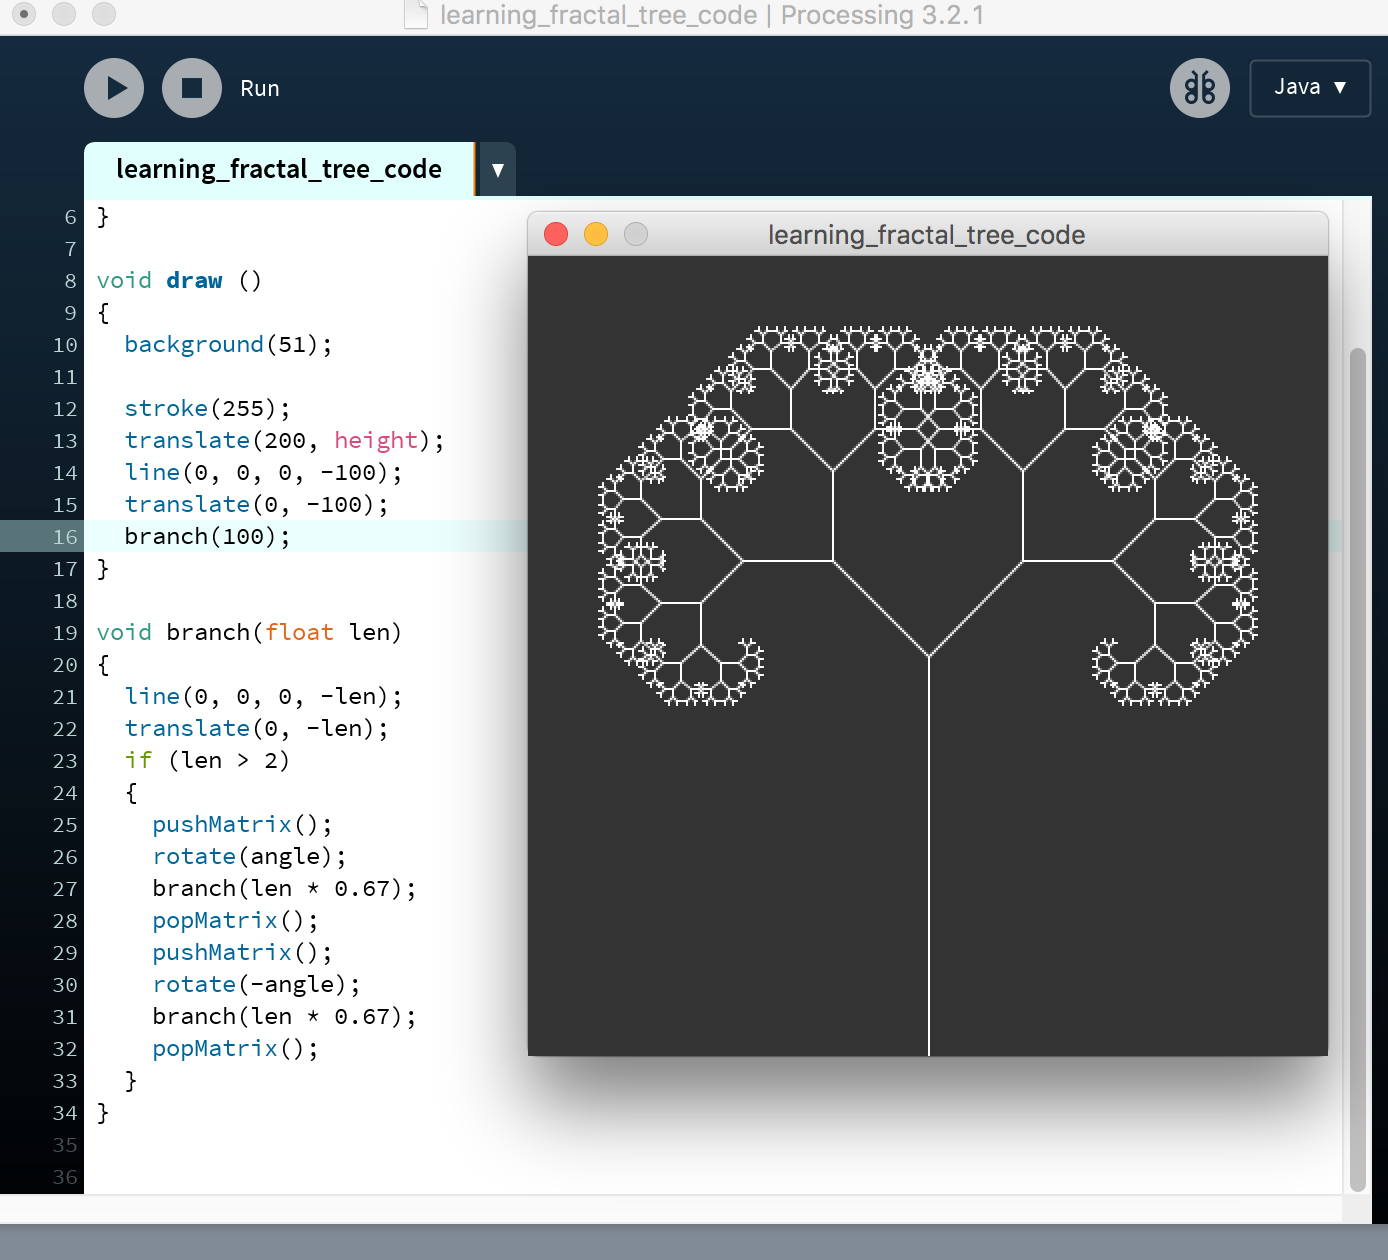
The sketch I used is from procesing. Processing has the sketch example on their website by Daniel Shiffman - the Recursive Tree example.
Of course I also wanted to follow and understand his code a bit more. This video helped me understand it a bit more.The below video really helps explain different ways to code it as well as a simpler way of putting it. It's also easy to listen to too.
I followed Daniel's code in the tutorial, having to alter it to work in Java as he wrote it in Javascript. I am actually pretty proud, impressed and happy with myself for being able to do that without outside help (help from friends or lectures). Shout to Nigel T.v.E. for his mini tutoring because it is because of him that I was able to figure it out on my own. Just had to think back to tips he gave me.
        float angle = PI/4;

void setup()
{
  size(400, 400);
}

void draw ()
{
  background(51);

  stroke(255);
  translate(200, height);
  line(0, 0, 0, -100);
  translate(0, -100);
  branch(100);
}

void branch(float len)
{
  line(0, 0, 0, -len);
  translate(0, -len);
  if (len > 4)
  {
    pushMatrix();
    rotate(angle);
    branch(len * 0.67);
    popMatrix();
    pushMatrix();
    rotate(-angle);
    branch(len * 0.67);
    popMatrix();
  }
}

Sophie Kiarie, Fab Academy 2018
Good ol' Daniel talked a lot about what each value meant, but I can often times be someone who doesn't always understand things until I literally see them happen or do them myself, I decided to play around with the code in terms of chaning the value len should be greater than (see line 23).
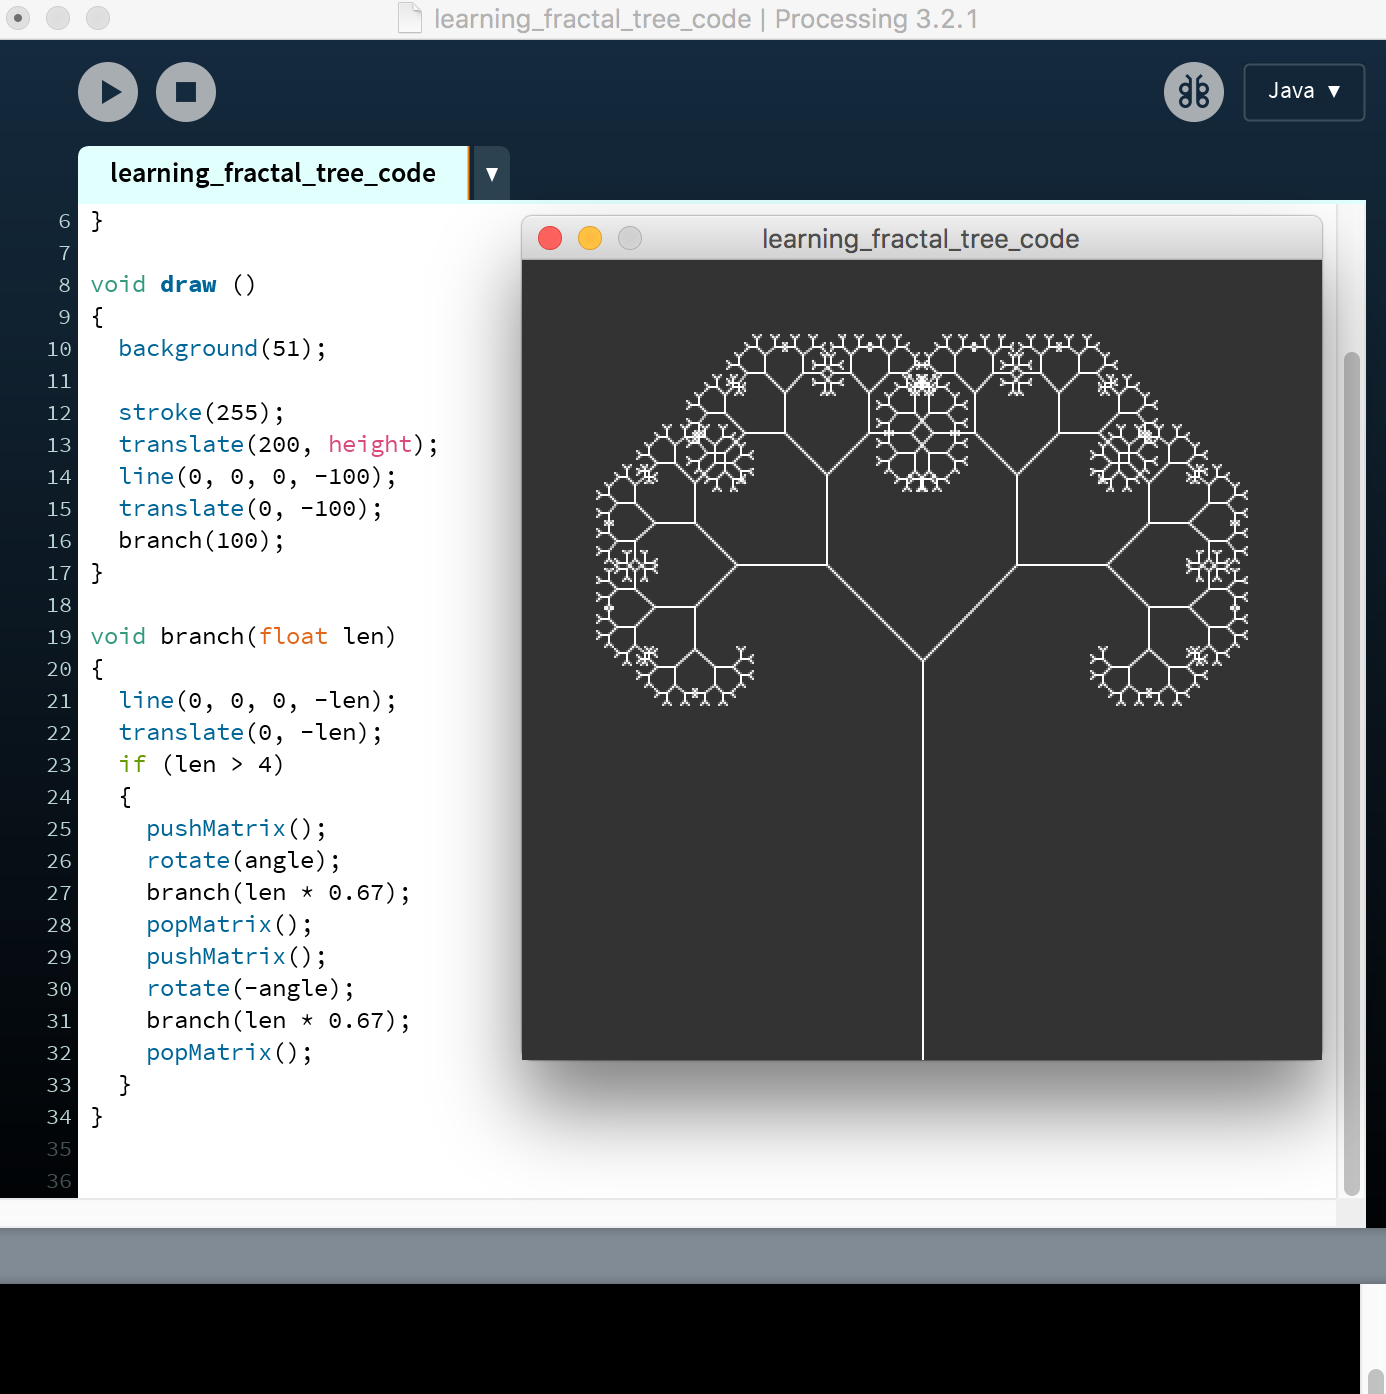
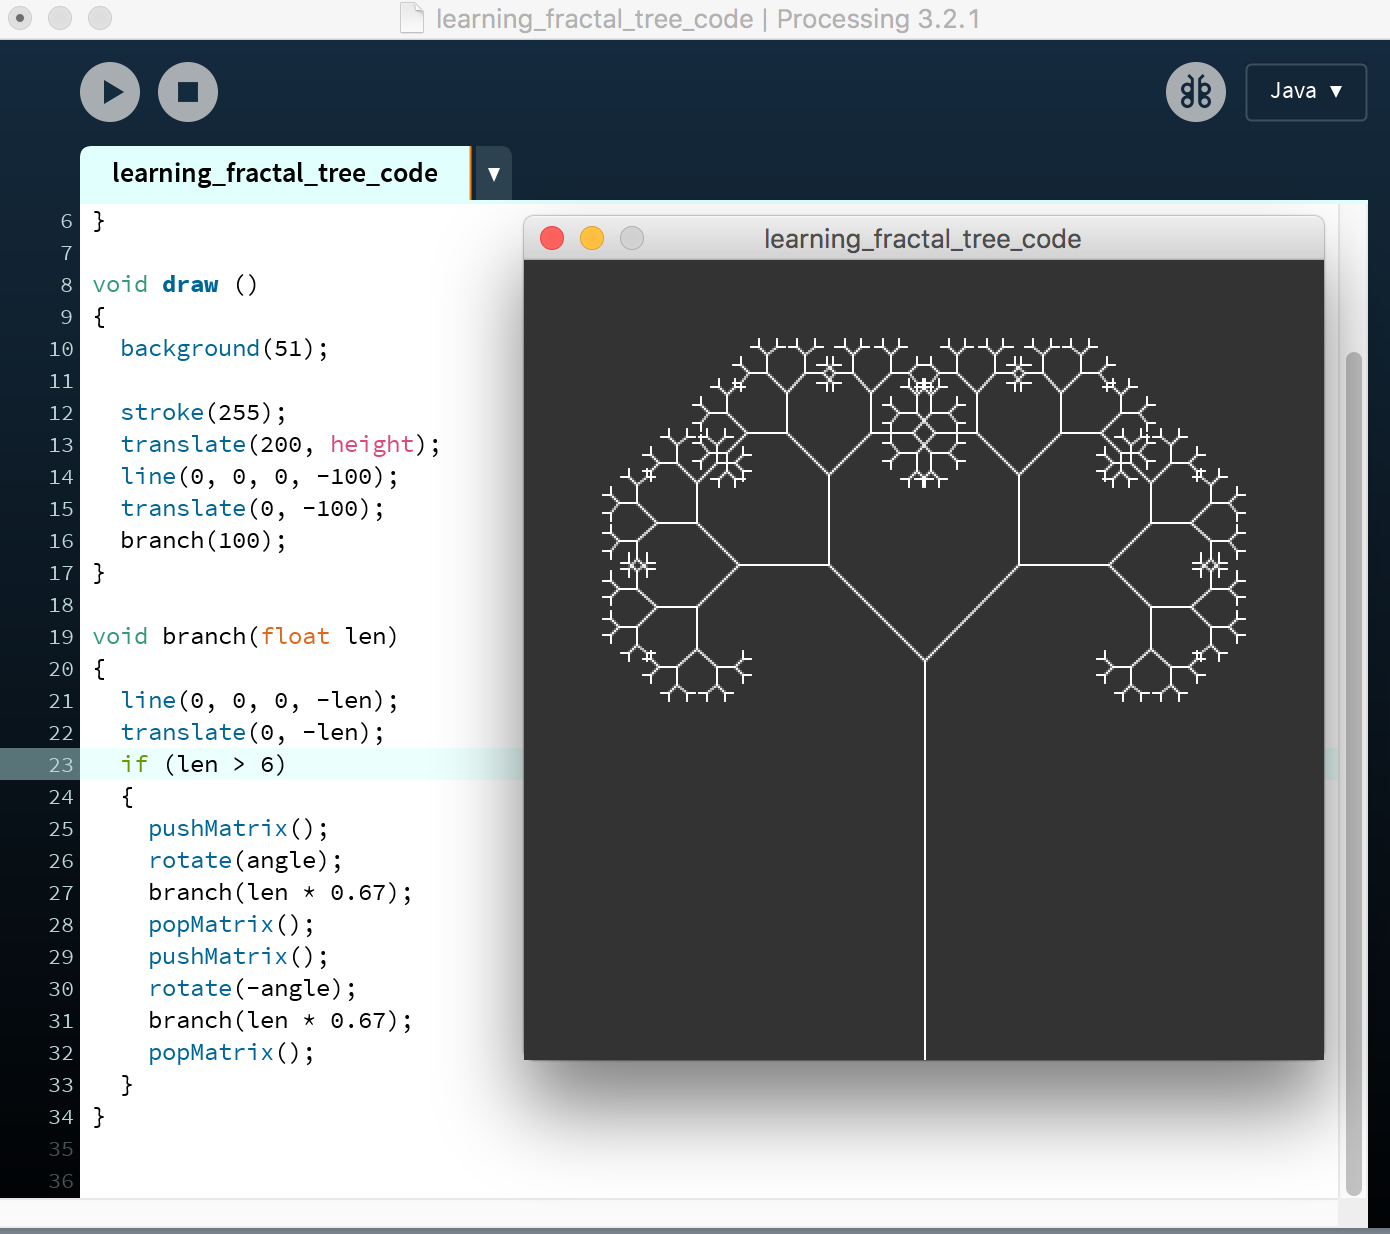
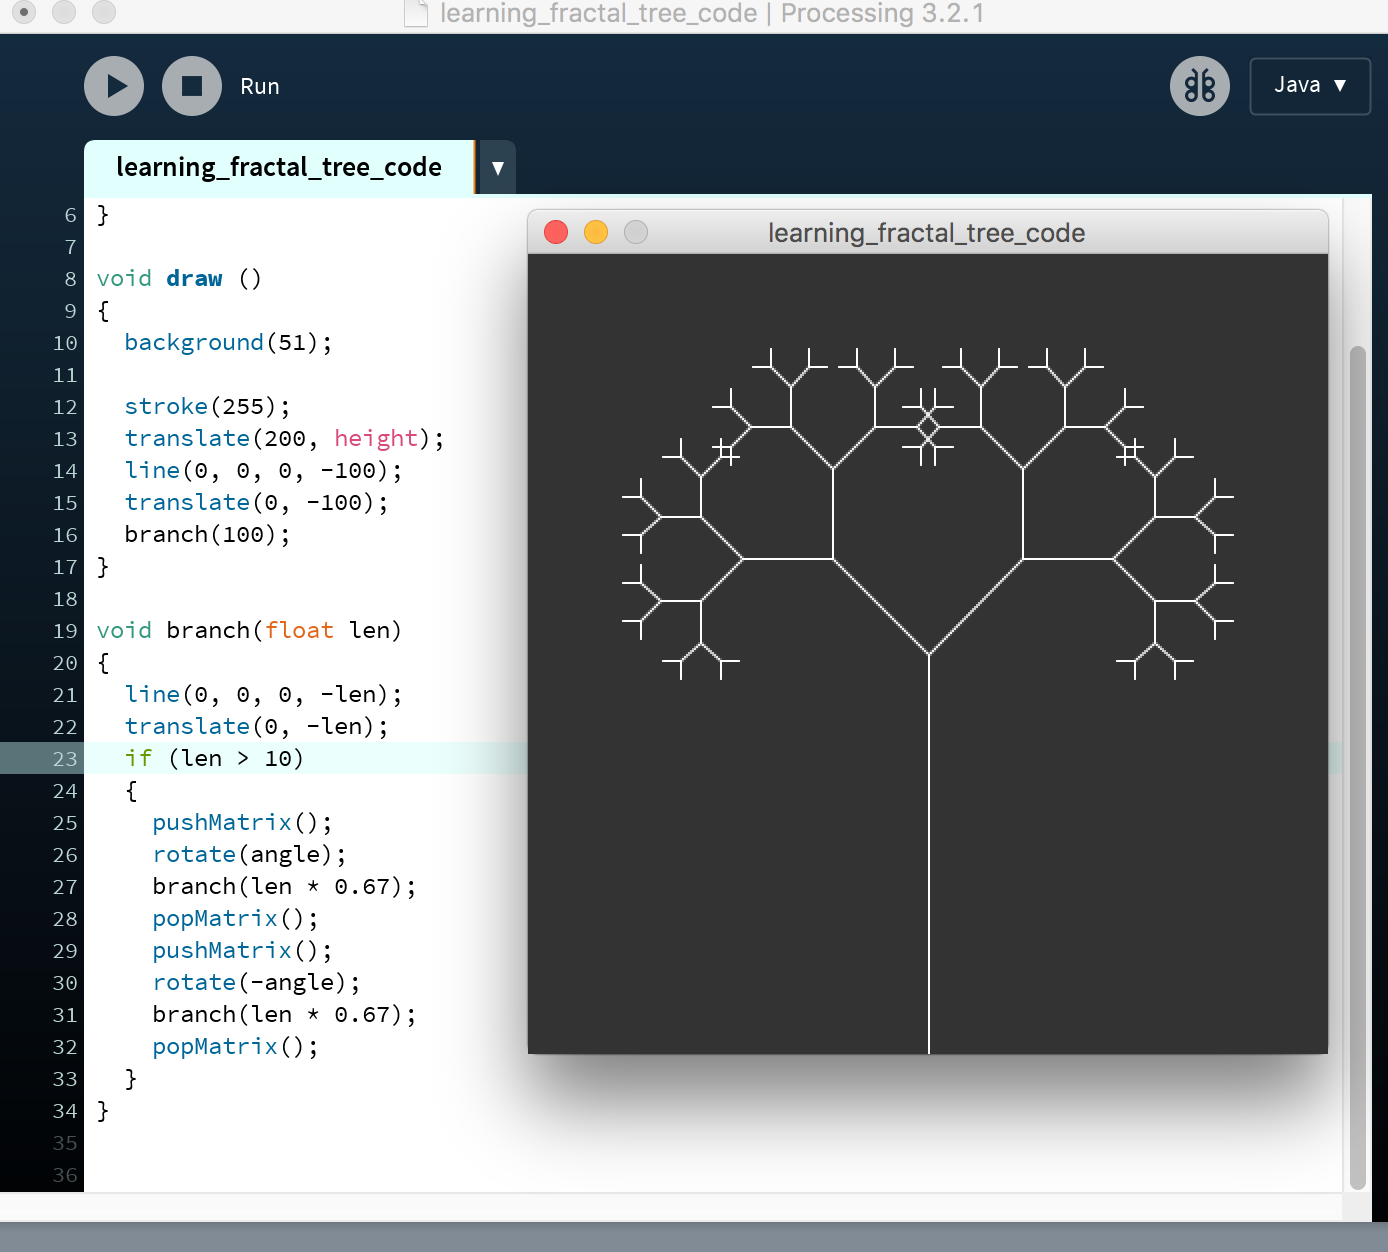
What I learnt here was that by decreaing the value length is greater than, the more branches are printed. And increasing produces more making a more "naked" tree. I thought that was very interesting.
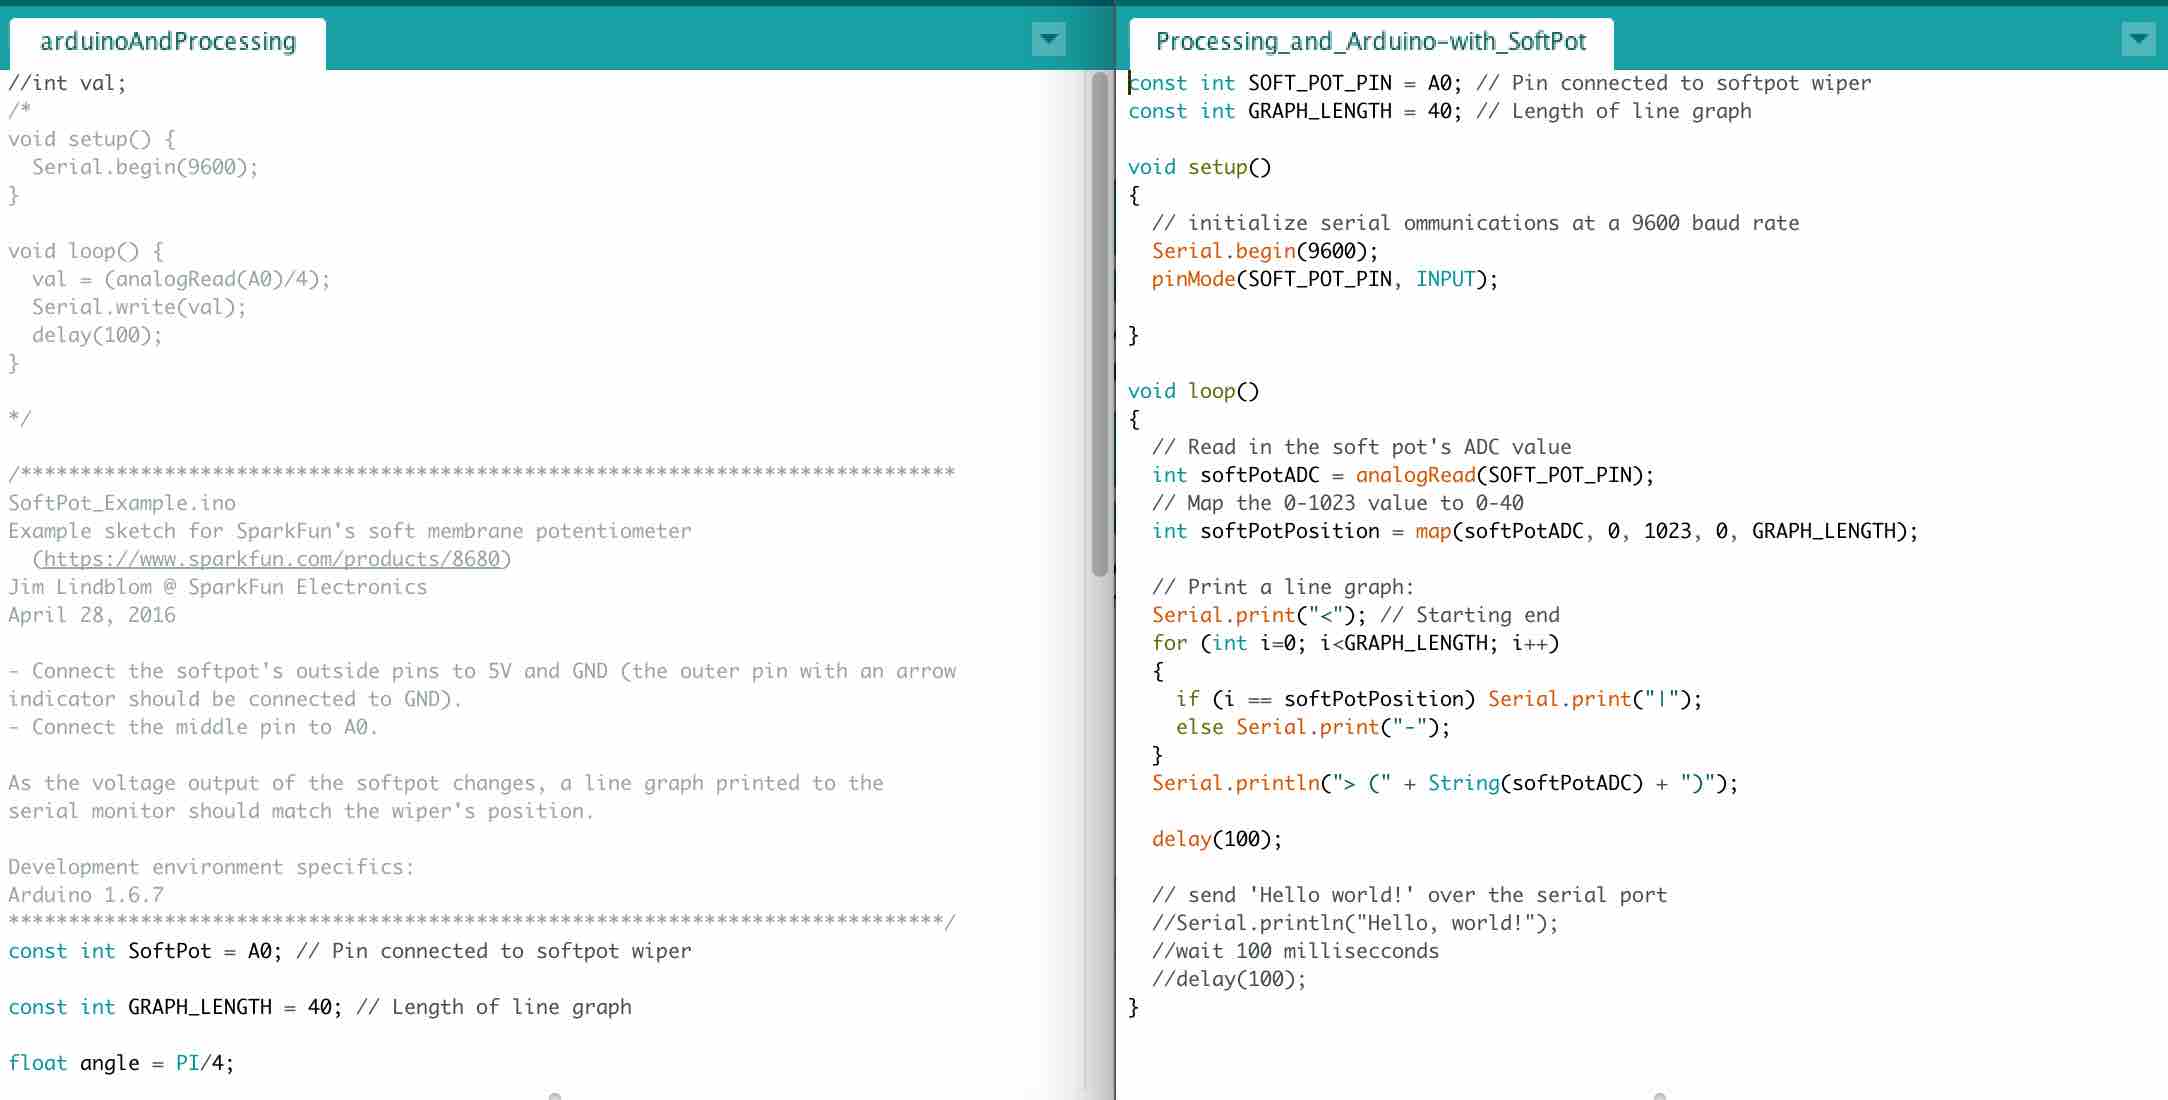
This was the tricky part, getting Arudino and Processing to talk. Now what I found out was that it is one thing to get them to talk, but it's another to get them to communicate to each other what I want them to communicate. I now know how frustrated my teachers in Primary must have felt! It's like giving the class an assingment to discuss one topic, but instead of dicussing the assigned topic, they discuss other things.
This is the video from the Youtuber:
This is the Arduino code from the site:
        int val;

void setup()
{
  Serial.begin(9600);
}

void loop()
{
  val = (analogRead(A0)/4);
  Serial.write(val);
  delay(100);
}
This is the Processing code from the site:
import processing.serial.*;
Serial myPort;

int value;
int padding = 100;
float m;

void setup()
{
  size(1440, 900);
  //  println("Available serial ports:");
  //  println(Serial.list());
  myPort = new Serial(this, Serial.list()[0], 9600);
  smooth();
  strokeWeight(3);
  stroke(100);
}

void draw() {
  background(#FFFFF0);
  if (myPort.available() > 0)
  {
    value = myPort.read();
    println(value);
    m = map(value, 255, 0, padding, width-padding);
  }
  line(padding, height/2, width-padding, height/2);
  noStroke();
  fill(#FFDE14);
  ellipse(m, height/2, 150, 150);
  stroke(100);
}
This is the code I wrote for Processing:
        import processing.serial.*;
Serial myPort;

int value;
int padding = 100;
//float angle = PI/4;

void setup()
{
  size(400, 400);
  myPort = new Serial(this, Serial.list()[3], 9600);
  smooth();
  strokeWeight(3);
  stroke(100);
}

void draw()
{
   background(51);

  stroke(255);
  translate(200, height);
  line(0, 0, 0, -100);
  translate(0, -100);
  branch(100);

  if (myPort.available() > 0)
  {
    value = myPort.read();
    println(value);
  }

}

void branch(float len)
{
  line(0, 0, 0, -len);
  translate(0, -len);
  if (len > 2)
  {
    pushMatrix();
    rotate(myPort.available());
    branch(len * 0.67);
    popMatrix();
    pushMatrix();
    rotate(-myPort.available());
    branch(len * 0.67);
    popMatrix();
  }
}

Sophie Kiarie, Fab Academy 2018
This is the code I wrote for Arduino:
        const int SOFT_POT_PIN = A0; // Pin connected to softpot wiper

const int GRAPH_LENGTH = 40; // Length of line graph

float angle = PI/4;

void setup()
{
  Serial.begin(9600);
  pinMode(SOFT_POT_PIN, INPUT);
}

void loop()
{
  // Read in the soft pot's ADC value
  int softPotADC = analogRead(SOFT_POT_PIN);
  // Map the 0-1023 value to 0-40
  int softPotPosition = map(softPotADC, 0, 1023, 0, angle);

  // Print a line graph:
  Serial.print("<"); // Starting end
  for (int i=0; i<GRAPH_LENGTH; i++)
  {
    if (i == softPotPosition) Serial.print("|");
    else Serial.print("-");
  }
  Serial.println("> (" + String(softPotADC) + ")");

  delay(500);
}

Sophie Kiarie, Fab Academy 2018
One small but if you don't know big problem I had was the serial number. The person uses 0 as theirs, and I tried to for mine as well and for quite some time I couldn't figure out why my code refused to work. It was only after research I discovered it refers to the serial port the board or device is connected to. I then went into Arduino and under tools, counted to see where my board that I was using showed up.
Now as you can see in the image below, the values for the softpot recorded in the serial monitor in Arduino were reacting to my touch.

And below you can see where I changed the the float angle so that it is coming in from arduino instead.
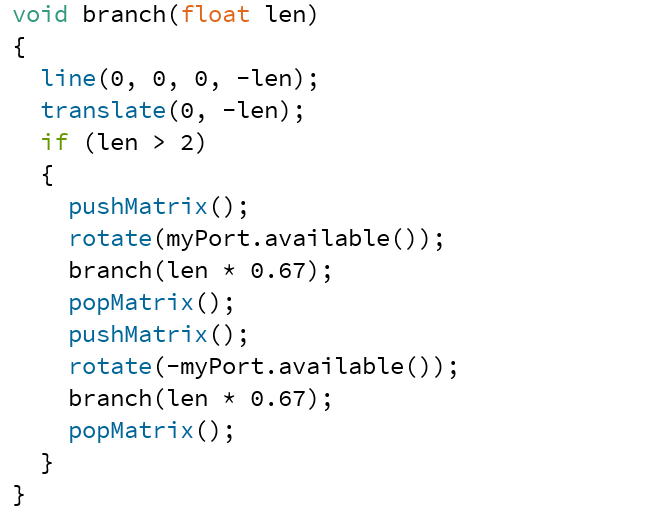
However as you can see in the video, the tree was not. :(
My first thought suspcion is that it lies within how I am using the imported serial data from Arduino to manipulate my tree. However after taking some breathing time away from this project and trying it again, I decided to go with a different approach.
I went back to the code I had borrowed/"hacked" from this page and tried to just to that code but instead of course using my potentiometer. It worked perfectly fine. Whilst racking my brains to figure out where I was going wrong, I noticed one small but really, huge difference between my arduino code and the code on this persons website...my arduino code was far longer than theirs. Which got me to thinking, perhaps my code was overly and uncesesarily complicated. So I worked on deciding which part needed to stay, which was vital and which stuff I quite honestly could do without or was redundant/not needed. So firstly I copied and pasted my code into a new file (don't want to lose anything) and then got rid of anything that was commented out. This changed quite a bit because now there was much less code on the page. The next step was to look at the code. And there I noticed that I had some code mapping values to other values and then setting conditions to it. Now before in previous codes this was useful, but here, it wasn't serving much purpose. So I tried to get rid of it and tested the code. And low and behold...IT WORKED!
        const int SoftPot = A0; // Pin connected to softpot wiper

const int GRAPH_LENGTH = 40; // Length of line graph

void setup()
{
  Serial.begin(9600);
  pinMode(SoftPot, INPUT);
}

void loop()
{
  // Read in the soft pot's ADC value
  int softPotADC = analogRead(SoftPot);

  Serial.println(softPotADC);

  delay(200);
}

Sophie Kiarie, Fab Academy 2018
I mean, how short is that code? I want to take a moment to show the evolution of this code. A little before and after...
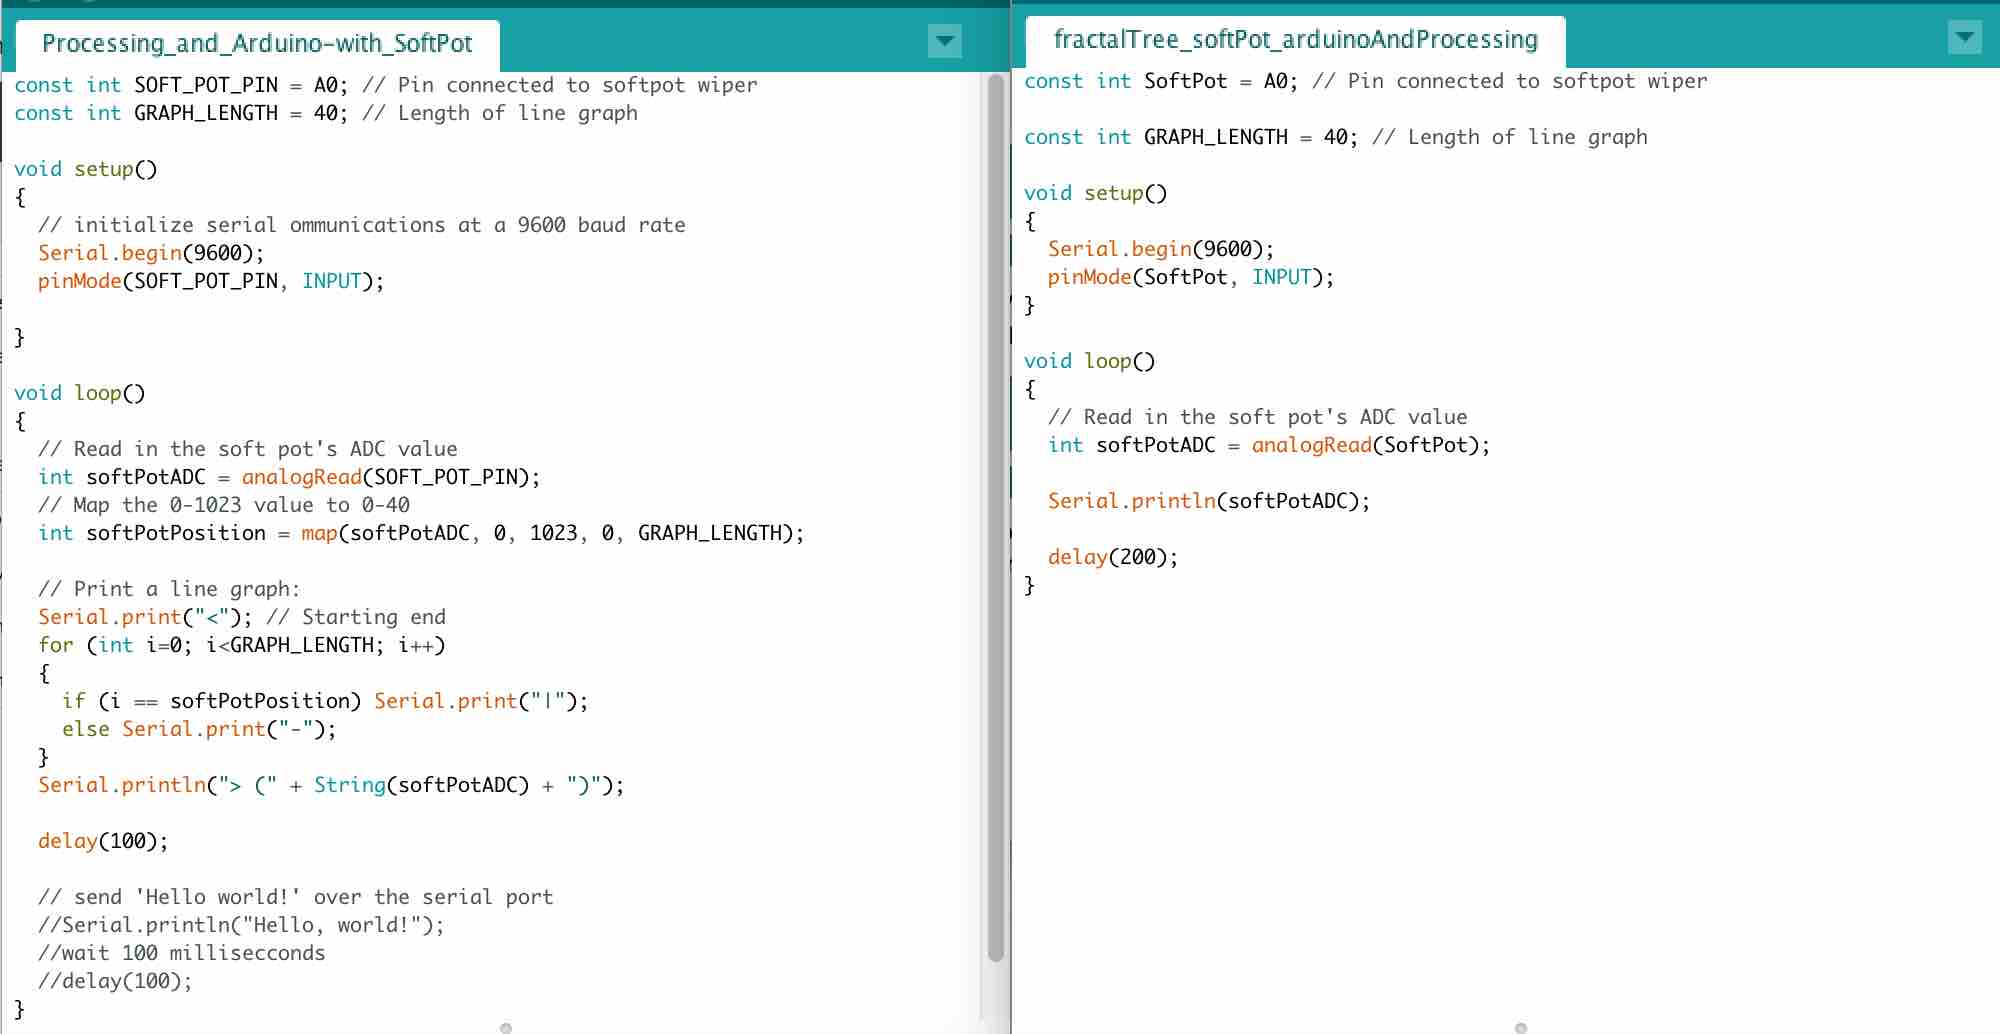
This means to me that what the issues must have been, is that the mapping part was confusing poor processing which is why it was reacting, but not reacting properly. Throughout my time at fab academy, I have not only learnt to code more things, but the important of keeping things simple and organized.
The Processing code has been cleaned and edited and up to now and looks like this:
        import processing.serial.*;

Serial myPort;        // The serial port
float softPotADC = 0;   // was softPotADC before


float theta;

void setup()
{
  size(640, 360);

  myPort = new Serial(this, Serial.list()[3], 9600);

  myPort.bufferUntil('\n');
}

void draw()
{

  background(0);
  frameRate(30);
  stroke(255);
  // Let's pick an angle 0 to 90 degrees based on the mouse position
  float a = (softPotADC / (float) width) * 90f;
  // Convert it to radians
  theta = radians(a);
  // Start the tree from the bottom of the screen
  translate(width/2,height);
  // Draw a line 120 pixels
  line(0,0,0,-120);
  // Move to the end of that line
  translate(0,-120);
  // Start the recursive branching!
  branch(120);

}

void branch(float h)
{
  // Each branch will be 2/3rds the size of the previous one
   h *= 0.66;

  // All recursive functions must have an exit condition!!!!
  // Here, ours is when the length of the branch is 2 pixels or less
  if (h > 2)
  {
    pushMatrix();    // Save the current state of transformation (i.e. where are we now)
    rotate(theta);   // Rotate by theta
    line(0, 0, 0, -h);  // Draw the branch
    translate(0, -h); // Move to the end of the branch
    branch(h);       // Ok, now call myself to draw two new branches!!
    popMatrix();     // Whenever we get back here, we "pop" in order to restore the previous matrix state

    // Repeat the same thing, only branch off to the "left" this time!
    pushMatrix();
    rotate(-theta);
    line(0, 0, 0, -h);
    translate(0, -h);
    branch(h);
    popMatrix();
  }
}

void serialEvent (Serial myPort)
{
  // get the ASCII string:
  String inString = myPort.readStringUntil('\n');

  if (inString != null)
  {
    // trim off any whitespace:
    inString = trim(inString);
    // convert to an int and map to the screen height:
    softPotADC = float(inString);
    println(softPotADC);
    softPotADC = map(softPotADC, 0, 1023, 0, height);
  }
}

Sophie Kiarie, Fab Academy 2018
Below some footage :)
Whippletrees remind me of the image of the table being held by buckets sitting on it. The crazy ways in which physics works....
This weeks homework: